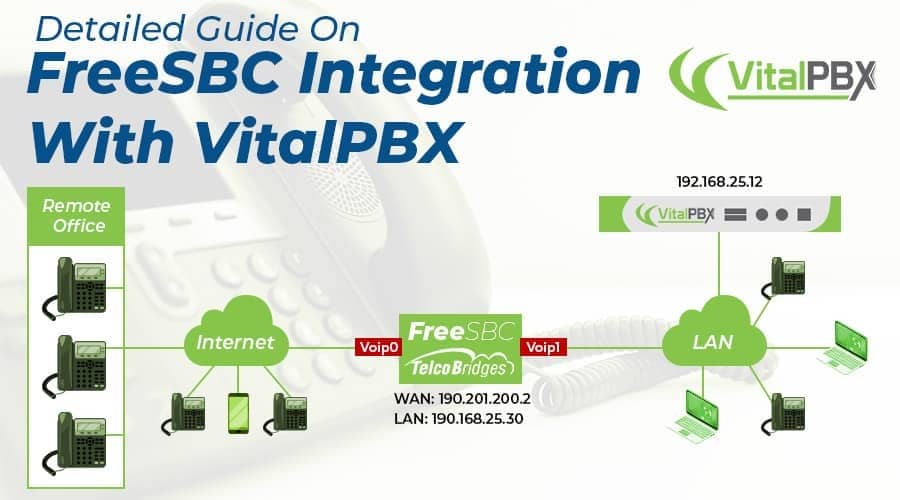
We have decided to create this blog explaining how to integrate FreeSBC with VitalPBX as we believe that the protection of your PBX is very important, especially when you are thinking about the cloud.
Read our tutorials and guides on how to implement new tools and technologies for your business with VitalPBX here.
A Session Border Controller is a device used in select VoIP networks to exert control over the signalling and usually also the media streams involved in setting up, conducting, and tearing down calls. The SBC enforces security, quality of service and admission control mechanism over the VoIP sessions.
The Session Border Controller is often installed in a point of demarcation between one part of a network and another. Most Session Border controllers will be installed between peering service provider networks, between the enterprise network and the service provider network, or between the service provider network and residential users.
Characteristics of the FreeSBC
- Back-to-back user agent (B2BUA)
- DOS/DDOS protection, dynamic blacklisting and call access control
- Easy to deploy, operate and manage through various interfaces including a RESTful API
- Integrated network troubleshooting tools (traces, media/ signalling recording, test call generation, etc)
- Up to 60,000 simultaneous signalling and media sessions
- Media transcoding
- Flexible and extensive routing with SIP headers modification capabilities
- Fit to install on clouds, baremetal servers or TelcoBriges’ hardware.
Installation
Go to the following link to install FreeSBC:
Install FreeSBC
For the FreeSBC Initial configuration go to this link:
FreeSBC Initial Configuration
License Configuration
At the beginning of the session in our SBC we will see that there is a message in yellow that tells us that we have a No valid license, this is why we must load the license.
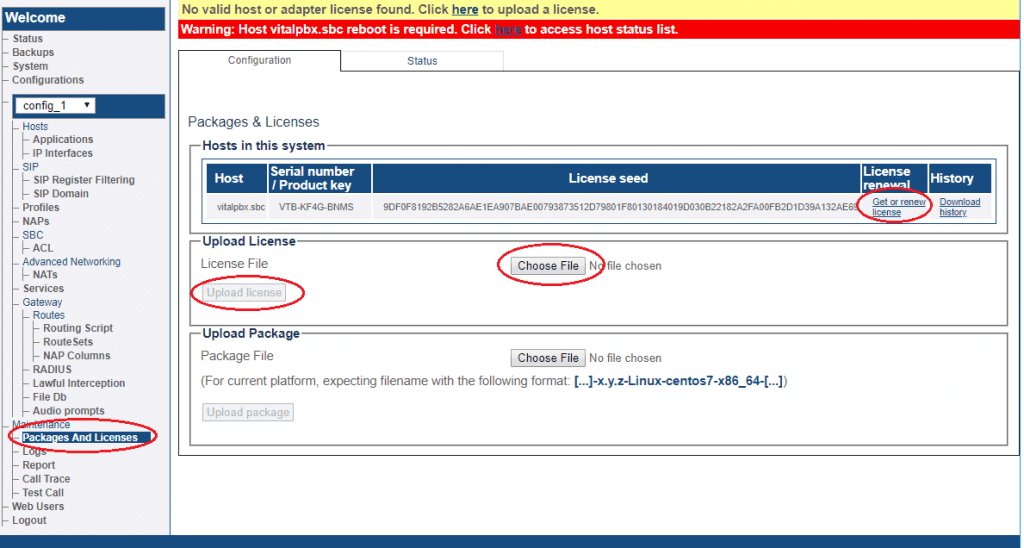
Follow the following procedure:
1.- Go to Maintenance/Packages And License.
- Get or renew license
- Choose File (This is the file that we downloaded previously)
- Upload license
2.- Now we will proceed to restart the computer
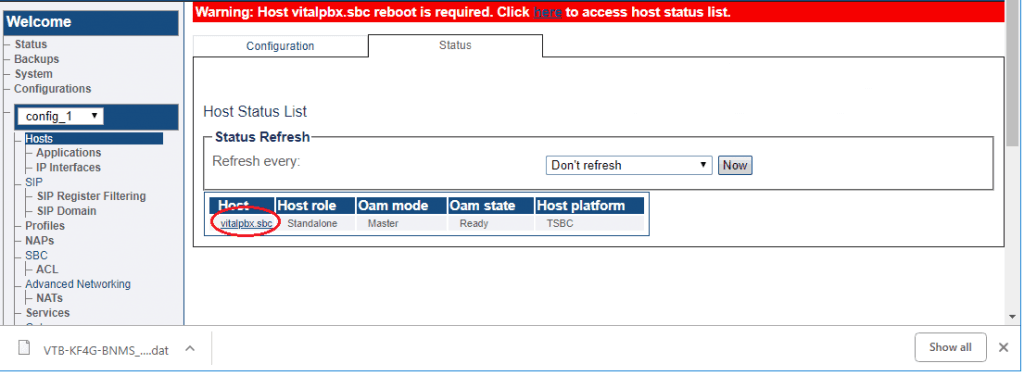
- Goto Hosts
- Select Hosts and click
- Go to the bottom of the page and select Reboot and press the Apply action button

Implementation
Remote Workers Example
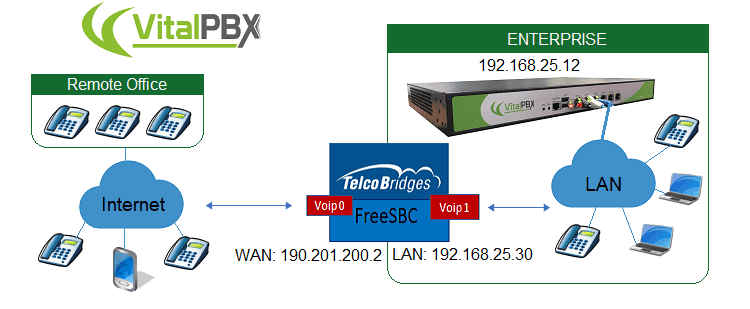
Create New Configuration
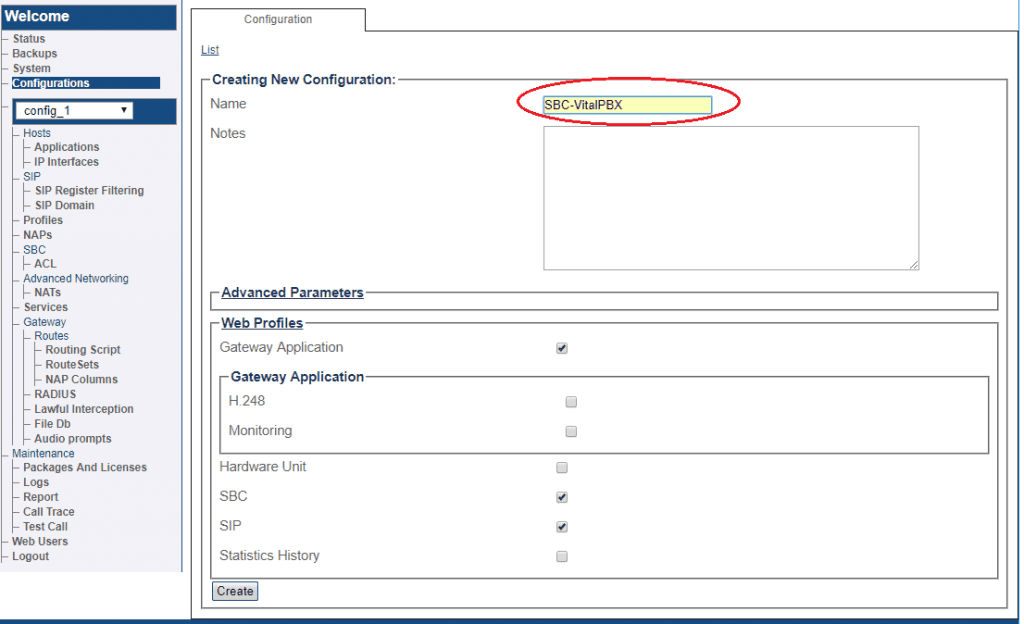
1.- Go to Configurations menu and click Create New Configuration

2.- Now create the configuration
IP Network Configuration
Virtual Port Configuration for Wide Area Network
1. Select IP Interfaces from the navigation panel
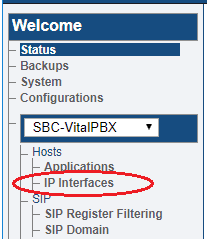
2. Click the Virtual Ports tab.
Click Create New Virtual Port

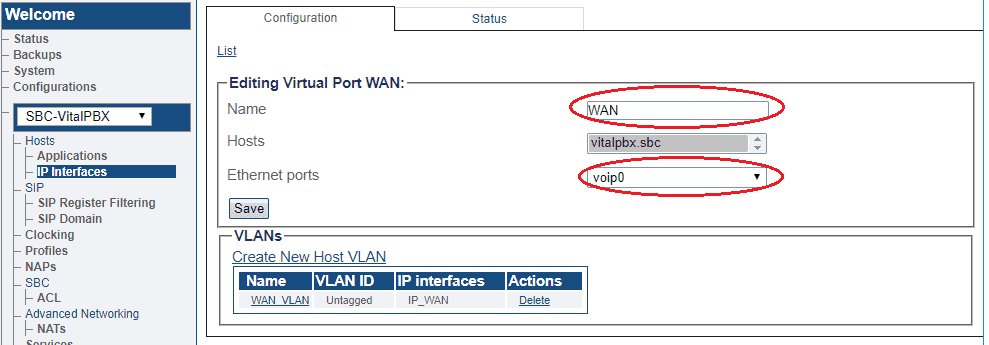
3. Configure the virtual port.
- Enter a name for the virtual port
- Select the host(s) to which the virtual port is assigned
- Select a physical port to which the virtual port is assigned
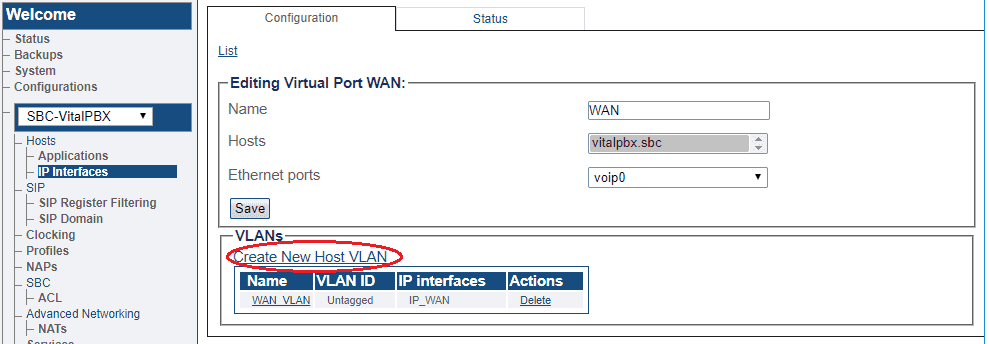
4. Create a VLAN that uses this virtual port
Click Create new Host VLAN
5. Configure the new VLAN
- Enter a name for the VLAN
- If the port is to be used untagged, make sure Untagged is checked.
- If the port is to be used with an 802.1Q tag, uncheck Untagged and enter a VLAN ID.

Virtual Port Configuration for Local Area Network
1. Select IP Interfaces from the navigation panel

2. Click the Virtual Ports tab.
Click Create New Virtual Port

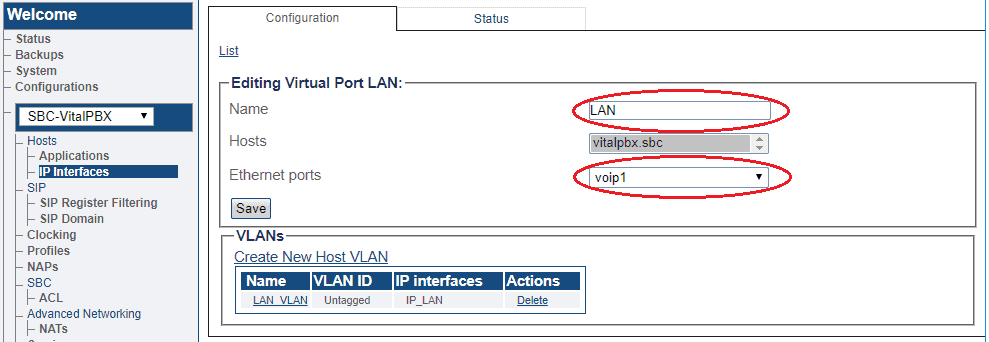
3. Configure the virtual port.
- Enter a name for the virtual port
- Select the host(s) to which the virtual port is assigned
- Select a physical port to which the virtual port is assigned
4. Create a VLAN that uses this virtual port
Click Create new Host VLAN
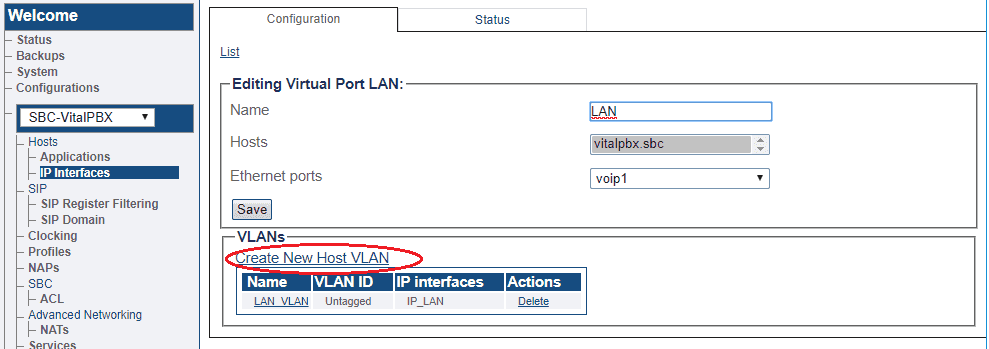
5. Configure the new VLAN
- Enter a name for the VLAN
- If the port is to be used untagged, make sure Untagged is checked.
- If the port is to be used with an 802.1Q tag, uncheck Untagged and enter a VLAN ID.

Configuring IP Interface for Wide Area Network
1. Select IP Interfaces from the navigation panel

2. Click the IP Interfaces tab.
Click Create New IP Interface

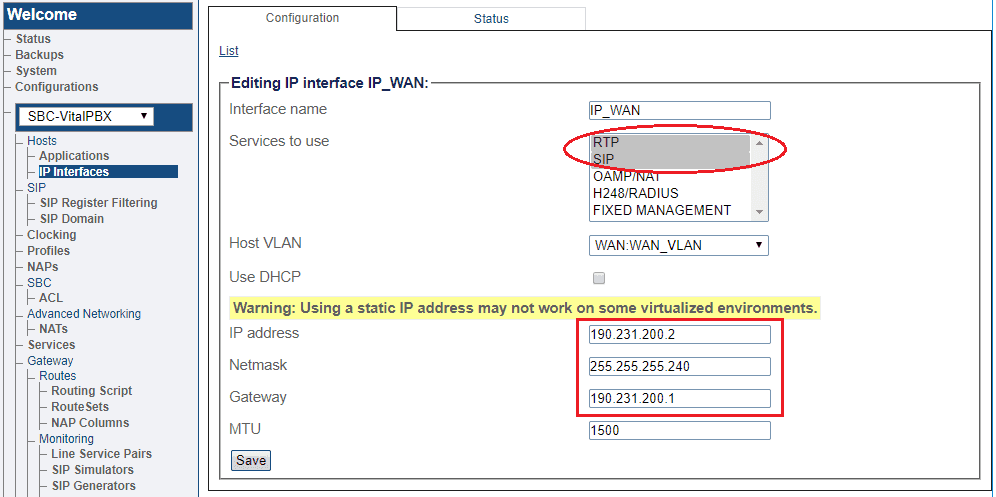
3. Configure the IP interface
- Enter a name for the interface
- Select 1 or more services to use for the IP interface (RTP and SIP).
- Select the Host VLAN from which IP packets will exit.
- Indicate whether or not to use DHCP to automatically get an IP address for this port. (selecting this option removes the need to enter and IP address, Netmask, and Gateway)
- Enter an IP address
- Enter a Netmask
- Enter a gateway address
Configuring IP Interface for Local Area Network
1. Select IP Interfaces from the navigation panel:

2. Click the IP Interfaces tab.
Click Create New IP Interface

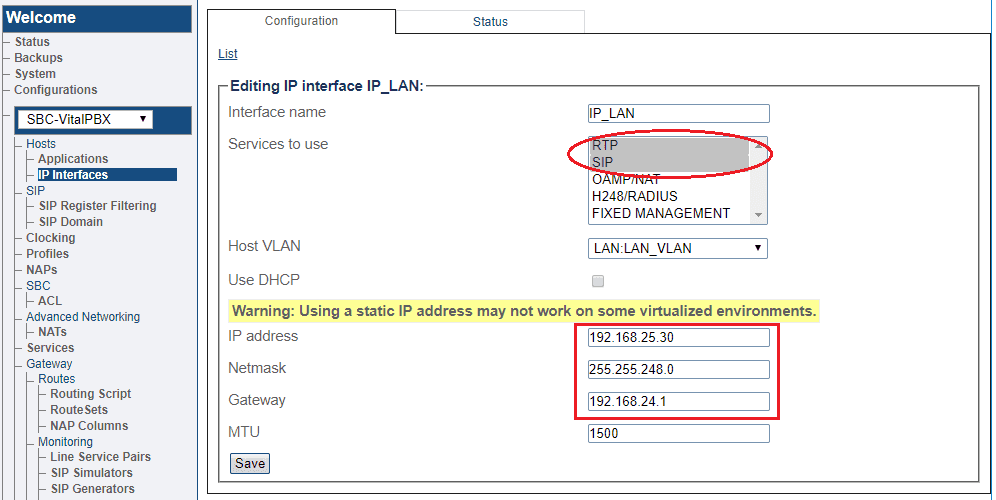
3. Configure the IP interface:
- Enter a name for the interface
- Select 1 or more services to use for the IP interface (RTP and SIP).
- Select the Host VLAN from which IP packets will exit.
- Indicate whether or not to use DHCP to automatically get an IP address for this port. (selecting this option removes the need to enter and IP address, Netmask, and Gateway)
- Enter an IP address
- Enter a Netmask
- Enter a gateway address
SIP Stack Configuration
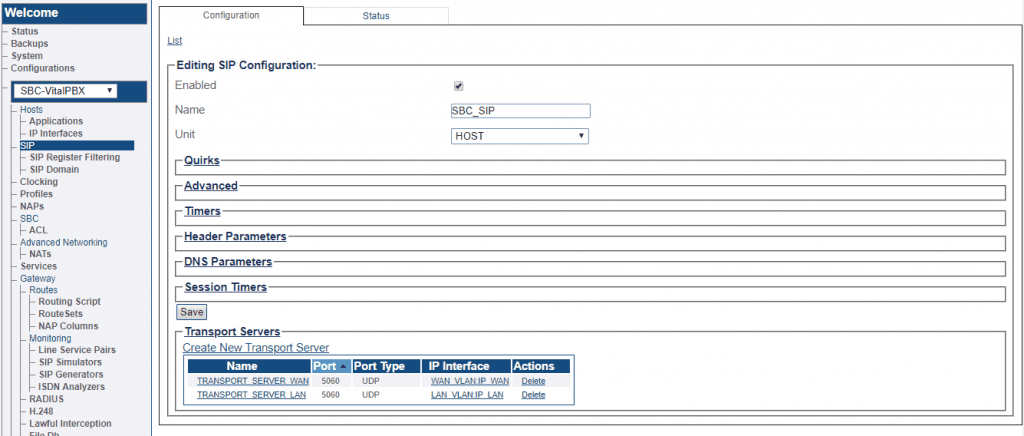
You must configure SIP signalling for your system. The first step in doing so is to create a SIP stack:
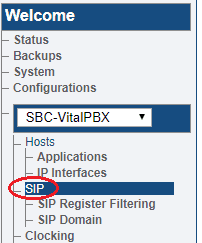
1- Click SIP in the navigation panel

3- Create the new SIP stack
- Verify that the box labelled Enabled is checked
- Enter a name for the stack
SIP Transport Server Configuration for Wide Area Network (WAN)
1- Select a SIP stack for which you wish to create a transport server

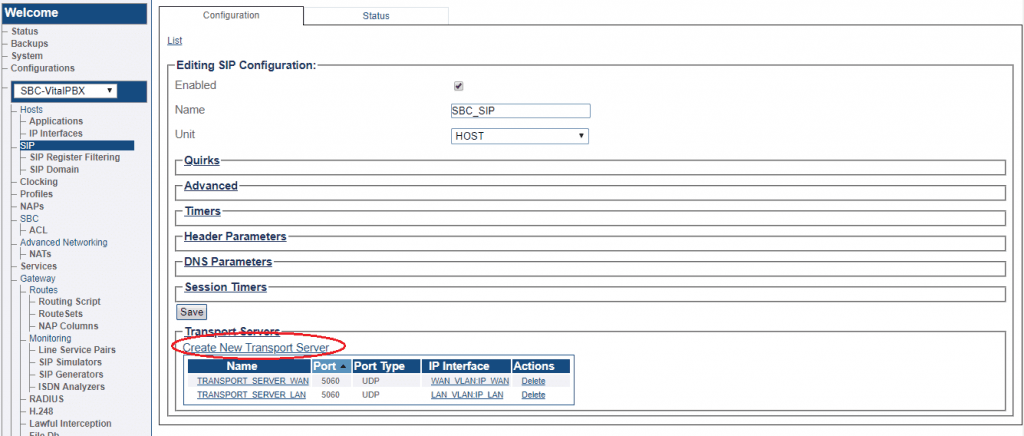
2- Click Create New Transport Server
3- Create the new SIP transport server
- Enter a name for the server
- Select an appropriate port type
- Select an appropriate host IP interface

SIP Transport Server Configuration for Local Area Network (LAN)
1- Select a SIP stack for which you wish to create a transport server

2- Click Create New Transport Server

3- Create the new SIP transport server
- Enter a name for the server
- Select an appropriate port type
- Select an appropriate host IP interface

SIP Domain
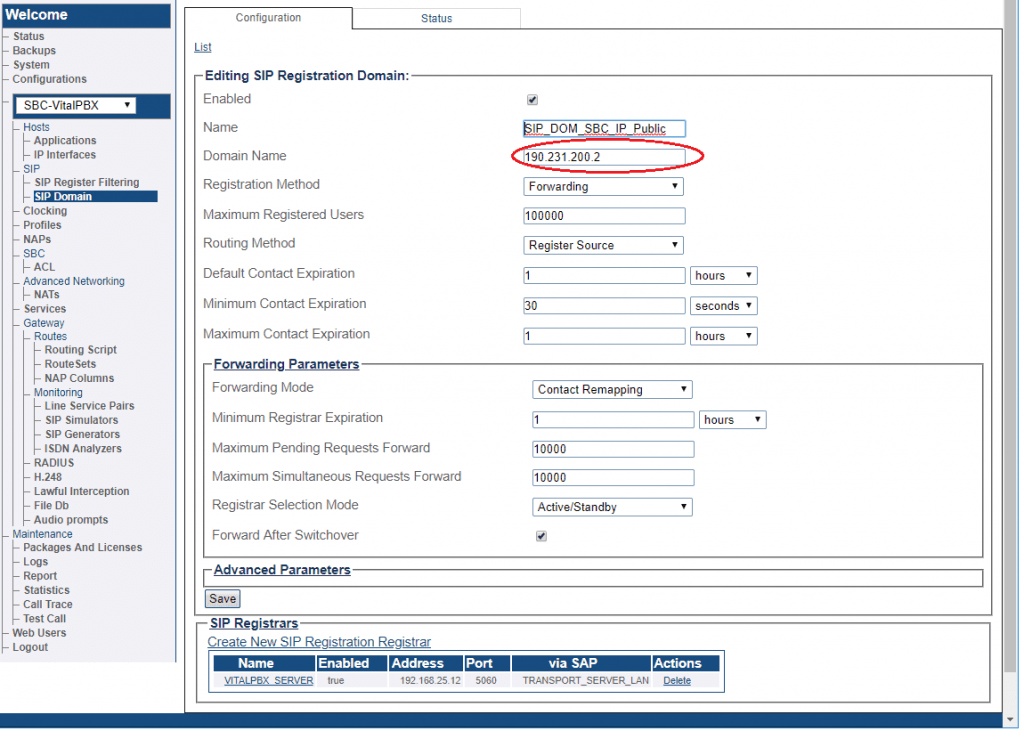
A SIP domain represents a grouping of devices (or users) that can communicate with one another. You must configure SIP Registration Domain for your system. The first step in doing so is to create a SIP Domain:
Create a New SIP Registration Domain
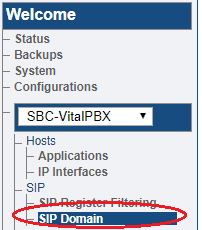
1- Click SIP Domain in the navigation panel

3- Create the new Domain
- Enter a configuration Name for this domain.
- Enter a Domain Name for the SIP Registration Domain (the domain can be an FQDN or an IP address, This is the IP address or domain to which the remote worker’s telephone points.)
- Set the number Maximum Registered Users for this domain
- Set the Expires value used by SBC when the remote device doesn’t supply one (Default Contact Expire)
- Select Routing Method the system will use to route calls to registered users (if enabled in routing scripts).
- Register source: Sends SIP Invite to the registering source IP address.
- Contact: Sends SIP Invite to the ‘contact’ from the Register message.
- Set the Default Contact Expiration, this value will be used when no Expires value is supplied by the user agent.
- Set the Minimum Contact Expiration, this is the minimum Expires value that can be supplied by a user agent. Lower values will be rejected with a 423 ‘Interval too brief’ response.
- Set the Maximum Contact Expiration, this is the maximum Expires value that can be supplied by a user agent. Higher value are replaced by this parameter.
Forwarding Parameters
- Select the Registration Forwarding Mode to the registrar:
- Contact Remapping: Changes the user and the IP address.
- Contact Passthrough: Doesn’t change anything. Enables devices to be contacted directly without going through the SBC.
- Set Minimum Registrar Expiration, this is the minimum Expires value sent by the SBC to the registrar. If a user agent ‘Expires’ value is greater than this parameter, the SBC will do rate adaptation between the user agent and the Registrar.
- Set Maximum Pending Register Forward, the maximum number of simultaneous pending register requests allowed for this domain. New REGISTER request are being refused passed this threshold.
- Set Maximum Simultaneous Register Forward, the maximum number of simultaneous active register requests allowed for this domain. New REGISTER request are being refused passed this threshold.
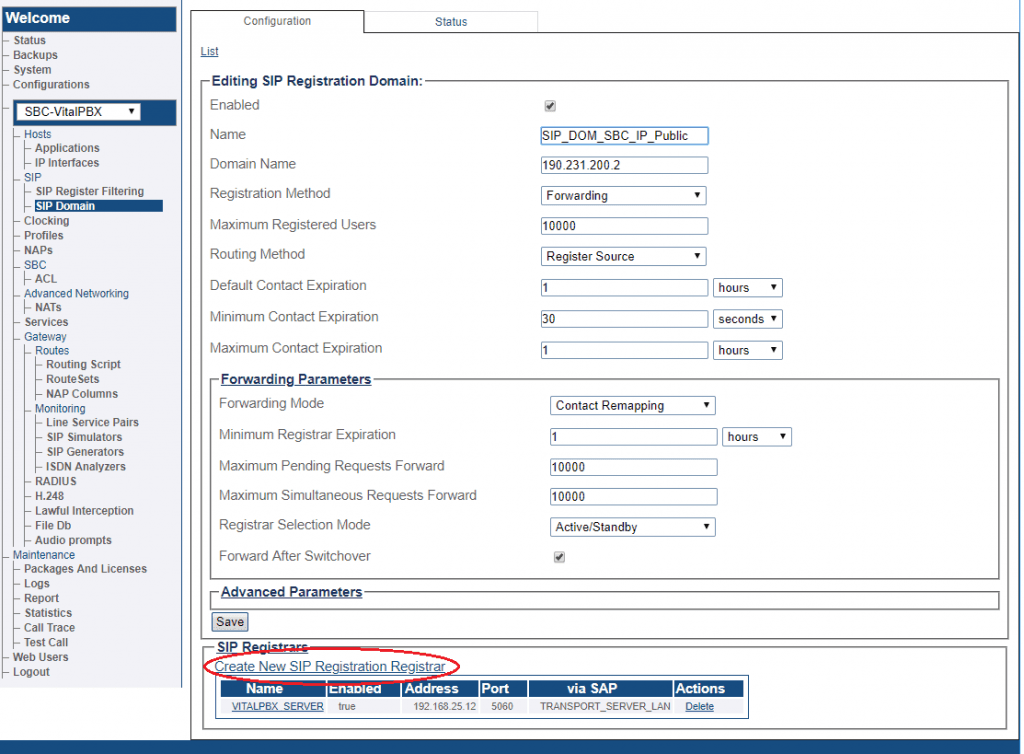
Create New SIP Registration Registrar
A SIP registrar represents a SIP endpoint that provides a location service. You must configure SIP Registrar for your system. The first step in doing so is to select your SIP Domain:
1- Click Create New SIP Registration Registrar
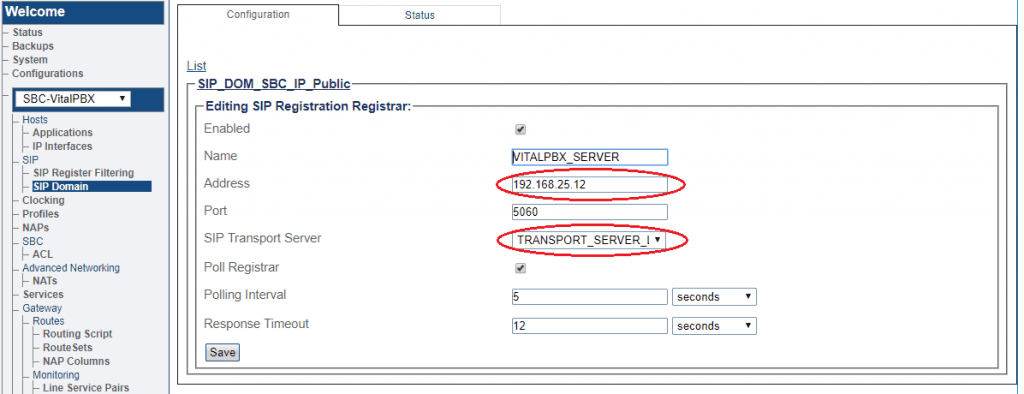
2- Create the new SIP Registration Registrar
- Enter a Name for the SIP Registration Registrar
- Enter an Address to reach the registrar. This is the IP Address of VitalPBX
- Select the registrar destination Port
- Select which local interface will be used to send REGISTER message in SIP Transport Server
SIP NAP
A Network Access Point or NAP represents the entry point to another network or destination peer (e.g. SIP proxy, SIP trunk, etc)
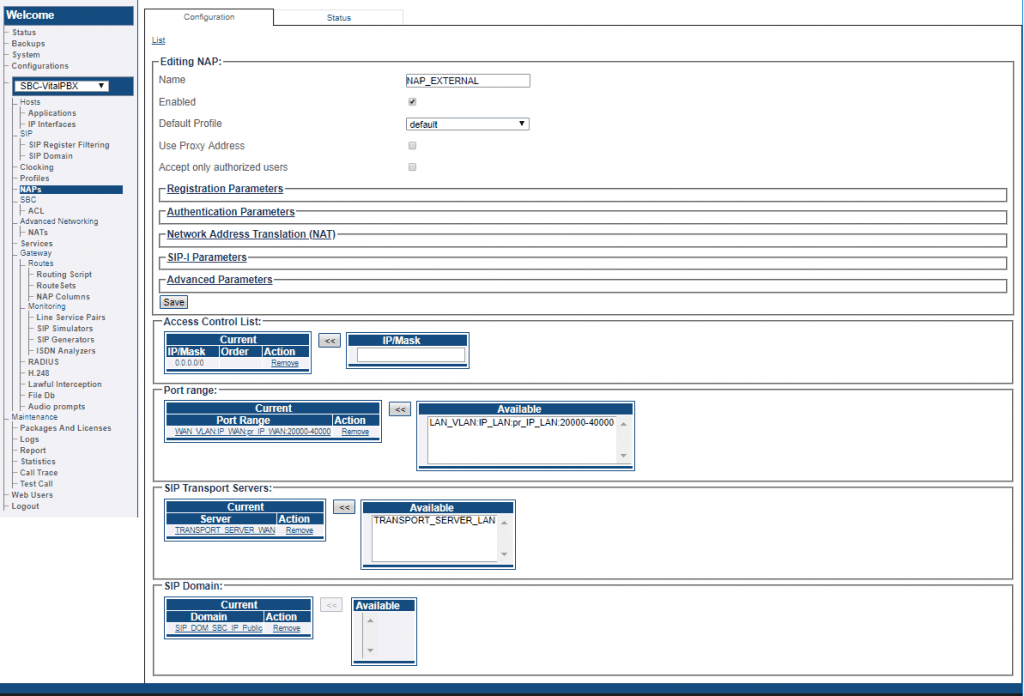
SIP NAP Configuration for Wide Area Network (WAN)
To create a new NAP:
1- Click NAPs in the navigation panel
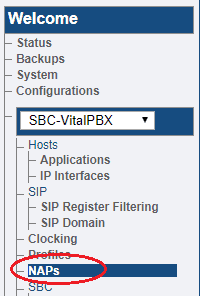
2- Click Create New NAP
- Enter a name for the NAP

Click Create
2. Then Configure the following parameters as shown below and click Save
SIP NAP Configuration for Local Area Network (LAN)
To create a new NAP:
1- Click Create New NAP
- Enter a name for the NAP

2. Then Configure the following parameters as shown below and click Save
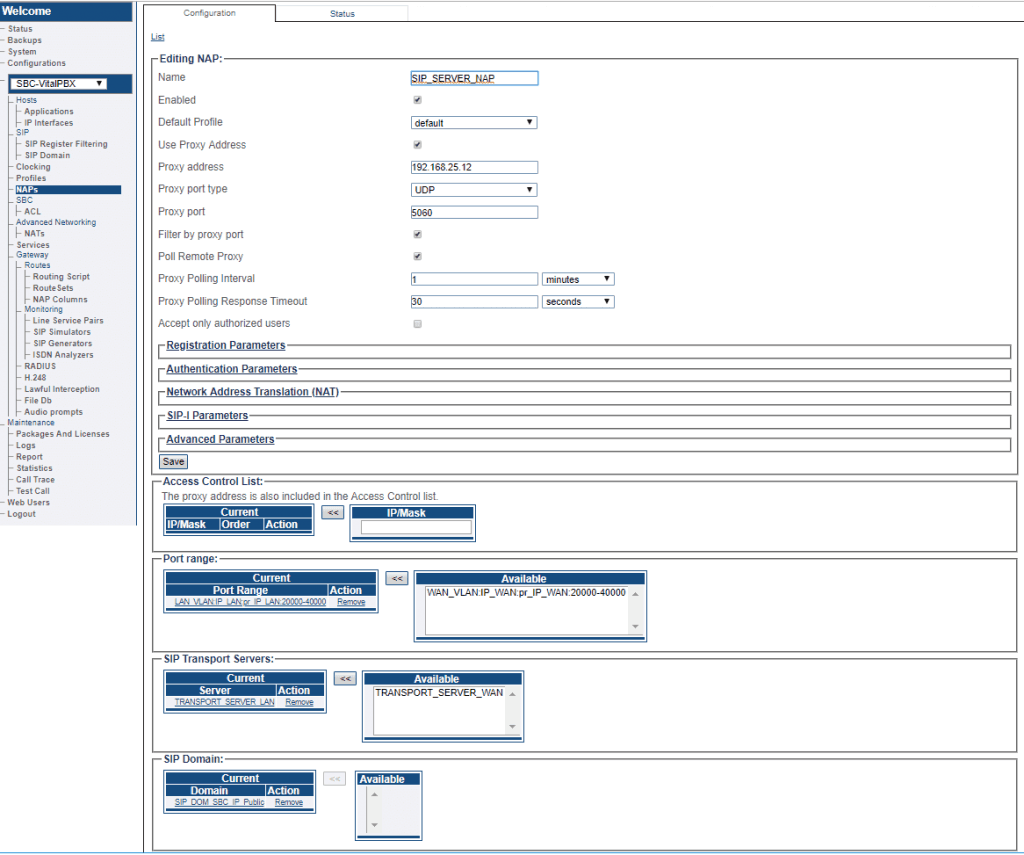
If you have audio problems, configure in Network Address Translation (NAT) section the option:
Remote Method for RTP: Force Passive Mode
In both configuration

Access Control List
FreeSBC will automatically create Access Control List for each NAP you created.
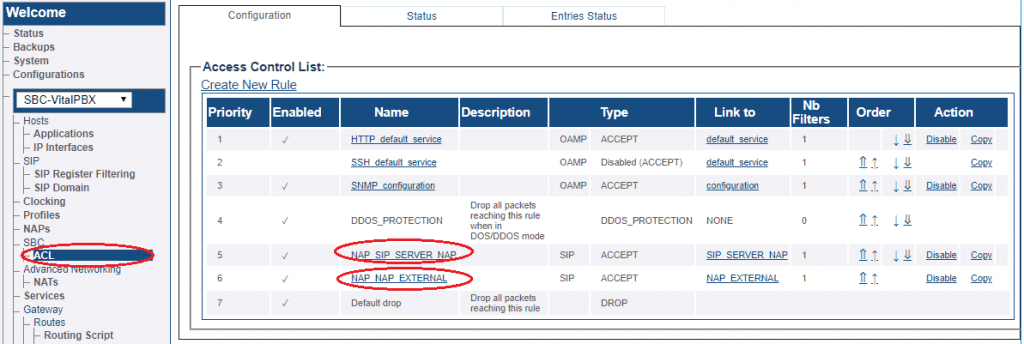
If you double-click one of the created ACL, you will see FreeSBC only accept the calls if source IP matches. In this sample; the calls from 192.168.25.12 will accepted only.

Call Route
You must set up call routing for your system. Call routing refers to the ability to route calls based on criteria such as origin, destination, time of day, service provider rates, and more.
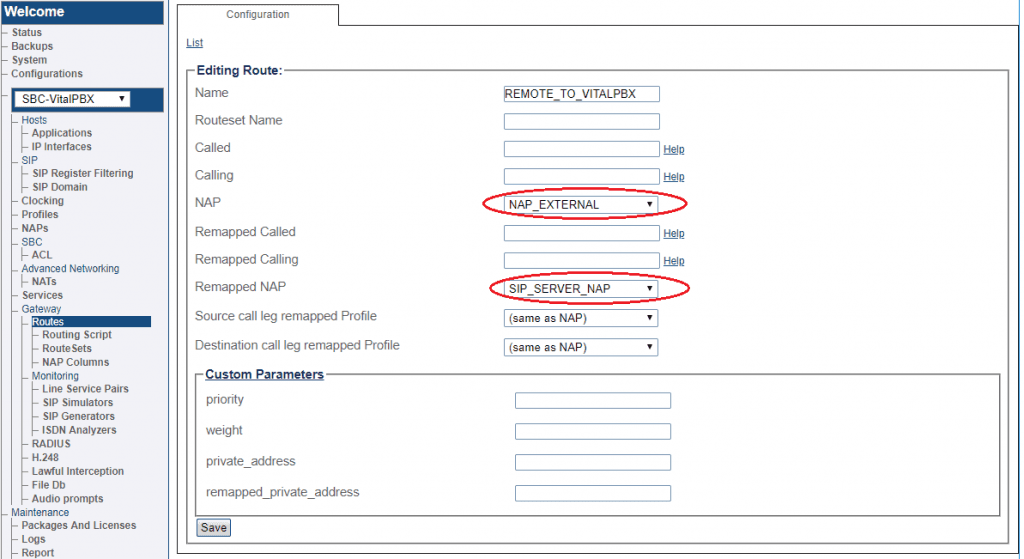
Route Configuration for Remote Workers to SIP Server
1- Click Routes in the navigation panel
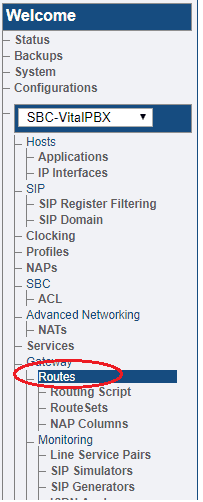
2- Click Create New Static Route
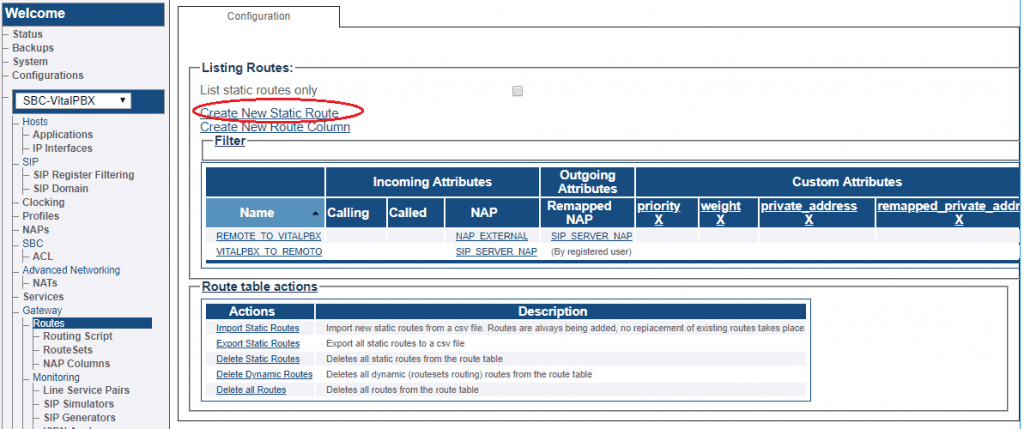
3- Create the new route:
- Enter a RoutesetName for the route
- Select SIP_EXTERNAL, to match calls from Trunk NAP
- Select SIP_SERVER_NAP
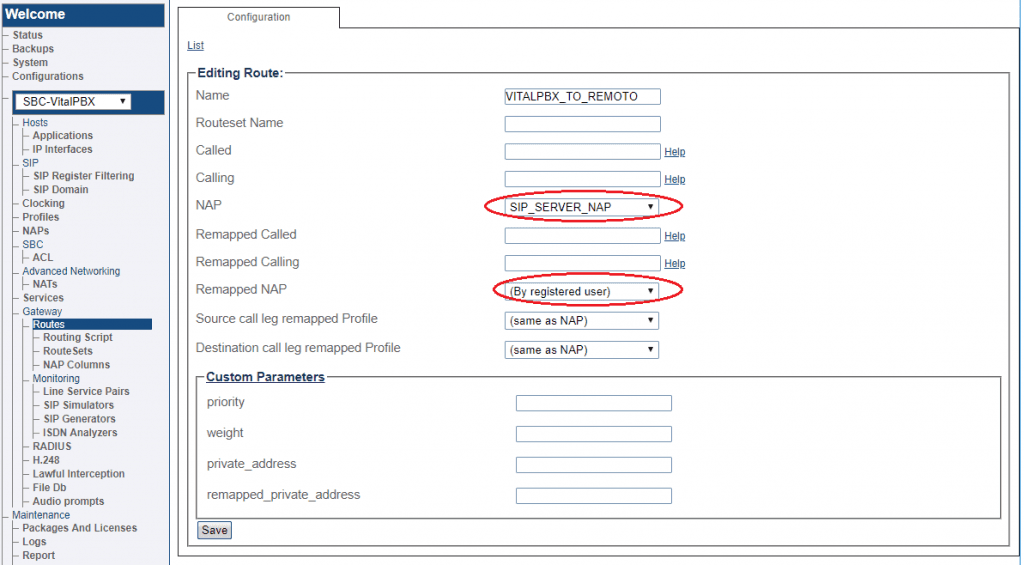
Route Configuration for SIP Server to Remote Workers
1- Click Create New Static Route

2- Create the new route:
- Enter a RoutesetName for the route
- Select SIP_SERVER_NAP, to match calls from Trunk NAP
- Select (By registered user)
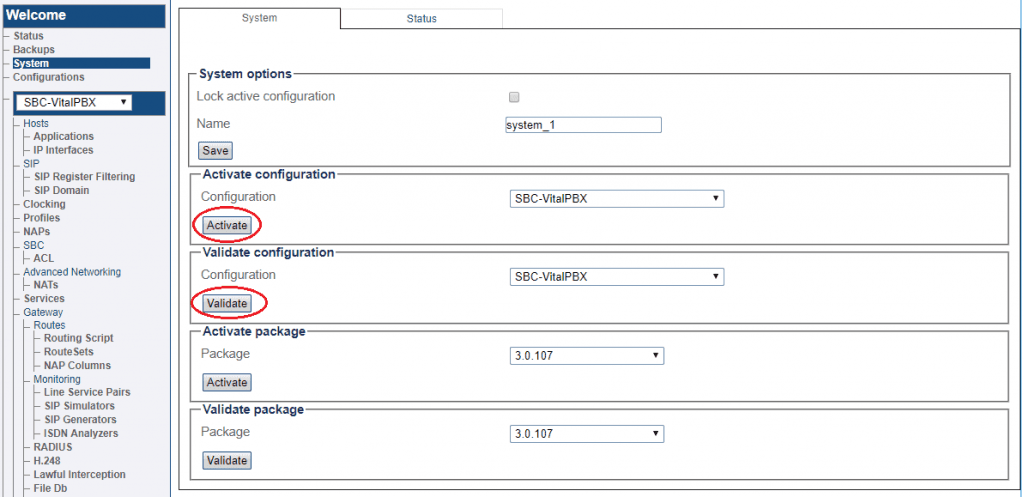
Apply Change
After having completed all the configuration you have to go to System and Apply the Changes
Register Your Phone
Now register your phone to the Public IP, which in our example is: 190.201.200.2
Notes:
Many thanks to TelcoBridge for providing us with all this information and also for allowing the community to have access to an efficient and easy to configure SBC solution.
Learn more about VitalPBX, our services and how we can help you achieve your goals in our official website.

