Learn how to setup Auto-Provisioning with the current version of the Endpoint Manager for VitalPBX, and provision your phones directly from VitalPBX. Read our tutorials and guides on how to implement new tools and technologies for your business with VitalPBX here.
Provisioning Phones is one of the essential processes when having a PBX deployment. Especially, when there are multiple phones involved in a small period of time.
So with this article, we will show you how to use the current version of the Endpoint Manager for VitalPBX.
Host Settings
The First thing we must configure are the Host Settings. So go to Settings > Endpoint Manager > Host Settings. There, you will add information with regards to your host (PBX) that will be provisioning your phones.

Your Host Settings will look similar to the image above. Where the Hostname is the PBX’s IP Address (if you are on the cloud or with a published IP Address, this will be a Public IP address), and then you specify the ports that you will use for the different protocols. Notice that we created a separate Host for “PJSIP”, this is necessary for you to be able to provision PJSIP devices. After filling this up, you Save and Apply Changes.
Templates
Next, you will need to create the Templates for your different phone models. So to do this go to Settings > Endpoint Manager > Create Template. There, you will create a template for the different phones you will provision.

On this template, you will add all of the configurations for the phone to provision. If you where to provision PJSIP accounts for this device you would have chosen the PJSIP Host Settings for the template. Then click on Save and Apply Changes.
Device Mapping
Now you will map these templates to the devices you wish to configure. So now you will go to Settings > Endpoint Manager > Device Mapping. Here, you will be able to assing the extensions and templates to your devices. If you are using remote extensions, you will not be able to use the “Scan Subnet for Devices” option, as this option is designed only for local networks. You will need to click on the blue “Add a Device” button and add the MAC Address, followed by the phone information.

Once you have entered the MAC Address, selected the Phone Brand, Model, and Template, you will be able to add the Devices (Extension Numbers) to the lines available to that specific phone. Then you will click on Save and Apply Changes. Once you Save, it will show like this:

Now, to provision the phones you can proceed in a couple of ways.
Provisioning – Option 66
This is the recommended way if you got to provision multiple phones in one location, like a whole office. You will need to enable Option 66 on your network’s Router or designated DHCP Server. There, you will add the provisioning URL, http://pbxdomain.com/xepm-provision or http://[PBX-IP-ADDRESS]/xepm-provision. Once this is enabled and applied, you will need to power cycle your phone and it will start the provisioning process.
Provisioning – Provision URL on Phones
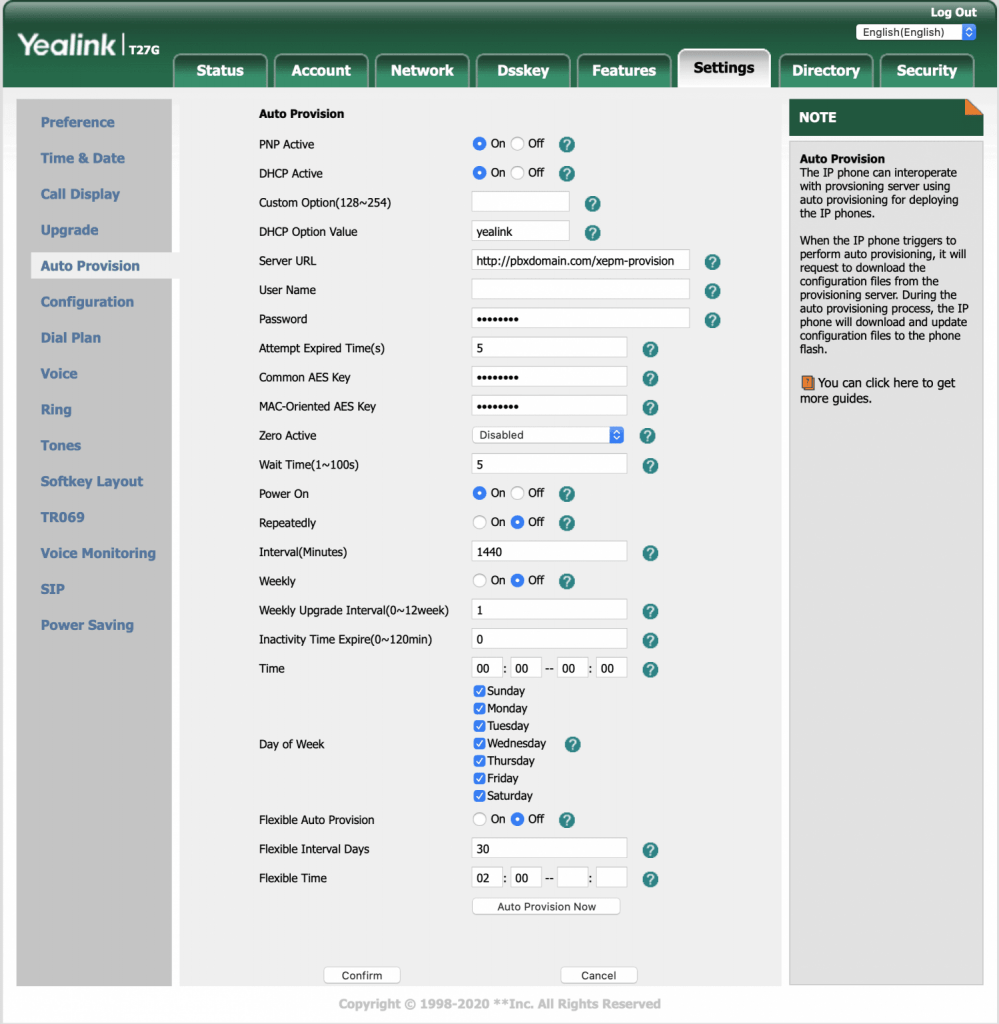
The other way to provision the phones, is to directly add the Provisioning URL to the phones themselves. Again, in this example we are using a Yealink phone, but the process is similar for any phone brand.

We have left everything on default, and only the Server URL has been added. Notice the need to add the http:// or https:// (depending on whether or not you are using certificates) and once again, the format is http://pbxdomain.com/xepm-provision or http://[PBX-IP-ADDRESS]/xepm-provision. Then, we clicked “Confirm” to apply the configurations. Again, this process would be similar on other phone brands.
Conclusion
Provisioning Phones is an essential part of the PBX deployment workflow. So Being able to setup the VitalPBX Provisioning System correctly, you are able to deploy your phones way faster.
But wait… There’s More!
You might notice that the list of Brands and Models is finite. in the case that the model of phones you wish to use is not available, you can still upload the configuration files to the following directory “/usr/share/vitalpbx/www/includes/xepm/provision” and you can setup your phones to be provisioned in any of the two ways we mention above.
Let us know if you got any comments or questions, by sending an email to sales@vitalpbx.org or learn more about VitalPBX, our services and how we can help you achieve your goals in our official website.


