Prerequisites for Implementing MariaDB Galera with VitalPBX
Before setting up MariaDB Galera with VitalPBX, ensure you have the following:+
1. Infrastructure Requirements:
At least three servers to form a Galera cluster for redundancy and high availability.
A stable network connection between cluster nodes with low latency.
2. Operating System:
• A Linux-based OS such as Debian, or Ubuntu, as MariaDB Galera works best in these environments.
3. Software Requirements:
• VitalPBX installed and running on a server.
• MariaDB or MySQL pre-installed (the same version on all nodes is crucial).
• Galera library compatible with your MariaDB version.
4. Configuration Knowledge:
• Familiarity with editing configuration files (e.g., my.cnf for MariaDB).
• Understanding of basic SQL commands for database management.
5. Backup and Security:
• Ensure you have a full backup of your VitalPBX database.
• Configure firewalls to allow necessary ports (default: 3306 for MariaDB and 4567-4568 for Galera synchronization).
With these prerequisites in place, you’ll be ready to configure MariaDB Galera to work seamlessly with VitalPBX, ensuring high availability and robust performance.
Building a Resilient VitalPBX with MariaDB Galera
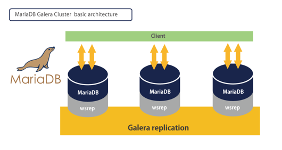
Implementing a MariaDB Galera Cluster for VitalPBX ensures high availability, scalability, and redundancy, making your communication system more robust and resilient.
This guide will walk you through configuring multiple database nodes to work in sync, enabling real-time data replication and failover capabilities, using Debian 12 as the operating system and MariaDB 10.11 as the database engine.
This combination provides a stable and modern platform for high availability and fault tolerance. By the end of this tutorial, you’ll have a fully functional Galera Cluster seamlessly integrated with VitalPBX, ensuring your system is reliable, robust, and ready to handle mission-critical workloads.

Step 1
3 Server
• Server1: 192.168.10.61
• Server2: 192.168.10.62
• Server3: 192.168.10.63
Step 2
Update OS
apt update && apt upgrade -y
Step 3
Firewall Configuration on All Three Servers
Make sure the following ports are open on the firewall of each server to allow communication between the nodes:
• 3306 (TCP): For MariaDB connections.
• 4567 (TCP/UDP): For Galera replication.
• 4568 (TCP): For Galera IST replication.
• 4444 (TCP): For SST state transfer.
					apt install ufw -y
ufw allow 3306/tcp
ufw allow 4567/tcp
ufw allow 4567/udp
ufw allow 4568/tcp
ufw allow 4444/tcp
ufw allow from 192.168.10.0/23
ufw allow ssh
ufw enable
ufw reload
ufw status
Step 4
Install MariaDB on all three servers
apt install mariadb-server galera-4 rsync -y
Step 6
Configure the hosts file: Make sure each server can resolve the names of the other nodes. Edit /etc/hosts on each server:
nano /etc/hosts
Add
					192.168.10.61 cluster01
192.168.10.62 cluster02
192.168.10.63 cluster03
Step 7
Create the State Transfer User (SST)
On one of the nodes, start MariaDB and create a user for state transfer (SST):
					mysql -u root
CREATE USER 'sst_user'@'%' IDENTIFIED BY 'password';
GRANT RELOAD, LOCK TABLES, PROCESS, REPLICATION CLIENT ON *.* TO 'sst_user'@'%';
FLUSH PRIVILEGES;
exit;
Step 8
Configure Galera on All Three Servers
a. Create the vitalpbx.cnf Configuration File on All Three Servers:
nano /etc/mysql/conf.d/vitalpbx.cnf
With the following configuration
					[mysqld]
skip-name-resolve
innodb_flush_log_at_trx_commit=2
innodb_log_file_size=64M
innodb_log_buffer_size=64M
bulk_insert_buffer_size=64M
innodb_lock_wait_timeout=180
tmp_table_size=128M
max_heap_table_size=128M
innodb_buffer_pool_size=800M
query_cache_size=64M
wait_timeout=1800
interactive_timeout=1800
max_allowed_packet=1G
log_warnings=1

bind-address=0.0.0.0
default_storage_engine=InnoDB
binlog_format=ROW
innodb_autoinc_lock_mode=2
b. Edit the 50-server.cnf File on All Three Servers.
nano /etc/mysql/mariadb.conf.d/50-server.cnf
Change
bind-address = 127.0.0.1
To
bind-address = 0.0.0.0
c. Now let’s edit the 60-galera.cnf file on all three servers.
nano /etc/mysql/mariadb.conf.d/60-galera.cnf
And leave it as shown below
					#
# * Galera-related settings
#
# See the examples of server wsrep.cnf files in /usr/share/mysql
# and read more at https://mariadb.com/kb/en/galera-cluster/

[galera]
wsrep_on=ON
wsrep_provider=/usr/lib/galera/libgalera_smm.so
wsrep_cluster_name="my_galera_cluster"
wsrep_cluster_address="gcomm://192.168.10.61,192.168.10.62,192.168.10.63"
wsrep_node_address="192.168.10.XX" # Replace XX with the corresponding node's IP address
wsrep_node_name="clusterXX" # Replace XX with the node number (01, 02, or 03)
wsrep_sst_method=rsync

# Usuario SST
wsrep_sst_auth=sst_user:password  # We replace the user and password with the ones we created earlier.
Step 9:
Start the Cluster on the First Node
On the first server (e.g., cluster01), start the cluster:
galera_new_cluster
Verify that the node is functioning correctly:
mysql -u root -e "SHOW STATUS LIKE 'wsrep_cluster_size';"
You should see that the cluster size is 1 (only one node).
					+--------------------+-------+
| Variable_name      | Value |
+--------------------+-------+
| wsrep_cluster_size | 1     |
+--------------------+-------+
Next, restart MariaDB on the remaining nodes (Cluster02 and Cluster03):
systemctl restart mariadb
You can verify that the cluster is functioning correctly by checking the Galera status:
mysql -u root -e "SHOW STATUS LIKE 'wsrep%';"
Look for the following values:
• wsrep_cluster_size: It should match the number of nodes in your cluster.
• wsrep_ready: It should be ON on all nodes.
• wsrep_connected: It should be ON.
Note:
Sometimes it is necessary to restart all three servers to ensure proper synchronization. Occasionally, you may need to wait 5 to 10 minutes for all three servers to start MariaDB correctly.
Connecting VitalPBX to MariaDB Galera
To integrate VitalPBX with your MariaDB Galera cluster, follow these steps:
Export the VitalPBX (ombutel) and Asterisk databases.
VitalPBX installs several databases on the local server. These databases must be fully copied, including their respective permissions, to our MariaDB cluster.
Export:
					mysqldump --databases asterisk ombutel provisioning vitalpbx_logs > vitalpbx_backup.sql
scp vitalpbx_backup.sql root@IP_REMOTA:/tmp/
Now, go to the server where your MariaDB cluster is located and restore the database:
					cd /tmp
mysql -u root  < vitalpbx_backup.sql
Finally, grant permissions to the users so they can be accessed from the local network:
					mysql -u root
GRANT ALL PRIVILEGES ON *.* TO 'ombutel'@'192.168.10.%' IDENTIFIED BY 'ombutel' WITH GRANT OPTION;
GRANT ALL PRIVILEGES ON *.* TO 'vitalpbx'@'192.168.10.%' IDENTIFIED BY 'vitalpbx' WITH GRANT OPTION;
GRANT ALL PRIVILEGES ON *.* TO 'vitalpbx_logs'@'192.168.10.%' IDENTIFIED BY 'vitalpbx_logs' WITH GRANT OPTION;
GRANT ALL PRIVILEGES ON *.* TO 'asterisk'@'192.168.10.%' IDENTIFIED BY 'asterisk' WITH GRANT OPTION;
FLUSH PRIVILEGES;
exit;
Replace 192.168.10 with your local network’s IP address range.
Connecting to MariaDB with Galera Cluster
To configure a client to access a MariaDB Galera cluster without being affected if one of the servers is down, the ideal approach is to use a load balancer or configure the client to attempt connections to multiple nodes in case of failure.
Use a Load Balancer
A common and robust solution is to place a load balancer (such as HAProxy or ProxySQL) in front of the MariaDB nodes. The load balancer will distribute connections among the available nodes and automatically handle failover if one node goes down.
• HAProxy: HAProxy is a reliable option for load balancing MariaDB connections. It monitors the health of each node and redirects traffic only to available servers.
• ProxySQL: ProxySQL is a powerful tool specifically designed for database load balancing. It offers advanced features like query caching and real-time monitoring, making it ideal for MariaDB Galera clusters.
This setup ensures seamless operation and minimizes the impact of node failures on your applications or systems.
Step 1:
Disable MariaDB in VitalPBX
Before making configuration, changes or performing maintenance, it’s important to disable MariaDB on the server to prevent unintended issues. Use the following commands to stop and disable the MariaDB service
					systemctl disable mariadb
systemctl stop mariadb
This ensures that MariaDB is not running while you proceed with the necessary adjustments.
Step 2:
MariaDB Client Configuration for Centralized Asterisk CDR Storage
To centralize the storage of Asterisk CDRs, configure the MariaDB client as follows:
Edit the odbc.ini File:
Open the configuration file located at /etc/odbc.ini for editing.
					nano /etc/odbc.ini
[MySQL-asterisk]
Description  = CDR Connection
Driver       = MariaDB Unicode
Database     = asterisk
User         = asterisk
Password     = asterisk
Server       = 127.0.0.1
#Socket       = /var/run/mysqld/mysqld.sock

[MySQL-vitalpbx]
Description  = VPBX Connection
Driver       = MariaDB Unicode
Database     = ombutel
User         = vitalpbx
Password     = vitalpbx
Server       = 127.0.0.1
#Socket       = /var/run/mysqld/mysqld.sock
Configure the /etc/vitalpbx/database.conf File.
To enable centralized database storage and allow remote updates, follow these steps:
Edit the database.conf File:
Open the VitalPBX database configuration file for editingl.
					nano /etc/vitalpbx/database.conf
[app]
database=ombutel
port=3306
host=127.0.0.1
username=ombutel
password=ombutel

[main]
host=127.0.0.1
port=3306
username=ombutel
password=ombutel
Step 3:
Install HAProxy
HAProxy is a reliable load balancer that can be used to distribute traffic across MariaDB Galera nodes. Follow these steps to install and configure HAProxy
apt-get install haproxy -y
Step 4:
Configure HAProxy
Edit the HAProxy Configuration File:
Open the HAProxy configuration file using your preferred text editor:
nano /etc/haproxy/haproxy.cfg
Configure HAProxy Frontend and Backend
To set up HAProxy for MariaDB Galera, add the following configuration to the end of the haproxy.cfg file.
					defaults
     log     global
     mode    tcp
     option  tcplog
     timeout connect 5000ms
     timeout client  50000ms
     timeout server  50000ms

frontend mysql_frontend
     bind *:3306
    mode tcp
     default_backend mysql_backend

backend mysql_backend
     mode tcp
     balance roundrobin
     option tcp-check
     server cluster01 192.168.10.61:3306 check
     server cluster02 192.168.10.62:3306 check
     server cluster03 192.168.10.63:3306 check
Frontend:
• bind *:3306: Binds HAProxy to port 3306 to listen for MariaDB client connections.
• mode tcp: Ensures HAProxy works in TCP mode, which is necessary for database traffic.
• default_backend: Specifies the backend that handles incoming traffic.
Backend:
• balance roundrobin: Distributes requests evenly across all available nodes.
• option mysql-check user haproxy_user: Performs a health check on each node using the specified MariaDB user (haproxy_user).
• server: Defines each node in the cluster with its IP, port, and health check settings.
Step 5:
Restart HAProxy
To apply the new configuration, restart the HAProxy service with the following command:
systemctl restart haproxy
This will restart HAProxy and ensure that the new settings are in effect.
You can verify the status of HAProxy to ensure it’s running correctly:
systemctl status haproxy
Step 6:
Test – Configure the MySQL Client
Now, the MySQL client should connect through HAProxy. Use the IP of the server where you installed HAProxy (which is the same server as the client):
mysql -u tu_usuario -p -h 127.0.0.1 -P 3306
This command will ensure that connections are balanced between the MariaDB Galera nodes. If one of the nodes is down, HAProxy will automatically redirect the connections to the available nodes, ensuring high availability and seamless failover.
Conclusion
By configuring HAProxy as a load balancer for your MariaDB Galera cluster, you’ve ensured that your MySQL clients are able to access the database in a highly available and fault-tolerant manner.
With HAProxy in place, traffic is evenly distributed across the cluster nodes, and automatic failover is enabled in case a node becomes unavailable.
This setup enhances the reliability, scalability, and performance of your database infrastructure, ensuring that your applications remain operational even during hardware failures. The steps outlined in this guide provide a solid foundation for managing a robust MariaDB Galera cluster that can handle high loads and ensure seamless service continuity.


