1.- Introduction
Welcome tech enthusiasts, to our blog on the cutting-edge world of high availability! In today’s digital landscape, where uninterrupted connectivity and seamless operations are paramount, the need for robust systems that can withstand failures and ensure continuous service has never been more critical. Whether you’re managing mission-critical applications, virtualized environments, or communication systems like IP PBX, a reliable high availability solution is essential to keep your operations running smoothly.
In this blog, we delve into the realm of High Availability (HA) and explore how a combination of powerful open-source technologies can create a rock-solid infrastructure capable of weathering unexpected challenges. At the core of our discussion lie four key pillars: DRBD, Pacemaker, Corosync, and Debian 12, which together form a formidable alliance to achieve fault tolerance, data redundancy, and seamless failover.
1.1.- Distributed Replicated Block Device (DRBD):
Imagine a scenario where data loss due to hardware failure could cripple your business. DRBD, an open-source Linux kernel module, is here to save the day. This revolutionary technology ensures real-time data replication across multiple networked devices, creating mirrored storage that guarantees data integrity and redundancy. Join us as we unravel the inner workings of DRBD and how it forms the foundation of our high availability solution.
1.2.- Pacemaker:
Bringing intelligence to the table, Pacemaker is an indispensable cluster resource manager. As the heartbeat of our HA setup, Pacemaker monitors the health of nodes and services, making critical decisions to maintain service availability. We’ll explore its advanced capabilities, such as resource allocation, failover policies, and even how it collaborates with DRBD to orchestrate data synchronization and prevent downtime.
1.3.- Corosync:
Communication is the key to any successful relationship, and that’s precisely where Corosync comes into play. As a messaging layer, Corosync facilitates the exchange of cluster status information among nodes, ensuring they remain in sync and can make informed decisions collectively. Our blog will highlight Corosync’s vital role in ensuring seamless cooperation among various components within our high availability architecture.
1.4.- Debian 12:
At the heart of our HA setup lies Debian 12, a rock-solid, community-driven operating system known for its stability and reliability. As the chosen platform for our HA journey, we’ll explore how Debian 12’s robustness complements our selected technologies, providing a secure and adaptable environment for our high availability system to thrive.
1.5.- IP PBX:
Diving into real-world application, we’ll demonstrate how our high availability architecture extends its protective embrace to critical communication systems like IP PBX. Discover how the combination of DRBD, Pacemaker, Corosync, and Debian 11 ensures that voice services remain uninterrupted, assuring seamless communication and business continuity.
Together, we will uncover the intricacies of setting up this formidable high availability solution and its potential applications across diverse industries. So, whether you’re an IT professional, a system administrator, or a curious tech enthusiast, join us as we embark on this enlightening journey through the world of high availability, where cutting-edge technologies converge to safeguard the lifeline of businesses and organizations alike. Let’s fortify our systems and brace ourselves for a future of resilience and uninterrupted operations. Stay tuned!
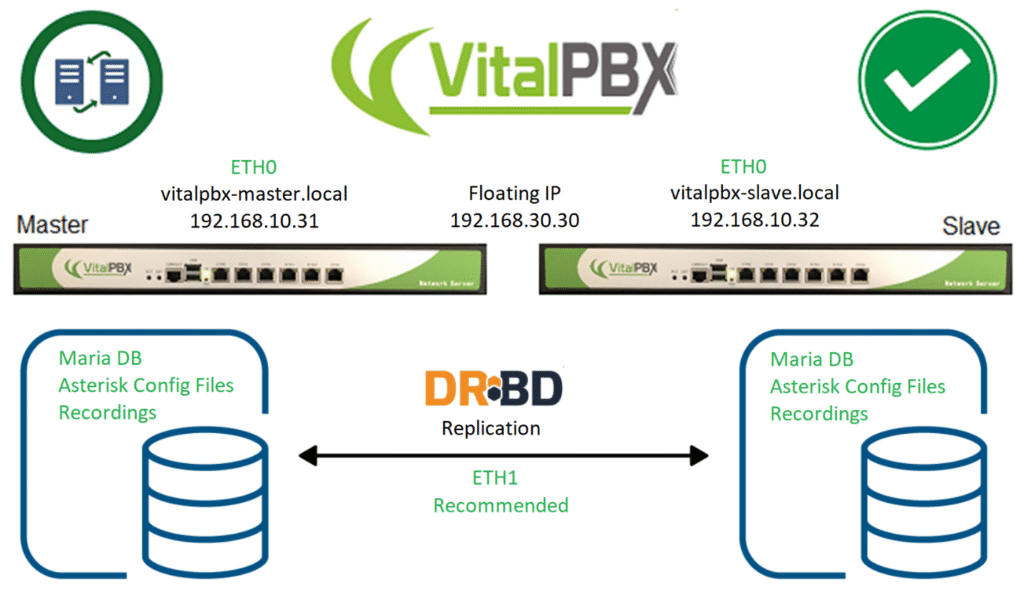
2.- Requirements to install VitalPBX in High Availability
Setting up High Availability (HA) with DRBD (Distributed Replicated Block Device) involves ensuring critical systems and services are available with minimal downtime in case of failures. DRBD enables real-time data replication between nodes to ensure data availability and integrity. Here are some general requirements to set up High Availability with DRBD:
1.- Physical Infrastructure and Networking:
Two or more identical or very similar nodes (servers) to implement redundancy.
Reliable and low-latency network connection between the nodes. This can be a dedicated replication network (preferred) or a shared network if it’s of high quality.
2.- Operating System – VitalPBX version:
Nodes should run the same operating system, preferably the same version and the same version of VitalPBX.
3.- Disk Partitioning:
The storage device to be replicated should be partitioned and accessible on both nodes.
Each node should have sufficient storage space to accommodate replication and data.
4.- Network Configuration:
Each node should have static IP addresses and resolve correctly in the local DNS system or in the /etc/hosts file of the other node.
Hostnames should be consistent across nodes.
5.- DRBD:
Install and configure DRBD on both nodes.
Configure DRBD resources that define which devices will be replicated and how replication will be established.
At the time of installation leave the largest amount of space on the hard drive to store the variable data on both servers.
Define node roles: primary and secondary nodes.
3.- Installation
3.1.- Install Debian 12 Minimal
We are going to start by installing Debian 12 minimal on two servers
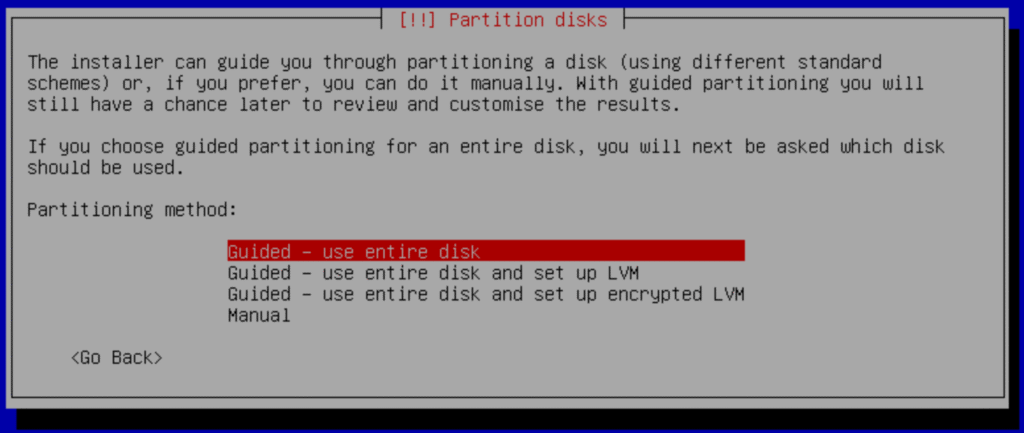
a.- When you get to the partitions part you must select “Guide – use entire disk”:

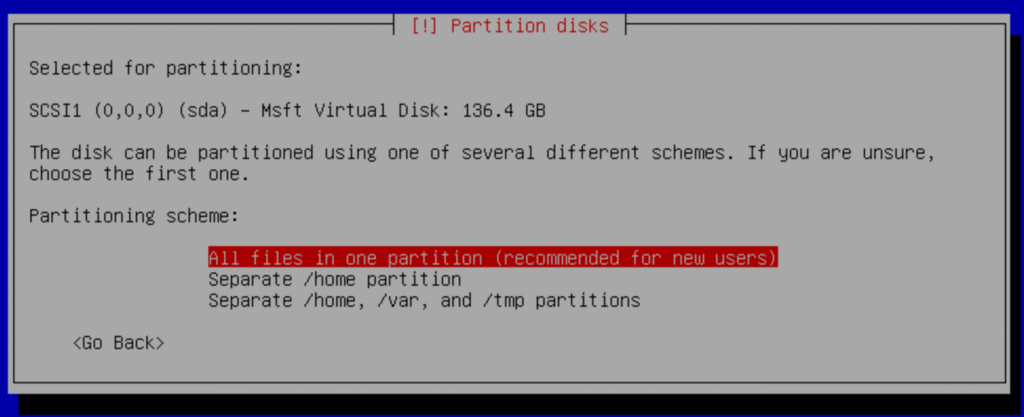
b.- Select:
“All files in one partition (recommended for new user)”
c.- Select primary: “#1 primary”
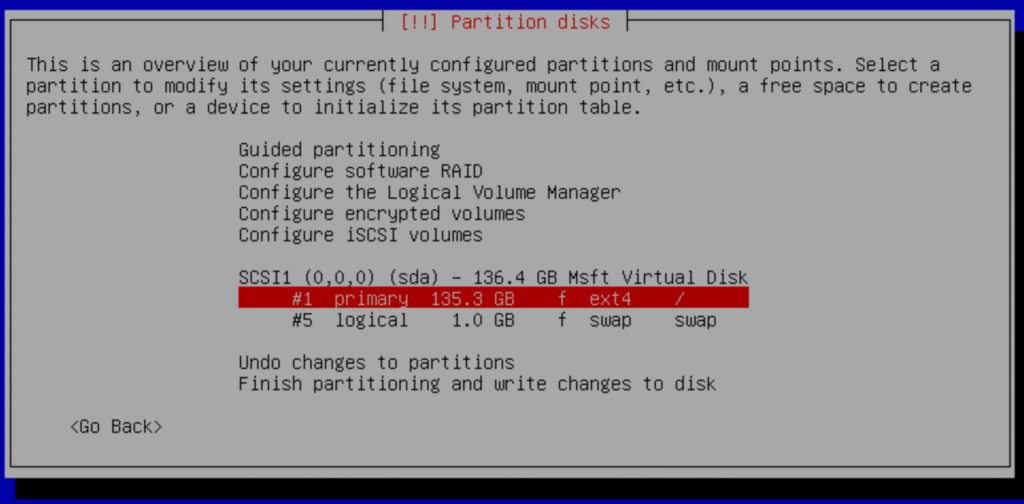
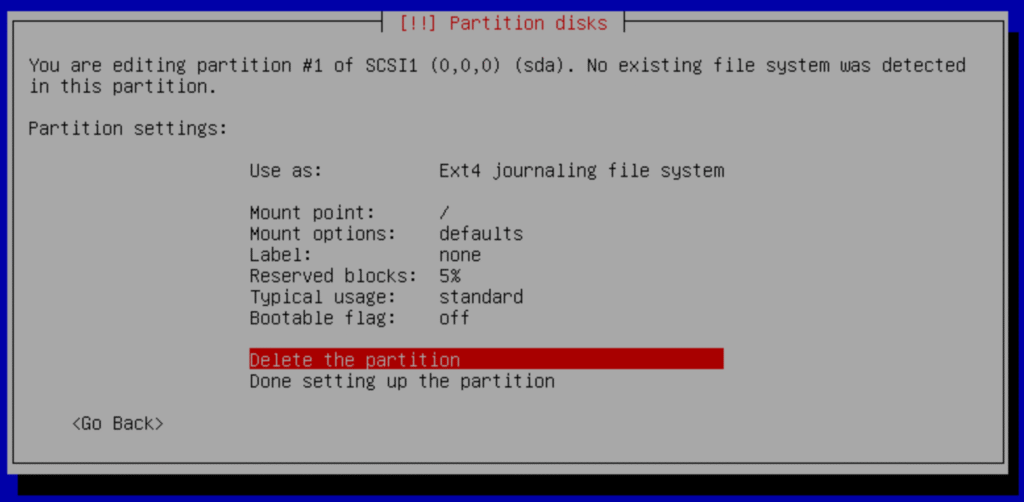
d.- Delete partition
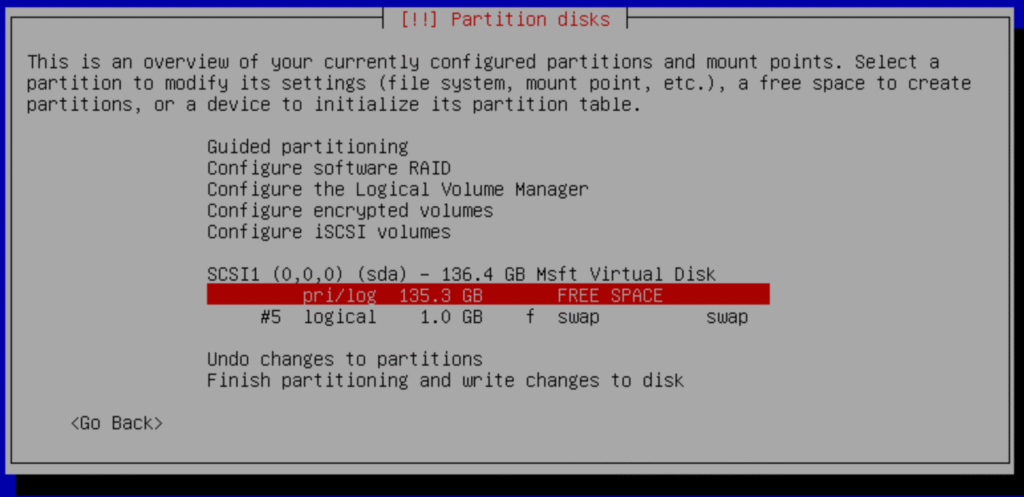
e.- Select pri/log
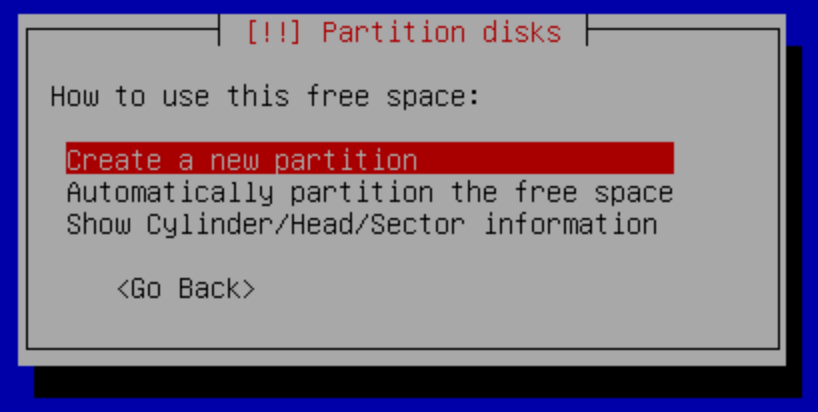
f.- Create New Partition
g.- Change the capacity to new partition size: 20GB
We need enough space for the operating system and its applications in the future; then <continue>

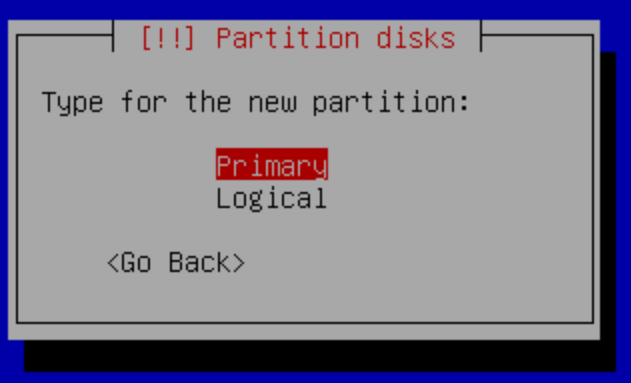
Select Primary
Select Beginning

Select Done setting up the partition
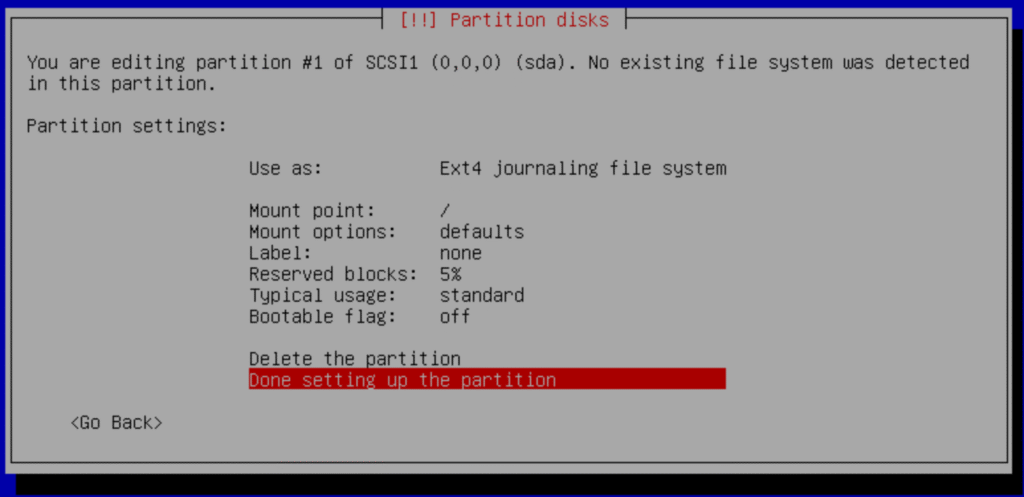
h.- Finish
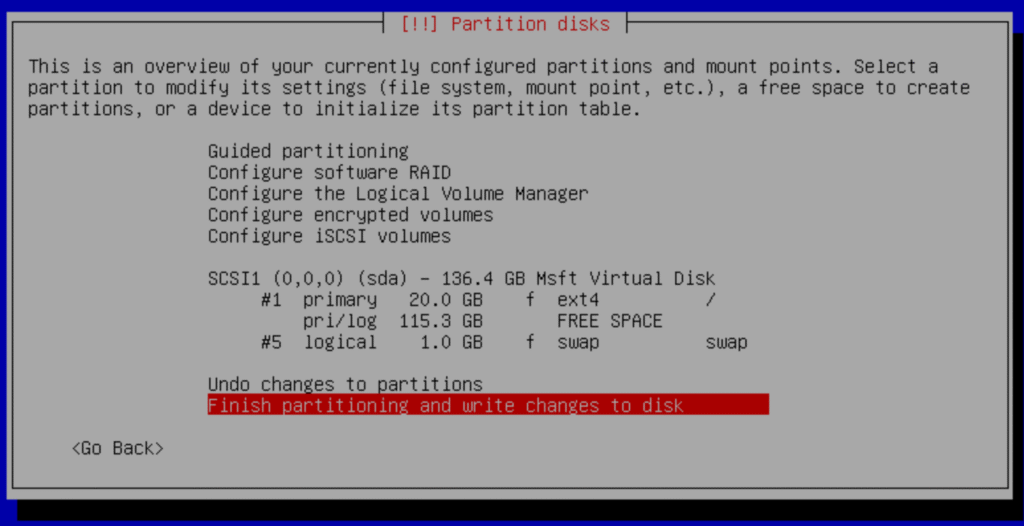
Pres Yes to confirm
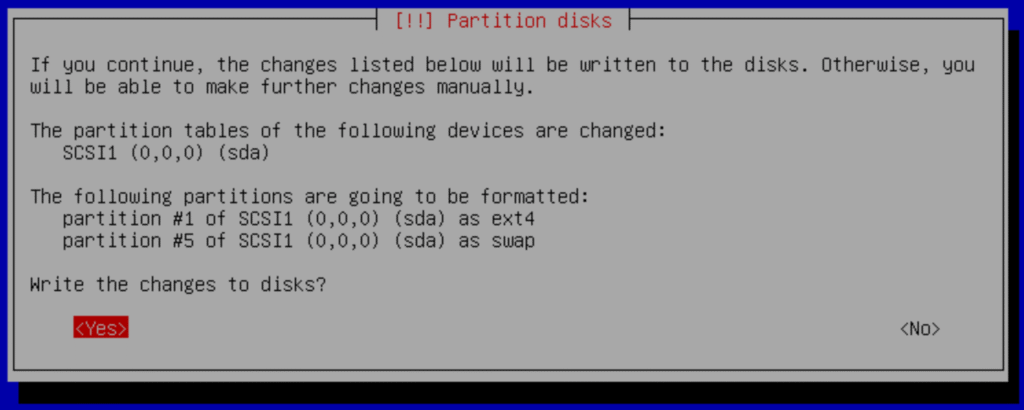
And continue with the installation.
4.- Configurations
4.1- IP and Hostname Configuration.
We will configure in each server the IP address and the host name.
Name | Master | Slave |
|---|---|---|
Hostname | vitalpbx-master.local | vitalpbx-slave.local |
IP Address | 192.168.10.31 | 192.168.10.32 |
Netmask | 255.255.254.0 | 255.255.254.0 |
Gateway | 192.168.10.1 | 192.168.10.1 |
Primary DNS | 8.8.8.8 | 8.8.8.8 |
Secondary DNS | 8.8.4.4 | 8.8.4.4 |
4.1.1.- Remote access with the root user.
As a security measure, the root user is not allowed to remote access the server. If you wish to unblock it, remember to set a complex password, and perform the following steps.
Enter the Command Line Console with the root user directly on your server with the password you set up earlier.
Edit the following file using nano, /etc/ssh/sshd_config (Master-Slave).
nano /etc/ssh/sshd_config
Change the following line
#PermitRootLogin prohibit-password
With
PermitRootLogIn yes
Save, Exit and restart the sshd service (Master-Slave).
systemctl restart sshd
4.1.2.- Changing your IP Address to a static address.
By default, our system’s IP address in Debian is obtained through DHCP, however, you can modify it and assign it a static IP address using the following steps:
Edit the following file with nano, /etc/network/interfaces (Master-Slave).
nano /etc/network/interfaces
Change
					#The primary network interface
allow-hotplug eth0
iface eth0 inet dchp
With the following. Sever Master.
					#The primary network interface
allow-hotplug eth0
iface eth0 inet static
address 192.168.10.31
netmask 255.255.254.0
gateway 192.168.10.1
With the following. Sever Slave.
					#The primary network interface
allow-hotplug eth0
iface eth0 inet static
address 192.168.10.32
netmask 255.255.254.0
gateway 192.168.10.1
Lastly, reboot both servers and you can now log in via ssh.
4.1.3.- Hostname
Connect through ssh to each of the servers and we configure the hostname of each server in the /etc/hosts file, so that both servers see each other with the hostname.
Server Master
hostname vitalpbx-master.local
Server Slave
hostname vitalpbx-slave.local
4.1.4.- Create authorization key
Create authorization key for the Access between the two servers without credentials.
Create key in Server Master (Master).
					ssh-keygen -f /root/.ssh/id_rsa -t rsa -N '' >/dev/null
ssh-copy-id root@192.168.10.32
					Are you sure you want to continue connecting (yes/no/[fingerprint])? yes
root@192.168.10.62's password: (remote server root’s password)

Number of key(s) added: 1

Now try logging into the machine, with:   "ssh 'root@192.168.10.32'"
and check to make sure that only the key(s) you wanted were added.

root@vitalpbx-master:~#
Create key in Server Slave (Slave).
					ssh-keygen -f /root/.ssh/id_rsa -t rsa -N '' >/dev/null
ssh-copy-id root@192.168.10.31
					Are you sure you want to continue connecting (yes/no/[fingerprint])? yes
root@192.168.10.61's password: (remote server root’s password)

Number of key(s) added: 1

Now try logging into the machine, with:   "ssh 'root@192.168.10.31'"
and check to make sure that only the key(s) you wanted were added.

root@vitalpbx-slave:~#
4.1.5.- Create the partition on both servers
Initialize the partition to allocate the available space on the hard disk. Do these on both servers (Master-Slave).
fdisk /dev/sda
					Welcome to fdisk (util-linux 2.38.1).
Changes will remain in memory only, until you decide to write them.
Be careful before using the write command.

This disk is currently in use - repartitioning is probably a bad idea.
It's recommended to umount all file systems, and swapoff all swap
partitions on this disk.


Command (m for help): n
Partition type
   p   primary (1 primary, 1 extended, 2 free)
   l   logical (numbered from 5)
Select (default p): p
Partition number (3,4, default 3): 3
First sector (39061504-266338303, default 39061504): [Enter]
Last sector, +/-sectors or +/-size{K,M,G,T,P} (39061504-264337407, default 264337407): [Enter]

Created a new partition 3 of type 'Linux' and of size 107.4 GiB.

Command (m for help): t
Partition number (1-3,5, default 5): 3
Hex code or alias (type L to list all): 8e

Changed type of partition 'Linux' to 'Linux LVM'.

Command (m for help): w
The partition table has been altered.
Syncing disks.
Then, restart the servers so that the new table is available (Master-Slave).
reboot
4.2.- Install VitalPBX 4.5
Install VitalPBX 4.5 on both servers. Let’s connect via SSH to each of them and run the following commands.
					apt install sudo
wget https://repo.vitalpbx.com/vitalpbx/v4.5/pbx_installer.sh
chmod +x pbx_installer.sh
./pbx_installer.sh
5.- HA Installation Steps
5.1.- Install Dependencies
Install dependencies on both servers (Master-Slave).
apt update && apt install -y drbd-utils pacemaker pcs corosync chrony rsync xfsprogs
5.2.- Using Script
We have two ways to configure the Cluster. Using the following Script or following this manual step by step. If you decide to use the following Script, the next step you should follow in this manual is 5 if you consider it necessary. Otherwise continue with step 4.6.
Now copy and run the following script in Master Server (Master).
					mkdir /usr/share/vitalpbx/ha
cd /usr/share/vitalpbx/ha
wget https://raw.githubusercontent.com/VitalPBX/vitalpbx45_drbd_ha/main/vpbxha.sh
chmod +x vpbxha.sh
./vpbxha.sh
Now we enter all the information requested.
					************************************************************
*  Welcome to the VitalPBX high availability installation  *
*                All options are mandatory                 *
************************************************************
IP Server1............... > 192.168.10.31
IP Server2............... > 192.168.10.32
Floating IP.............. > 192.168.10.30
Floating IP Mask (SIDR).. > 24
Disk (sdax).............. > sda3
hacluster password....... > MyPassword
************************************************************
*                   Check Information                      *
*        Make sure you have internet on both servers       *
************************************************************
Are you sure to continue with this settings? (yes,no) > yes
Note:
Before doing any high availability testing, make sure that the data has finished syncing. To do this, use the cat /proc/drbd command.
CONGRATULATIONS, you have installed high availability in VitalPBX 4
5.3.- Add Hostnames to /etc/hots
Server Master and Slave (Master-Slave).
nano /etc/hosts
					192.168.10.31 vitalpbx-master.local
192.168.10.32 vitalpbx-slave.local
5.4.- Format the partition
Now, we will proceed to format the new partition in both servers with the following command: (Master-Slave).
					mkdir /vpbx_data
mke2fs -j /dev/sda3
dd if=/dev/zero bs=1M count=500 of=/dev/sda3; sync
5.5.- Firewall
Configure the Firewall (Both Servers) (Master-Slave).
Port | Description |
TCP 2224 | Required on all nodes (needed by the pcsd Web UI and required for node-to-node communication) It is crucial to open port 2224 in such a way that pcs from any node can talk to all nodes in the cluster, including itself. When using the Booth cluster ticket manager or a quorum device you must open port 2224 on all related hosts, such as Booth arbiters or the quorum device host. |
TCP 3121 | Required on all nodes if the cluster has any Pacemaker Remote nodes Pacemaker’s crmd daemon on the full cluster nodes will contact the pacemaker_remoted daemon on Pacemaker Remote nodes at port 3121. If a separate interface is used for cluster communication, the port only needs to be open on that interface. At a minimum, the port should open on Pacemaker Remote nodes to full cluster nodes. Because users may convert a host between a full node and a remote node, or run a remote node inside a container using the host’s network, it can be useful to open the port to all nodes. It is not necessary to open the port to any hosts other than nodes. |
TCP 5403 | Required on the quorum device host when using a quorum device with corosync-qnetd. The default value can be changed with the -p option of the corosync-qnetd command. |
UDP 5404 | Required on corosync nodes if corosync is configured for multicast UDP. |
UDP 5405 | Required on all corosync nodes (needed by corosync) |
TCP 21064 | Required on all nodes if the cluster contains any resources requiring DLM (such as clvm or GFS2) |
TCP 9929, UDP 9929 | Required to be open on all cluster nodes and booth arbitrator nodes to connections from any of those same nodes when the Booth ticket manager is used to establish a multi-site cluster. |
TCP 7789 | Required by DRBD to synchronize information. |
Add in both Servers the Service and Rule with this Service.
Add the Service in ADMIN/Firewall/Services Add Service
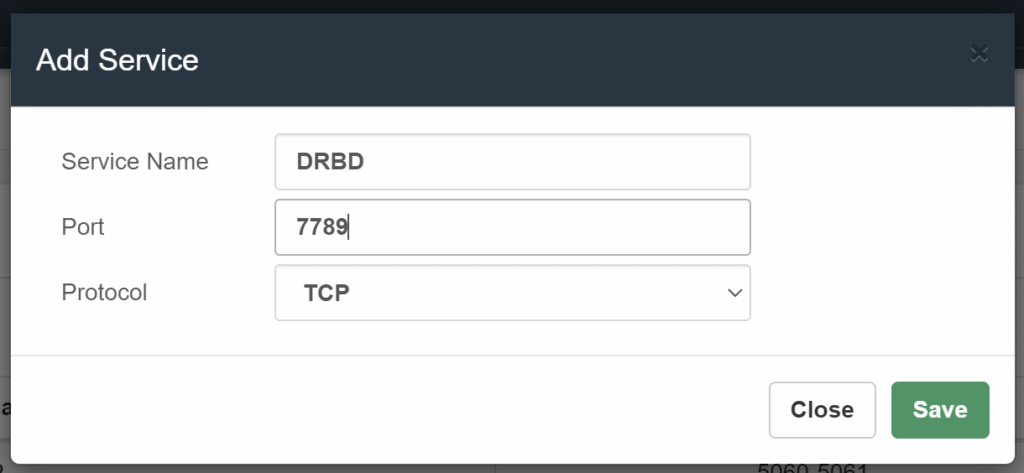
We add the Rule in /ADMIN/Firewall/Rules Add Rules
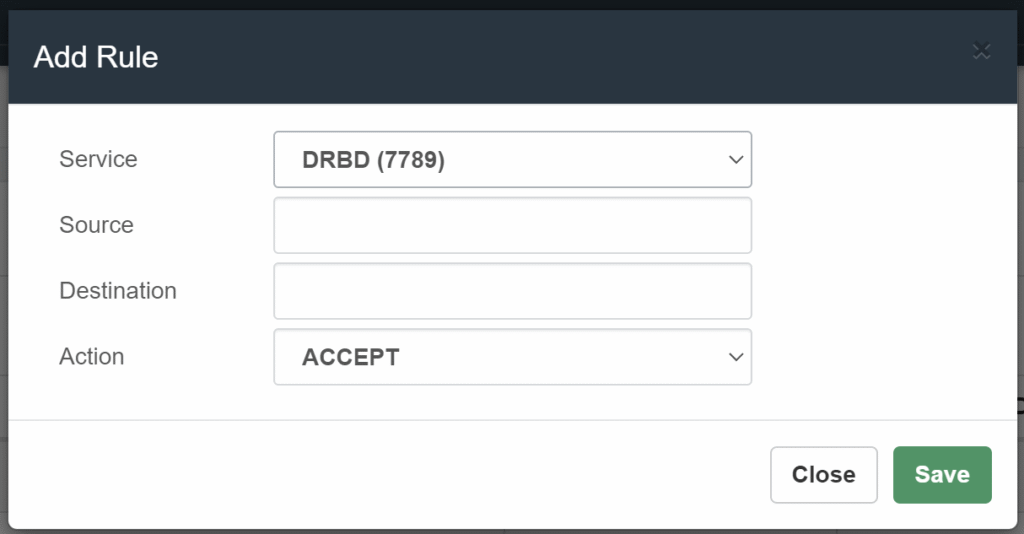
And we apply changes.
Do the same with all the listed ports.
5.6.- Configuring DRBD
Load the module and enable the service on both nodes, using the follow command: (Master-Slave).
					modprobe drbd
systemctl enable drbd.service
Create a new global_common.conf file on both nodes with the following contents: (Master-Slave).
					mv /etc/drbd.d/global_common.conf /etc/drbd.d/global_common.conf.orig
nano /etc/drbd.d/global_common.conf
					global {
  usage-count no;
}
  common {
net {
  protocol C;
  }
}
Next, we will need to create a new configuration file called /etc/drbd.d/drbd0.res for the new resource named drbd0, with the following contents: (Master-Slave).
nano /etc/drbd.d/drbd0.res
					resource drbd0 {
startup {
        wfc-timeout  5;
	outdated-wfc-timeout 3;
        degr-wfc-timeout 3;
	outdated-wfc-timeout 2;
}
syncer {
	rate 10M;
 	verify-alg md5;
}
net {
    after-sb-0pri discard-older-primary;
    after-sb-1pri discard-secondary;
    after-sb-2pri call-pri-lost-after-sb;
}
handlers {
    pri-lost-after-sb "/sbin/reboot";
}
on vitalpbx-master.local {
	device /dev/drbd0;
   	disk /dev/sda3;
   	address 192.168.10.31:7789;
	meta-disk internal;
}
on vitalpbx-slave.local {
	device /dev/drbd0;
   	disk /dev/sda3;
   	address 192.168.10.32:7789;
	meta-disk internal;
   	}
}
Note:
Although the access interfaces can be used, which in this case is ETH0. It is recommended to use an interface (ETH1) for synchronization, this interface must be directly connected between both servers.
Initialize the meta data storage on each nodes by executing the following command on both nodes (Master-Slave).
					drbdadm create-md drbd0
Writing meta data...
New drbd meta data block successfully created.
Let’s define the DRBD Primary node as first node “vitalpbx-master” (Master).
					drbdadm up drbd0
drbdadm primary drbd0 --force
On the Secondary node “vitalpbx-slave” run the following command to start the drbd0 (Slave).
drbdadm up drbd0
You can check the current status of the synchronization while it’s being performed. The cat /proc/drbd command displays the creation and synchronization progress of the resource.
5.6.1.- Formatting and Test DRBD Disk
In order to test the DRBD functionality we need to Create a file system, mount the volume and write some data on primary node “vitalpbx-master” and finally switch the primary node to “vitalpbx-slave”
Run the following command on the primary node to create an xfs filesystem on /dev/drbd0 and mount it to the mnt directory, using the following commands (Master).
					mkfs.xfs /dev/drbd0
mount /dev/drbd0 /vpbx_data
Create some data using the following command: (Master).
					touch /vpbx_data/file{1..5}
ls -l /vpbx_data
					-rw-r--r-- 1 root root 0 Nov 17 11:28 file1
-rw-r--r-- 1 root root 0 Nov 17 11:28 file2
-rw-r--r-- 1 root root 0 Nov 17 11:28 file3
-rw-r--r-- 1 root root 0 Nov 17 11:28 file4
-rw-r--r-- 1 root root 0 Nov 17 11:28 file5
Let’s now switch primary mode “vitalpbx-server” to second node “vitalpbx-slave” to check the data replication works or not.
First, we have to unmount the volume drbd0 on the first drbd cluster node “vitalpbx-master” and change the primary node to secondary node on the first drbd cluster node “vitalpbx-master” (Master).
					umount /vpbx_data
drbdadm secondary drbd0
Change the secondary node to primary node on the second drbd cluster node “vitalpbx-slave” (Slave).
					drbdadm up drbd0
drbdadm primary drbd0 --force
Mount the volume and check the data available or not (Slave).
					mount /dev/drbd0 /vpbx_data
ls -l  /vpbx_data
					-rw-r--r-- 1 root root 0 Nov 17 11:28 file1
-rw-r--r-- 1 root root 0 Nov 17 11:28 file2
-rw-r--r-- 1 root root 0 Nov 17 11:28 file3
-rw-r--r-- 1 root root 0 Nov 17 11:28 file4
-rw-r--r-- 1 root root 0 Nov 17 11:28 file5
Normalize Server-Slave (Slave).
					umount /vpbx_data
drbdadm secondary drbd0
Normalize Server-Master (Master).
					drbdadm primary drbd0
mount /dev/drbd0 /vpbx_data
5.7.- Configure Cluster
Create the password of the hacluster user on both nodes (Master-Slave).
echo hacluster:Mypassword | chpasswd
Start PCS on both servers (Master-Slave).
systemctl start pcsd
Configure the start of services on both nodes (Master-Slave).
					systemctl enable pcsd.service
systemctl enable corosync.service
systemctl enable pacemaker.service
Server Authenticate in Master
On vitalpbx-master, use pcs cluster auth to authenticate as the hacluster user (Master).
					pcs cluster destroy
pcs host auth vitalpbx-master.local vitalpbx-slave.local -u hacluster -p Mypassword
					vitalpbx-master.local: Authorized
vitalpbx-slave.local: Authorized
Next, use pcs cluster setup on the vitalpbx-master to generate and synchronize the corosync configuration (Master).
pcs cluster setup cluster_vitalpbx vitalpbx-master.local vitalpbx-slave.local --force
Starting Cluster in Master (Master).
					pcs cluster start --all
pcs cluster enable --all
pcs property set stonith-enabled=false
pcs property set no-quorum-policy=ignore
Prevent Resources from Moving after Recovery
In most circumstances, it is highly desirable to prevent healthy resources from being moved around the cluster. Moving resources almost always requires a period of downtime. For complex services such as databases, this period can be quite long (Master).
pcs resource defaults update resource-stickiness=INFINITY
Create resource for the use of Floating IP (Master).
					pcs resource create ClusterIP ocf:heartbeat:IPaddr2 ip=192.168.10.30 cidr_netmask=24 op monitor interval=30s on-fail=restart
pcs cluster cib drbd_cfg
pcs cluster cib-push drbd_cfg --config
Create resource for the use of DRBD (Master).
					pcs cluster cib drbd_cfg
pcs -f drbd_cfg resource create DrbdData ocf:linbit:drbd drbd_resource=drbd0 op monitor interval=60s
pcs -f drbd_cfg resource promotable DrbdData promoted-max=1 promoted-node-max=1 clone-max=2 clone-node-max=1 notify=true
pcs cluster cib fs_cfg
pcs cluster cib-push drbd_cfg --config
Create FILESYSTEM resource for the automated mount point (Master).
					pcs cluster cib fs_cfg
pcs -f fs_cfg resource create DrbdFS Filesystem device="/dev/drbd0" directory="/vpbx_data" fstype="xfs"
pcs -f fs_cfg constraint colocation add DrbdFS with DrbdData-clone INFINITY with-rsc-role=Master
pcs -f fs_cfg constraint order promote DrbdData-clone then start DrbdFS
pcs -f fs_cfg constraint colocation add DrbdFS with ClusterIP INFINITY
pcs -f fs_cfg constraint order DrbdData-clone then DrbdFS
pcs cluster cib-push fs_cfg --config
Stop and disable all services in both servers (Master-Salve).
					systemctl stop mariadb
systemctl disable mariadb
systemctl stop fail2ban
systemctl disable fail2ban
systemctl stop asterisk
systemctl disable asterisk
systemctl stop vpbx-monitor
systemctl disable vpbx-monitor
Create resource for the use of MariaDB in Master (Master).
					mkdir /vpbx_data/mysql
mkdir /vpbx_data/mysql/data
cp -aR /var/lib/mysql/* /vpbx_data/mysql/data
chown -R mysql:mysql /vpbx_data/mysql
sed -i 's/var\/lib\/mysql/vpbx_data\/mysql\/data/g' /etc/mysql/mariadb.conf.d/50-server.cnf
pcs resource create mysql service:mariadb op monitor interval=30s
pcs cluster cib fs_cfg
pcs cluster cib-push fs_cfg --config
pcs -f fs_cfg constraint colocation add mysql with ClusterIP INFINITY
pcs -f fs_cfg constraint order DrbdFS then mysql
pcs cluster cib-push fs_cfg --config
Change 50-server.cnf in Slave (Slave).
sed -i 's/var\/lib\/mysql/vpbx_data\/mysql\/data/g' /etc/mysql/mariadb.conf.d/50-server.cnf
Path Asterisk service in both servers (Master-Slave).
					sed -i 's/RestartSec=10/RestartSec=1/g'  /usr/lib/systemd/system/asterisk.service
sed -i 's/Wants=mariadb.service/#Wants=mariadb.service/g'  /usr/lib/systemd/system/asterisk.service
sed -i 's/After=mariadb.service/#After=mariadb.service/g'  /usr/lib/systemd/system/asterisk.service
Create resource for Asterisk (Master).
					pcs resource create asterisk service:asterisk op monitor interval=30s
pcs cluster cib fs_cfg
pcs cluster cib-push fs_cfg --config
pcs -f fs_cfg constraint colocation add asterisk with ClusterIP INFINITY
pcs -f fs_cfg constraint order mysql then asterisk
pcs cluster cib-push fs_cfg --config
pcs resource update asterisk op stop timeout=120s
pcs resource update asterisk op start timeout=120s
pcs resource update asterisk op restart timeout=120s
Copy folders and files the DRBD partition on the Master (Master).
					tar -zcvf var-asterisk.tgz /var/log/asterisk
tar -zcvf var-lib-asterisk.tgz /var/lib/asterisk
tar -zcvf var-lib-vitalpbx.tgz /var/lib/vitalpbx
tar -zcvf etc-vitalpbx.tgz /etc/vitalpbx
tar -zcvf usr-lib-asterisk.tgz /usr/lib/asterisk
tar -zcvf var-spool-asterisk.tgz /var/spool/asterisk
tar -zcvf etc-asterisk.tgz /etc/asterisk

tar xvfz var-asterisk.tgz -C /vpbx_data
tar xvfz var-lib-asterisk.tgz -C /vpbx_data
tar xvfz var-lib-vitalpbx.tgz -C /vpbx_data
tar xvfz etc-vitalpbx.tgz -C /vpbx_data
tar xvfz usr-lib-asterisk.tgz -C /vpbx_data
tar xvfz var-spool-asterisk.tgz -C /vpbx_data
tar xvfz etc-asterisk.tgz -C /vpbx_data
chmod -R 775 /vpbx_data/var/log/asterisk

rm -rf /var/log/asterisk
rm -rf /var/lib/asterisk
rm -rf /var/lib/vitalpbx
rm -rf /etc/vitalpbx
rm -rf /usr/lib/asterisk
rm -rf /var/spool/asterisk
rm -rf /etc/asterisk

ln -s /vpbx_data/var/log/asterisk /var/log/asterisk
ln -s /vpbx_data/var/lib/asterisk /var/lib/asterisk
ln -s /vpbx_data/var/lib/vitalpbx /var/lib/vitalpbx
ln -s /vpbx_data/etc/vitalpbx /etc/vitalpbx
ln -s /vpbx_data/usr/lib/asterisk /usr/lib/asterisk
ln -s /vpbx_data/var/spool/asterisk /var/spool/asterisk
ln -s /vpbx_data/etc/asterisk /etc/asterisk

rm -rf var-asterisk.tgz
rm -rf var-lib-asterisk.tgz
rm -rf var-lib-vitalpbx.tgz
rm -rf etc-vitalpbx.tgz
rm -rf usr-lib-asterisk.tgz
rm -rf var-spool-asterisk.tgz
rm -rf etc-asterisk.tgz
Configure symbolic links on the Slave (Slave).
					rm -rf /var/log/asterisk
rm -rf /var/lib/asterisk
rm -rf /var/lib/vitalpbx
rm -rf /etc/vitalpbx
rm -rf /usr/lib/asterisk
rm -rf /var/spool/asterisk
rm -rf /etc/asterisk

ln -s /vpbx_data/var/log/asterisk /var/log/asterisk
ln -s /vpbx_data/var/lib/asterisk /var/lib/asterisk
ln -s /vpbx_data/var/lib/vitalpbx /var/lib/vitalpbx
ln -s /vpbx_data/etc/vitalpbx /etc/vitalpbx
ln -s /vpbx_data/usr/lib/asterisk /usr/lib/asterisk
ln -s /vpbx_data/var/spool/asterisk /var/spool/asterisk
ln -s /vpbx_data/etc/asterisk /etc/asterisk
Create VitalPBX Service (Master).
					pcs resource create vpbx-monitor service:vpbx-monitor op monitor interval=30s
pcs cluster cib fs_cfg
pcs cluster cib-push fs_cfg --config
pcs -f fs_cfg constraint colocation add vpbx-monitor with ClusterIP INFINITY
pcs -f fs_cfg constraint order asterisk then vpbx-monitor
pcs cluster cib-push fs_cfg --config
Create fail2ban Service (Master).
					pcs resource create fail2ban service:fail2ban op monitor interval=30s
pcs cluster cib fs_cfg
pcs cluster cib-push fs_cfg --config
pcs -f fs_cfg constraint colocation add fail2ban with ClusterIP INFINITY
pcs -f fs_cfg constraint order asterisk then fail2ban
pcs cluster cib-push fs_cfg --config
Note:
All configuration is stored in the file: /var/lib/pacemaker/cib/cib.xml
Show the Cluster Status (Master).
pcs status resources
					  * ClusterIP  (ocf::heartbeat:IPaddr2):        Started vitalpbx-master.local
  * Clone Set: DrbdData-clone [DrbdData] (promotable):
    * Masters: [ vitalpbx-master.local ]
    * Slaves: [ vitalpbx-slave.local ]
  * DrbdFS      (ocf::heartbeat:Filesystem):     Started vitalpbx-master.local
  * mysql       (ocf::heartbeat:mysql):  Started vitalpbx-master.local
  * asterisk    (service:asterisk):      Started vitalpbx-master.local
  * vpbx-monitor        (service:vpbx-monitor):  Started vitalpbx-master.local
  * fail2ban    (service:fail2ban):      Started vitalpbx-master.local
Note: Before doing any high availability testing, make sure that the data has finished syncing. To do this, use the cat /proc/drbd command.
cat /proc/drbd
					version: 8.4.11 (api:1/proto:86-101)
srcversion: 96ED19D4C144624490A9AB1
 0: cs:Connected ro:Primary/Secondary ds:UpToDate/UpToDate C r-----
    ns:12909588 nr:2060 dw:112959664 dr:12655881 al:453 bm:0 lo:0 pe:0 ua:0 ap:0 ep:1 wo:f oos:0
5.8.- Bind Address
Managing the bind address also is critical if you use multple IP addresses on the same NIC [as, for example, when using a floating IP address in an HA cluster]. In that circumstance, asterisk has a rather nasty habit of listening for SIP/IAX on the virtual IP address but replying on the base address of the NIC causing phones/trunks to fail to register.
In the Master server go to SETTINGS/PJSIP Settings and configure the Floating IP that we are going to use in “Bind” and “TLS Bind”.
Also do it in SETTINGS/SIP Settings Tab NETWORK fields “TCP Bind Address” and “TLS Bind Address”.

5.9.- Create “bascul” command in both servers
The bascul command permanently moves services from one server to another. If you want to return the services to the main server you must execute the command again. (Master-Slave).
Download file
wget https://raw.githubusercontent.com/VitalPBX/vitalpbx45_drbd_ha/main/bascul
Or create file
nano /usr/local/bin/bascul
Paste
					#!/bin/bash
# VitalPBX LLC - HA Role Switch Script
# Date: 2025-06-25
# License: Proprietary

set -e

progress_bar() {
    local duration=$1
    for ((elapsed = 1; elapsed <= duration; elapsed++)); do
        printf "\r["
        for ((i = 0; i < elapsed; i++)); do printf "#"; done
        for ((i = elapsed; i < duration; i++)); do printf " "; done
        printf "] %d%%" $((elapsed * 100 / duration))
        sleep 1
    done
    printf "\n"
}

# Extract promoted and stopped node from pcs status
host_master=$(pcs status | grep "Promoted:" | awk -F'[][]' '{print $2}' | xargs)
host_standby=$(pcs status | grep " Unpromoted:" | awk -F'[][]' '{print $2}' | xargs)

# Validate
if [[ -z "$host_master" || -z "$host_standby" ]]; then
    echo -e "\e[41m Error: Could not detect cluster nodes from DRBD status. \e[0m"
    exit 1
fi

# Confirm switch
echo -e "************************************************************"
echo -e "*     Change the roles of servers in high availability     *"
echo -e "* \e[41m WARNING: All current calls will be dropped!         \e[0m *"
echo -e "************************************************************"
read -p "Are you sure to switch from $host_master to $host_standby? (yes/no): " confirm

if [[ "$confirm" != "yes" ]]; then
    echo "Aborted by user. No changes applied."
    exit 0
fi

# Ensure both nodes are not in standby
pcs node unstandby "$host_master" || true
pcs node unstandby "$host_standby" || true

# Clear previous constraints if exist
pcs resource clear DrbdData-clone || true
pcs resource clear ClusterIP || true

# Put current master into standby
echo "Putting $host_master into standby..."
pcs node standby "$host_master"

# Wait for switchover
echo "Waiting for cluster to promote $host_standby..."
progress_bar 10

# Sets the one that remains in Standby to Unpromoted to prevent it from remaining in the Stopped state
echo "Putting $host_master into unstandby..."
pcs node unstandby "$host_master"

# Display final status
echo -e "\n\033[1;32mSwitch complete. Current cluster status:\033[0m"
sleep 5
role

exit 0
Add permissions and move to folder /usr/local/bin
chmod +x /usr/local/bin/bascul
5.10.- Create “role” command in both servers
Download file
wget https://raw.githubusercontent.com/VitalPBX/vitalpbx45_drbd_ha/main/role
Or create file
nano /usr/local/bin/role
Paste
					#!/bin/bash
# This code is the property of VitalPBX LLC Company
# License: Proprietary
# Date: 8-Agu-2023
# Show the Role of Server.
#Bash Colour Codes
green="\033[00;32m"
yellow="\033[00;33m"
txtrst="\033[00;0m"
linux_ver=`cat /etc/os-release | grep -e PRETTY_NAME | awk -F '=' '{print $2}' | xargs`
vpbx_version=`aptitude versions vitalpbx | awk '{ print $2 }'`
server_master=`pcs status resources | awk 'NR==1 {print $5}'`
host=`hostname`
if [[ "${server_master}" = "${host}" ]]; then
        server_mode="Master"
else
        server_mode="Standby"
fi
logo='
 _    _ _           _ ______ ______ _    _
| |  | (_)_        | (_____ (____  \ \  / /
| |  | |_| |_  ____| |_____) )___)  ) \/ /
 \ \/ /| |  _)/ _  | |  ____/  __  ( )  (
  \  / | | |_( ( | | | |    | |__)  ) /\ \\
   \/  |_|\___)_||_|_|_|    |______/_/  \_\\
'
echo -e "
${green}
${logo}
${txtrst}
 Role           : $server_mode
 Version        : ${vpbx_version//[[:space:]]}
 Asterisk       : `asterisk -rx "core show version" 2>/dev/null| grep -ohe 'Asterisk [0-9.]*'`
 Linux Version  : ${linux_ver}
 Welcome to     : `hostname`
 Uptime         : `uptime | grep -ohe 'up .*' | sed 's/up //g' | awk -F "," '{print $1}'`
 Load           : `uptime | grep -ohe 'load average[s:][: ].*' | awk '{ print "Last Minute: " $3" Last 5 Minutes: "$4" Last 15 Minutes "$5 }'`
 Users          : `uptime | grep -ohe '[0-9.*] user[s,]'`
 IP Address     : ${green}`ip addr | sed -En 's/127.0.0.1//;s/.*inet (addr:)?(([0-9]*\.){3}[0-9]*).*/\2/p' | xargs `${txtrst}
 Clock          :`timedatectl | sed -n '/Local time/ s/^[ \t]*Local time:\(.*$\)/\1/p'`
 NTP Sync.      :`timedatectl |awk -F: '/NTP service/ {print $2}'`
"
echo -e ""
echo -e "************************************************************"
if [[ "${server_mode}" = "Master" ]]; then
echo -e "*                Server Status: ${green}$server_mode${txtrst}                     *"
else
echo -e "*                Server Status: ${yellow}$server_mode${txtrst}                     *"
fi
echo -e "************************************************************"
pcs status resources
echo -e "************************************************************"
echo -e ""
echo -e "Servers Status"
pcs status pcsd
Add permissions and copy to folder /etc/profile.d/
					cp -rf role /etc/profile.d/vitalwelcome.sh
chmod 755 /etc/profile.d/vitalwelcome.sh
Now add permissions and move to folder /usr/local/bin
chmod +x /usr/local/bin/role
6.- Add New Services
6.1.- Add Sonata Switchboard
To install Sonata Switchboard make sure vitalpbx-master.local is set to Master. And follow the procedure below (Master).
1.- From your browser, go to ip 192.168.10.30
2.- Install Sonata Switchboard and execute the Wizard.
3.- Copy the files that are going to be in the replica.
					tar -zcvf switchboard-settings.tgz /etc/switchboard/settings.conf
tar xvfz switchboard-settings.tgz -C /vpbx_data/
rm -rf /etc/switchboard/settings.conf
ln -s /vpbx_data/etc/switchboard/settings.conf  /etc/switchboard/settings.conf
rm -rf switchboard-settings.tgz
4.- Execute the following command in Master console
bascul
5.- From your browser, go to ip 192.168.10.30 again
6.- Install Sonata Switchboard
7.- Create the virtual link from the settings.conf file (Slave).
					rm -rf /etc/switchboard/settings.conf
ln -s /vpbx_data/etc/switchboard/settings.conf  /etc/switchboard/settings.conf
8.- Execute the following command in Master console (Master).
bascul
6.2.- Add Sonata Recording
To install Sonata Recording make sure vitalpbx-master.local is set to Master. And follow the procedure below (Master).
1.- From your browser, go to ip 192.168.10.30
2.- Install Sonata Recording and execute the Wizard.
3.- Copy the files that are going to be in the replica.
					tar -zcvf recording-settings.tgz /etc/rec-manager/settings.conf
tar xvfz recording-settings.tgz -C /vpbx_data/
rm -rf /etc/rec-manager/settings.conf
ln -s /vpbx_data/etc/rec-manager/settings.conf  /etc/rec-manager/settings.conf
rm -rf recording-settings.tgz
4.- Execute the following command in Master console
bascul
5.- From your browser, go to ip 192.168.10.30 again
6.- Install Sonata Recording
7.- Create the virtual link from the settings.conf file (Slave).
					rm -rf /etc/rec-manager/settings.conf
ln -s /vpbx_data/etc/rec-manager/settings.conf  /etc/rec-manager/settings.conf
8.- Execute the following command in Master console (Master).
bascul
9.- Disabled and stop sonata recording service (Master-Slave).
					systemctl stop recordings
systemctl disable recordings
10.- We added the Sonata Recordings automation service (Master).
					pcs resource create sonata-recordings service:recordings op monitor interval=30s
pcs cluster cib fs_cfg
pcs cluster cib-push fs_cfg --config
pcs -f fs_cfg constraint colocation add sonata-recordings with ClusterIP INFINITY
pcs -f fs_cfg constraint order vpbx-monitor then sonata-recordings
pcs cluster cib-push fs_cfg --config
6.3.- Add Sonata Billing
To install Sonata Billing make sure vitalpbx-master.local is set to Master. And follow the procedure below (Master).
1.- From your browser, go to ip 192.168.10.30
2.- Install Sonata Billing and execute the Wizard.
3.- Copy the files that are going to be in the replica.
					tar -zcvf billing-settings.tgz /etc/billing/settings.conf
tar xvfz billing-settings.tgz -C /vpbx_data/
rm -rf /etc/billing/settings.conf
ln -s /vpbx_data/etc/billing/settings.conf  /etc/billing/settings.conf
rm -rf billing-settings.tgz
4.- Execute the following command in Master console
bascul
5.- From your browser, go to ip 192.168.10.30 again
6.- Install Sonata Billing
7.- Create the virtual link from the settings.conf file (Slave).
					rm -rf /etc/billing/settings.conf
ln -s /vpbx_data/etc/billing/settings.conf  /etc/billing/settings.conf
8.- Execute the following command in Master console (Master).
bascul
6.4.- Add Sonata Stats
To install Sonata Stats make sure vitalpbx-master.local is set to Master. And follow the procedure below (Master).
1.- From your browser, go to ip 192.168.10.30
2.- Install Sonata Stats and execute the Wizard.
3.- Copy the files that are going to be in the replica.
					tar -zcvf stats-env.tgz /usr/share/queues-stats/backend/.env
tar -zcvf stats-wizard.tgz /var/lib/sonata/stats/wizard.conf
tar xvfz stats-env.tgz -C /vpbx_data/
tar xvfz stats-wizard.tgz -C /vpbx_data/
rm -rf /usr/share/queues-stats/backend/.env
ln -s /vpbx_data/usr/share/queues-stats/backend/.env  /usr/share/queues-stats/backend/.env
rm -rf /var/lib/sonata/stats/wizard.conf
ln -s /vpbx_data/var/lib/sonata/stats/wizard.conf  /var/lib/sonata/stats/wizard.conf
rm -rf stats-env.tgz
rm -rf stats-wizard.tgz
4.- Execute the following command in Master console
bascul
5.- From your browser, go to ip 192.168.10.30 again
6.- Create the virtual link from the .env file (Slave).
					rm -rf /usr/share/queues-stats/backend/.env
ln -s /vpbx_data/usr/share/queues-stats/backend/.env /usr/share/queues-stats/backend/.env
rm -rf /var/lib/sonata/stats/wizard.conf
ln -s /vpbx_data/var/lib/sonata/stats/wizard.conf  /var/lib/sonata/stats/wizard.conf
cd /usr/share/queues-stats/backend/
php artisan config:cache && php artisan route:cache && php artisan view:cache
7.- Execute the following command in Master console (Master).
bascul
8.- Disabled and stop sonata stats services (Master-Slave).
					systemctl stop sonata-stats
systemctl disable sonata-stats
9.- We added the Sonata Stats automation service (Master).
					pcs resource create sonata-stats service:sonata-stats op monitor interval=30s
pcs cluster cib fs_cfg
pcs cluster cib-push fs_cfg --config
pcs -f fs_cfg constraint colocation add sonata-stats with ClusterIP INFINITY
pcs -f fs_cfg constraint order vpbx-monitor then sonata-stats
pcs cluster cib-push fs_cfg --config
6.5.- Add Sonata Dialer
To install Sonata Dialer make sure vitalpbx-master.local is set to Master. And follow the procedure below (Master).
1.- From your browser, go to ip 192.168.10.30
2.- Install Sonata Dialer and execute the Wizard.
3.- Copy the files that are going to be in the replica.
					tar -zcvf dialer-env.tgz /usr/share/dialer/backend/.env
tar -zcvf dialer-wizard.tgz /var/lib/sonata/dialer/wizard.conf
tar xvfz dialer-env.tgz -C /vpbx_data/
tar xvfz dialer-wizard.tgz -C /vpbx_data/
rm -rf /usr/share/dialer/backend/.env
ln -s /vpbx_data/usr/share/dialer/backend/.env  /usr/share/dialer/backend/.env
rm -rf /var/lib/sonata/dialer/wizard.conf
ln -s /vpbx_data/var/lib/sonata/dialer/wizard.conf  /var/lib/sonata/dialer/wizard.conf
rm -rf dialer-env.tgz
4.- Execute the following command in Master console
bascul
5.- From your browser, go to ip 192.168.10.30 again
6.- Create the virtual link from the .env file (Slave).
					rm -rf /usr/share/dialer/backend/.env
ln -s /vpbx_data/usr/share/dialer/backend/.env /usr/share/dialer/backend/.env
rm -rf /var/lib/sonata/dialer/wizard.conf
ln -s /vpbx_data/var/lib/sonata/dialer/wizard.conf  /var/lib/sonata/dialer/wizard.conf
cd /usr/share/dialer/backend/
php artisan config:cache && php artisan route:cache && php artisan view:cache
7.- Disabled and stop sonata dialer service (Master-Slave).
					systemctl stop sonata-dialer
systemctl disable sonata-dialer
8.- We added the Sonata Dialer automation service (Master).
					pcs resource create sonata-dialer service:sonata-dialer op monitor interval=30s
pcs cluster cib fs_cfg
pcs cluster cib-push fs_cfg --config
pcs -f fs_cfg constraint colocation add sonata-dialer with ClusterIP INFINITY
pcs -f fs_cfg constraint order vpbx-monitor then sonata-dialer
pcs cluster cib-push fs_cfg --config
6.6.- Add VitXi
To install VitXi make sure vitalpbx-master.local is set to Master. And follow the procedure below.
1.- From your browser, go to ip 192.168.10.30 (Master).
2.- Install VitXi and execute the Wizard.
3.- Copy the files that are going to be in the replica.
					tar -zcvf vitxi-env.tgz /usr/share/vitxi/backend/.env
tar -zcvf vitxi-storage.tgz /usr/share/vitxi/backend/storage
tar -zcvf vitxi-wizard.tgz /var/lib/vitxi/wizard.conf
tar xvfz vitxi-env.tgz -C /vpbx_data/
tar xvfz vitxi-storage.tgz -C /vpbx_data/
tar xvfz vitxi-wizard.tgz -C /vpbx_data/

rm -rf /usr/share/vitxi/backend/.env
rm -rf /usr/share/vitxi/backend/storage
rm -rf /var/lib/vitxi/wizard.conf

ln -s /vpbx_data/usr/share/vitxi/backend/.env /usr/share/vitxi/backend/.env
ln -s /vpbx_data/usr/share/vitxi/backend/storage  /usr/share/vitxi/backend/storage
ln -s /vpbx_data/var/lib/vitxi/wizard.conf  /var/lib/vitxi/wizard.conf

rm -rf vitxi-env.tgz
rm -rf vitxi-storage.tgz
rm -rf vitxi-wizard.tgz
4.- Execute the following command in Master console (Master).
bascul
5.- From your browser, go to ip 192.168.10.30 again
6.- Install VitXi
7.- Create the virtual link from the .env file (Slave).
					rm -rf /usr/share/vitxi/backend/.env
ln -s /vpbx_data/usr/share/vitxi/backend/.env /usr/share/vitxi/backend/.env
rm -rf /var/lib/vitxi/wizard.conf
ln -s /vpbx_data/var/lib/vitxi/wizard.conf  /var/lib/vitxi/wizard.conf
rm -rf /usr/share/vitxi/backend/storage
ln -s /vpbx_data/usr/share/vitxi/backend/storage  /usr/share/vitxi/backend/storage

cd /usr/share/vitxi/backend/
php artisan config:cache && php artisan route:cache && php artisan view:cache
8.- Execute the following command in Master console (Master).
bascul
9.- Disabled and stop vitxi service (Master-Slave).
					systemctl stop vitxi
systemctl disable vitxi
10.- We added the VitXi automation service (Master).
					pcs resource create vitxi service:vitxi op monitor interval=30s
pcs cluster cib fs_cfg
pcs cluster cib-push fs_cfg --config
pcs -f fs_cfg constraint colocation add vitxi with ClusterIP INFINITY
pcs -f fs_cfg constraint order vpbx-monitor then vitxi
pcs cluster cib-push fs_cfg --config
6.7.- Add OpenVPN
To install OpenVPN make sure vitalpbx-master.local is set to Master. And follow the procedure below.
1.- From your browser, go to ip 192.168.10.30 (Master).
2.- Install OpenVPN
3.- Copy the files that are going to be in the replica.
					tar -zcvf etc-openvpn.tgz /etc/openvpn
tar xvfz etc-openvpn.tgz -C /vpbx_data/
rm -rf /etc/openvpn
ln -s /vpbx_data/etc/openvpn /etc/openvpn
rm -rf etc-openvpn.tgz
4.- Execute the following command in Master console (Master).
bascul
5.- From your browser, go to ip 192.168.10.30 again
6.- Install OpenVPN
7.- Execute the following command in Master console (Master).
bascul
8.- Create the virtual link from OpenVPN path (Slave).
					rm -rf /etc/openvpn
ln -s /vpbx_data/etc/openvpn /etc/openvpn
9.- Disable and stop openvpn service (Master-Slave).
					systemctl stop openvpn
systemctl disable openvpn
10.- We added the OpenVPN automation service (Master).
					pcs resource create openvpn service:openvpn op monitor interval=30s
pcs cluster cib fs_cfg
pcs cluster cib-push fs_cfg --config
pcs -f fs_cfg constraint colocation add openvpn with ClusterIP INFINITY
pcs -f fs_cfg constraint order vpbx-monitor then openvpn
pcs cluster cib-push fs_cfg --config
6.8.- Add Maintenance
To install Maintenance make sure vitalpbx-master.local is set to Master. And follow the procedure below (Master).
1.- From your browser, go to ip 192.168.10.30
2.- Install Maintenance module.
3.- Execute the following command in Master console
bascul
4.- From your browser, go to ip 192.168.10.30 again
5.- Install Maintenance module.
6.- Execute the following command in Master console
bascul
7.- Because the maintenance cron file is copied to a shared folder (/etc/cron.d/vpbx_maintenace) that has other system cron services active, we recommend first creating the maintenance on the master server and then bascul and create the same maintenance on the slave server.
Because the databases are synchronized, it is only necessary to go to ADMIN/Tools/Maintenance and press Save and Apply Changes
7.- Test
To execute the process of changing the role, we recommend using the following command:
					root@vitalpbx-master-slave:~# bascul
************************************************************
*     Change the roles of servers in high availability     *
* WARNING-WARNING-WARNING-WARNING-WARNING-WARNING-WARNING  *
*All calls in progress will be lost and the system will be *
*     be in an unavailable state for a few seconds.        *
************************************************************
Are you sure to switch from vitalpbx-master.local to vitalpbx-slave.local? (yes,no) >
This action convert the vitalpbx-master.local to Slave and vitalpbx-slave.local to Master. If you want to return to default do the same again.
If you want to know the current state of High Availability from a phone, please create the following context.
					root@vitalpbx-master:~# nano /etc/asterisk/vitalpbx/extensions__61-ha-test.conf
[cos-all](+)
exten => *777,1,NoOp(Say Asterisk IP Address)
 same => n,Answer()
 same => n,Set(ASTERISK_IP=${SHELL(/usr/bin/hostname -I | awk -F " " '{print $1}')})
 same => n,NoOp(IP Address: ${ASTERISK_IP})
 same => n,SayDigits(${CUT(ASTERISK_IP,.,1)})
 same => n,Playback(letters/dot)
 same => n,SayDigits(${CUT(ASTERISK_IP,.,2)})
 same => n,Playback(letters/dot)
 same => n,SayDigits(${CUT(ASTERISK_IP,.,3)})
 same => n,Playback(letters/dot)
 same => n,SayDigits(${CUT(ASTERISK_IP,.,4)})
 same => n,PlayBack(silence/1&vm-goodbye)
 same => n,Hangup()
Now for the context to be used we must restart the Asterisk dial plan.
root@vitalpbx-master:~# asterisk -rx"dialplan reload"
To try just dial *777
Warning Note ⚠
When you must turn off the servers, when you turn it on always try to start with the Master, wait for the Master to start and then turn on the Slave.
8.- Update VitalPBX or Add-Ons
To update VitalPBX to the latest version just follow the following steps:
1.- From your browser, go to ip 192.168.10.30
2.- Update VitalPBX from the interface
3.- Execute the following command in Master console (Master).
bascul
4.- From your browser, go to ip 192.168.10.30 again
5.- Update VitalPBX from the interface
6.- Execute the following command in Master console (Master).
bascul
CONGRATULATIONS, you have installed and tested the high availability in VitalPBX
9.- Changing one of the Servers
Sometimes it is necessary to change one of the servers either because it is damaged or because of some hardware modification.
For this it is necessary to follow the following procedure.
9.1.- Changing the secondary Server
The method to change the secondary server differs a bit from the primary server method, here are the steps to change the secondary server (Master).
First we proceed to destroy the cluster in master-vitalpbx.local
					pcs cluster stop
pcs cluster destroy
systemctl disable pcsd.service
systemctl disable corosync.service
systemctl disable pacemaker.service
systemctl stop pcsd.service
systemctl stop corosync.service
systemctl stop pacemaker.service
Now, if we still have access to vitalpbx-slave.local, we proceed to destroy the cluster as well (Slave).
					pcs cluster stop --force
pcs cluster destroy
systemctl disable pcsd.service
systemctl disable corosync.service
systemctl disable pacemaker.service
systemctl stop pcsd.service
systemctl stop corosync.service
systemctl stop pacemaker.service
Because when destroying the Cluster the DRBD unit is unmounted, in vitalpbx-master.local we must mount it again manually to avoid interrupting the normal operation of our services (Master).
					drbdadm up drbd0
drbdadm primary drbd0 --force
mount /dev/drbd0 /vpbx_data
Now enable the services to make sure our server continues to function normally (Master).
					systemctl enable asterisk
systemctl restart asterisk
systemctl enable mariadb
systemctl restart mariadb
systemctl enable fail2ban
systemctl restart fail2ban
systemctl enable vpbx-monitor
root@vitalpbx-master:~# systemctl restart vpbx-monitor
Our vitalpbx-master.local server is now working normally. Now we proceed to configure the replica with our new server.
First we prepare our new server following the steps in section 3, 4.1, 4.2, 4.3, 4.4, 4.6. It should only be configured in vitalpbx-slave.local.
Now, we will proceed to format the new partition on vitalpbx-slave.local with the following command: (Slave).
					mkdir /vpbx_data
mke2fs -j /dev/sda3
dd if=/dev/zero bs=1M count=500 of=/dev/sda3; sync
Load the module and enable the service on vitalpbx-slave.local, using the follow command: (Slave).
					modprobe drbd
systemctl enable drbd.service
Create a new global_common.conf file on vitalpbx-slave.local with the following contents: (Slave).
					mv /etc/drbd.d/global_common.conf /etc/drbd.d/global_common.conf.orig
nano /etc/drbd.d/global_common.conf
					global {
  usage-count no;
}
  common {
net {
  protocol C;
  }
}
Next, we will need to create on vitalpbx-slave.local a new configuration file called /etc/drbd.d/drbd0.res for the new resource named drbd0, with the following contents: (Slave).
nano /etc/drbd.d/drbd0.res
					resource drbd0 {
startup {
        wfc-timeout  5;
	outdated-wfc-timeout 3;
        degr-wfc-timeout 3;
	outdated-wfc-timeout 2;
}
syncer {
	rate 10M;
 	verify-alg md5;
}
net {
    after-sb-0pri discard-older-primary;
    after-sb-1pri discard-secondary;
    after-sb-2pri call-pri-lost-after-sb;
}
handlers {
    pri-lost-after-sb "/sbin/reboot";
}
on vitalpbx-master.local {
	device /dev/drbd0;
   	disk /dev/$disk;
   	address 192.168.10.31:7789;
	meta-disk internal;
}
on vitalpbx-slave.local {
	device /dev/drbd0;
   	disk /dev/$disk;
   	address 192.168.10.32:7789;
	meta-disk internal;
   	}
}
Although the access interfaces can be used, which in this case is ETH0. It is recommended to use an interface (ETH1) for synchronization, this interface must be directly connected between both servers.
Initialize the meta data storage on each nodes by executing the following command on vitalpbx-slave.local. (Slave).
					drbdadm create-md drbd0
Writing meta data...
New drbd meta data block successfully created.
On the vitalpbx-slave.local run the following command to start the drbd0(Slave).
drbdadm up drbd0
You can check the current status of the synchronization while it’s being performed. The cat /proc/drbd command displays the creation and synchronization progress of the resource.
Now follow steps 4.9, 4.11, 4.12, 4.13.
CONGRATULATIONS, you have updated the high availability in VitalPBX
9.2.- Changing the primary Server
The method to change the primary server differs a bit from the secundary server method, here are the steps to change the primary server (Master).
First we proceed to destroy the cluster in master-vitalpbx.local
					pcs cluster stop
pcs cluster destroy
systemctl disable pcsd.service
systemctl disable corosync.service
systemctl disable pacemaker.service
systemctl stop pcsd.service
systemctl stop corosync.service
systemctl stop pacemaker.service
Now, if we still have access to vitalpbx-slave.local, we proceed to destroy the cluster as well (Slave).
					pcs cluster stop --force
pcs cluster destroy
systemctl disable pcsd.service
systemctl disable corosync.service
systemctl disable pacemaker.service
systemctl stop pcsd.service
systemctl stop corosync.service
systemctl stop pacemaker.service
Because when destroying the Cluster the DRBD unit is unmounted, in vitalpbx-slave.local we must mount it again manually to avoid interrupting the normal operation of our services (Slave).
					drbdadm up drbd0
drbdadm primary drbd0 --force
mount /dev/drbd0 /vpbx_data
Now enable the services to make sure our server continues to function normally (Slave).
					systemctl enable asterisk
systemctl restart asterisk
systemctl enable mariadb
systemctl restart mariadb
systemctl enable fail2ban
systemctl restart fail2ban
systemctl enable vpbx-monitor
systemctl restart vpbx-monitor
Our vitalpbx-slave.local server is now working normally. Now we proceed to configure the replica with our new server.
First we prepare our new server following the steps in section 3, 4.1, 4.2, 4.3, 4.4, 4.6. It should only be configured in vitalpbx-slave.local.
Now, we will proceed to format the new partition on vitalpbx-master.local with the following command: (Master).
					mkdir /vpbx_data
mke2fs -j /dev/sda3
dd if=/dev/zero bs=1M count=500 of=/dev/sda3; sync
Load the module and enable the service on vitalpbx-master.local, using the follow command: (Master).
					modprobe drbd
systemctl enable drbd.service
Create a new global_common.conf file on vitalpbx-slave.local with the following contents: (Master).
					mv /etc/drbd.d/global_common.conf /etc/drbd.d/global_common.conf.orig
nano /etc/drbd.d/global_common.conf
					global {
  usage-count no;
}
  common {
net {
  protocol C;
  }
}
Next, we will need to create on vitalpbx-master.local a new configuration file called /etc/drbd.d/drbd0.res for the new resource named drbd0, with the following contents: (Master).
nano /etc/drbd.d/drbd0.res
					resource drbd0 {
startup {
        wfc-timeout  5;
	outdated-wfc-timeout 3;
        degr-wfc-timeout 3;
	outdated-wfc-timeout 2;
}
syncer {
	rate 10M;
 	verify-alg md5;
}
net {
    after-sb-0pri discard-older-primary;
    after-sb-1pri discard-secondary;
    after-sb-2pri call-pri-lost-after-sb;
}
handlers {
    pri-lost-after-sb "/sbin/reboot";
}
on vitalpbx-master.local {
	device /dev/drbd0;
   	disk /dev/$disk;
   	address 192.168.10.31:7789;
	meta-disk internal;
}
on vitalpbx-slave.local {
	device /dev/drbd0;
   	disk /dev/$disk;
   	address 192.168.10.32:7789;
	meta-disk internal;
   	}
}
Note:
Although the access interfaces can be used, which in this case is ETH0. It is recommended to use an interface (ETH1) for synchronization, this interface must be directly connected between both servers.
Initialize the meta data storage on each nodes by executing the following command on vitalpbx-master.local (Master).
					drbdadm create-md drbd0
Writing meta data...
New drbd meta data block successfully created.
On the vitalpbx-slave.local run the following command to start the drbd0(Master).
drbdadm up drbd0
You can check the current status of the synchronization while it’s being performed. The cat /proc/drbd command displays the creation and synchronization progress of the resource.
Now follow steps 4.9, 4.11, 4.12, 4.13.
10.- Some useful commands
- bascul, is used to change roles between high availability servers. If all is well, a confirmation question should appear if we wish to execute the action. The bascul command permanently moves services from one server to another. If you want to return the services to the main server you must execute the command again.
- role, shows the status of the current server. If all is well you should return Masters or Slaves.
- pcs resource refresh –full, to poll all resources even if the status is unknown, enter the following command.
- pcs node standby host, Stops the server node where it is running. The node status is shown as stopped.
- pcs node unstandby host, in some cases the bascul command does not finish tilting, which causes one of the servers to be in standby (stop), with this command the state is restored to normal.
- pcs resource delete, removes the resource so it can be created.
- pcs resource create, create the resource.
- corosync-cfgtool -s, to check whether cluster communication is happy.
- ps axf, confirmed that Corosync is functional, we can check the rest of the stack. Pacemaker has already been started, so verify the necessary processes are running.
- pcs status, check the pcs status output.
- crm_verify -L -V, check the validity of the configuration.
- drbdadm status, shows the integrity status of the disks that are being shared between both servers in high availability. If for some reason the status of Connecting or Standalone returns to us, wait a while and if the state remains it is because there are synchronization problems between both servers, and you should execute the drbdsplit command.
- cat /proc/drbd, the state of your device is kept in /proc/drbd.
- drbdadm connect drbd0, on the other node (the split brain survivor), if its connection state is also StandAlone, you would enter.
- drbdadm role drbd0, another way to check the role of the block device.
- drbdadm primary drbd0, switch the DRBD block device to Primary using drbdadm.
- drbdadm secondary drbd0, switch the DRBD block device to Secondary using drbdadm.
- /usr/share/vitalpbx/ha/ ./vpbxha.sh, create the cluster automatically.
- /usr/share/vitalpbx/ha/ ./destroy.sh, completely destroy the cluster, leaving the DRBD intact.
- /usr/share/vitalpbx/ha/ ./rebuild.sh, recreates the cluster starting from the fact that the DRBD is already configured on both servers.
11.- Solve a DRBD split-brain in 4 steps
Whenever a DRBD setup runs into a situation where the replication network is disconnected and fencing policy is set to dont-care (default), there is the potential risk of a split-brain. Even with resource level fencing or STONITH setup, there are corner cases that will end up in a split-brain.
When your DRBD resource is in a split-brain situation, don’t panic! Split-brain means that the contents of the backing devices of your DRBD resource on both sides of your cluster started to diverge. At some point in time, the DRBD resource on both nodes went into the Primary role while the cluster nodes themselves were disconnected from each other.
Different writes happened to both sides of your cluster afterwards. After reconnecting, DRBD doesn’t know which set of data is “right” and which is “wrong”.
Indications of a Split-Brain
The symptoms of a split-brain are that the peers will not reconnect on DRBD startup but stay in connection state StandAlone or WFConnection. The latter will be shown if the remote peer detected the split-brain earlier and was faster at shutdown its connection. In your kernel logs you will see messages like:
kernel: block drbd0: Split-Brain detected, dropping connection!
4 Steps to solve the Split-Brain
Step 1
Manually choose a node which data modifications will be discarded.
We call it the split brain victim. Choose wisely, all modifications will be lost! When in doubt run a backup of the victim’s data before you continue.
When running a Pacemaker cluster, you can enable maintenance mode. If the split brain victim is in Primary role, bring down all applications using this resource. Now switch the victim to Secondary role: (Victim).
					drbdadm up drbd0
drbdadm secondary drbd0
Step 2
Disconnect the resource if it’s in connection state WFConnection: (Victim).
drbdadm disconnect drbd0
Step 3
Force discard of all modifications on the split brain victim: (Victim).
drbdadm connect --discard-my-data drbd0
Step 4
Resync will start automatically if the survivor was in WFConnection network state. If the split brain survivor is still in Standalone connection state, reconnect it: (Survivor).
drbdadm connect drbd0
At the latest now the resynchronization from the survivor (SyncSource) to the victim (SyncTarget) starts immediately. There is no full sync initiated but all modifications on the victim will be overwritten by the survivor’s data and modifications on the survivor will be applied to the victim.
Background: What happens?
With the default after-split-brain policies of disconnect this will happen always in dual primary setups. It can happen in single primary setups if one peer changes at least once its role from Secondary to Primary while disconnected from the previous (before network interruption) Primary.
There are a variety of automatic policies to solve a split brain but some of them will overwrite (potentially valid) data without further inquiry. Even with theses policies in place a unresolvable split-brain can occur.
The split-brain is detected once the peers reconnect and do their DRBD protocol handshake which also includes exchanging of the Generation Identifiers (GIs).


