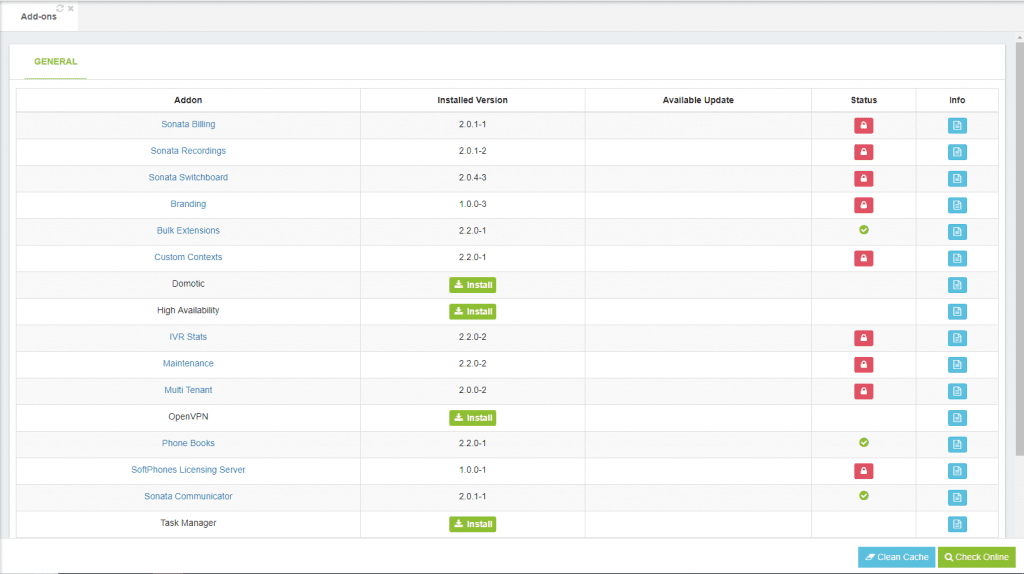
The add-ons module allows you to install new modules in order to expand the PBX capabilities and add new features. Some of these add-ons come integrated on VitalPBX GUI, and others have their own interface, like the Sonata Suite. VitalPBX has free and commercial add-ons; You may buy our commercial add-ons from our store or acquire most of them with our bundle packages (Plans).
All the commercial add-ons come with demo versions, there are no time limits or feature limits. You are only limited to the number of objects you can create. For example, on our Multi-Tenant module, you have all the features to create a tenant but are only limited to creating one tenant.
On this short post, we will explain how to install, update, and activate add-ons step by step.
Read our tutorials and guides on how to implement new tools and technologies for your business with VitalPBX here.
Installing Add-ons
To start, we will go to the following path on the main menu, “Admin >> Add-ons >> Add-ons“. To download the list of available add-ons you must click the blue “Clean Cache” button, followed by clicking on the green “Check Online” button. This way you will see the list of the latest add–ons for VitalPBX.

To install any of the add-ons, you must click the green “Install” button next to the add-on you wish to install. Then, after a couple of minutes, the add-on will be installed. After installing the add-on, you may click the add-on name in order to launch the module or use the global search on the top bar to find the installation path of the add-on on the main menu.
Activating add-ons
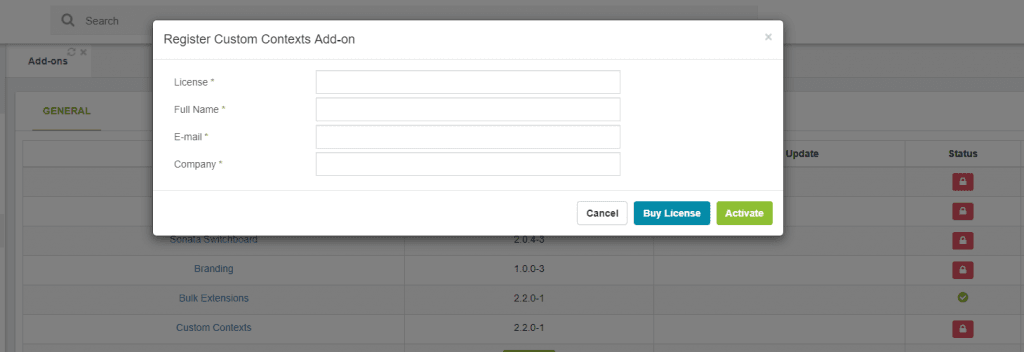
To activate commercial add-ons, you must click the red button with the padlock. This will open a modal where you must introduce, the license, full name, email and company name, and then click the green “Activate” button.

After activating the add-on, the red button under status column will change to a green button with a key, if you click this button, it will open a modal where you may view the license info, and make actions like re-activate or revoke the license to move it to another server.

Updating Add-ons
We release updates for add-ons periodically, usually to preserve compatibility with latest versions of VitalPBX or add new functionalities. To update the add-ons, first, you must click the “Check Online” button, and if an update is available for any of the add-on, a red button will appear under the “Available Update” column, you may click this button in order to update the add-on.

Conclusion
As you may notice, the add-ons module is a powerful tool to expand the PBX capabilities and add new features, letting you reach more options for your VitalPBX.
Learn more about VitalPBX, our services and how we can help you achieve your goals in our official website.


