1.- Introduction
After a long research on the internet, googling everywhere We decided to make a manual on how to integrate MS Teams with VitalPBX without having an SBC in the middle.
Because of this, we took on the task of searching the available information and putting it together in a single guide that makes life easier for people interested in implementing VitalPBX with MS Teams. The best knowledge is the one shared with others.
2.- Recommendations
- In this manual we are going to create a Trial account to have access to MS Teams with Voice plan.
- In this manual we use the latest version available of VitalPBX based on Centos 7. MS Teams Add-Ons is only available from VitalPBX version 3.1.
- We must have a valid domain (FQDN) that we have access to configure at the DNS level.
- We must work from Windows since we are going to use PowerShell for some configurations and module installations. Although there are also versions of PowerShell for MAC.
- To know the list of IPs and domains that you must include in the firewall rules to prevent blocks, we recommend that you see the following document: https://forums.vitalpbx.org/t/microsoft-teams-direct-routing-ip-addresses/2544
- VitalPBX team support is limited to VitalPBX configuration. We do not support the configuration of Microsoft Teams or the configuration of domains.
3.- VitalPBX Installation
In this guide we are going to assume that you already installed Centos 7 minimal or if you installed VitalPBX from the ISO we will proceed to step 4.
First, we install VitalPBX from the script by following the following steps:
|
[root@localhost ~]# yum install wget nano -y [root@localhost ~]# wget https://raw.githubusercontent.com/VitalPBX/VPS/master/vps.sh [root@localhost ~]# chmod +x vps.sh [root@localhost ~]# ./vps.sh |
At the end of the installation the server restarts, we wait a couple of minutes and proceed to enter a browser (we recommend Chrome) we enter the IP and configure the admin password.
4.- Create Office 365 E5 Trial Account
Now we go to the Microsoft page and create an Office 365 E5 Trial account which already comes with MS Teams and the Phone System plan enabled. As Microsoft constantly changes the links, we recommend searching Google using the following phrase “Office 365 E5 trial”. It is likely that in your country this type of plan is not available yet, so if you want to choose the USA you must make sure that someone you know has a cell phone number in the USA so that they can provide you with codes that they will send you by SMS.
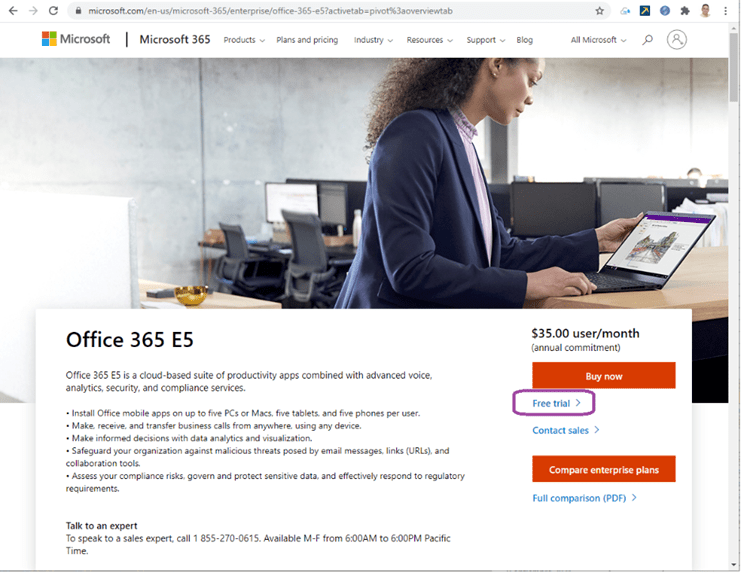
We select Free Trial and fill in all the information requested.
It is also possible to use the Office 365 E1 Plan (US$ 8.00/month) or Microsoft 365 Business Basic (US$ 5.00/month), but we would have to buy the Phone System add-on separately, however, with this combination the cost is much less since the Phone System license costs US$ 8.00/month. The advantage of the Office 365 E1 license is that it allows us to do Webinar and Live Events
We select the domain that contains mydomain.onmicrosoft.com, in our case it is vitxi.onmicrosoft.com. Later we will create a new domain that is the one that will be configured in our VitalPBX Server.
Once the account is created, we must take into consideration the following:
- To enter the administrative part (Microsoft 365 admin center) which is where we create users, domains, groups, etc. Go to the following link:
- To enter the MS Teams administration, which is where we are going to configure the interconnection with VitalPBX we must go to the following link:
- To enter MS Teams, which is where we will be able to make calls, conferences, chat, etc. Go to the following link:
4.1. Microsoft 365 admin center.
Go to https://admin.microsoft.com/
We enter with the username and password created at the time of registration of the Trial.
4.1.1 User Management
We enter User/Active users, here it allows us to manage the created user or create a new one.

4.1.2 Domain Management
We enter Settings/Domains and we are going to see the domain created in the initial configuration, also here we can create a new domain.
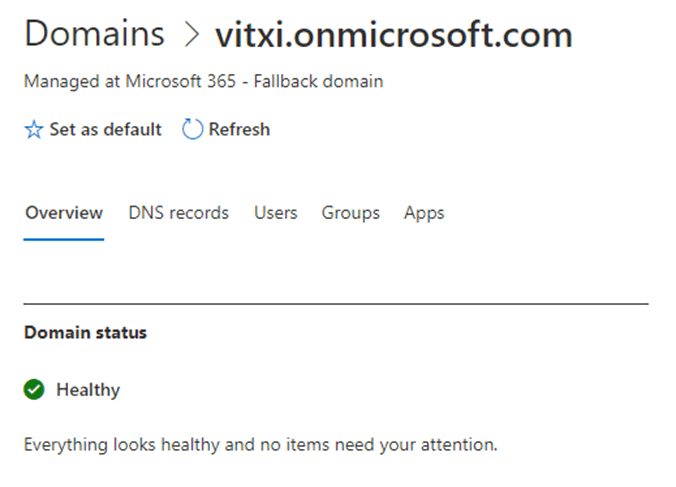
Now we will proceed to create a domain that matches the domain that we are going to connect our trunk to through Direct Routing of MS Teams.
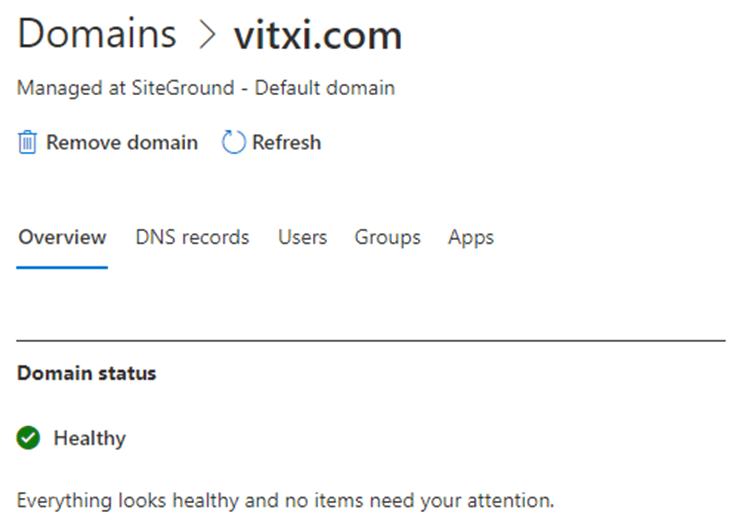
For which we go to Settings/Domains Add domain in Microsoft 365 admin center. In order to create this domain, we must have control of it since we will be asked to make some DNS settings to show that the domain is ours. Once the domain is created, which in our case is vitxi.com, it will be displayed like this:
Take into account that our VitalPBX does not necessarily have to be in the domain itself, but it can be in a sub-domain of it, for example: msteams.vitxi.com.
4.1.3 MS Teams Admin Access
To go to the MS Teams administrative interface from Microsoft 365 admin center we must go to the Admin Center/Teams section.
4.2. MS Teams Settings
To configure MS Teams at the connection level with VitalPBX, it is necessary to do it through PowerShell, which is generally installed in Windows.
4.2.1 Admin Access
Connect PowerShell to Microsoft Teams. Very important is that the domain of the user has to coincide with the domain of the VitalPBX where we are going to connect.
Run Windows PowerShell as Administrator
Run these commands:
|
PS C:\Windows\system32> Install-Module MicrosoftTeams PS C:\Windows\system32> Import-Module MicrosoftTeams |
This command prompts for the Office 365 administrator credentials. Enter the Office 365 administrator credentials.
|
PS C:\Windows\system32> $credential = Get-Credential cmdlet Get-Credential at command pipeline position 1 Supply values for the following parameters: CredentialPS C:\Windows\system32> Connect-MicrosoftTeams Account Environment Tenant TenantIdPS C:\Windows\system32> Get-Command *onlinePSTNGateway* CommandType Name Version Source |
This shows that the connection was successful, and the commands are now available.
4.2.2 Create Direct Routing
PS C:\Windows\system32> New-CsOnlinePSTNGateway -Fqdn mydomain.com -SipSignalingPort 5061 -MaxConcurrentSessions 10 -Enabled $true$trueIdentity : mydomain.com InboundTeamsNumberTranslationRules : {} InboundPstnNumberTranslationRules : {} OutboundTeamsNumberTranslationRules : {} OutboundPstnNumberTranslationRules : {} Fqdn : mydomain.com SipSignalingPort : 5061 FailoverTimeSeconds : 10 ForwardCallHistory : False ForwardPai : False SendSipOptions : True MaxConcurrentSessions : 10 Enabled : True MediaBypass : False GatewaySiteId : GatewaySiteLbrEnabled : False GatewayLbrEnabledUserOverride : False FailoverResponseCodes : 408,503,504 PidfLoSupported : False MediaRelayRoutingLocationOverride : ProxySbc : BypassMode : None Description : |
4.2.3 Incoming call routing
To configure the routing of incoming calls within MS Teams, you must configure in MS Teams which phone number will be associated with it. To do this, execute the following command.
|
PS C:\Windows\system32> Set-CsPhoneNumberAssignment -Identity [email protected] -EnterpriseVoiceEnabled $true PS C:\Windows\system32> Set-CsPhoneNumberAssignment -Identity [email protected] -PhoneNumber “3000” -PhoneNumberType DirectRouting |
4.2.4 Outgoing call routing
To configure the routing of outgoing calls, the following configuration is necessary.
|
PS C:\Windows\system32> Set-CsOnlinePstnUsage -Identity Global -Usage @{Add=”Default”} PS C:\Windows\system32> New-CsOnlineVoiceRoute -Identity “All” -NumberPattern “.*” -OnlinePstnGatewayList mydomain.com -Priority 0 -OnlinePstnUsages “Default” Identity : All Priority : 0 Description : NumberPattern : .* OnlinePstnUsages : {Default} OnlinePstnGatewayList : {mydomain.com} BridgeSourcePhoneNumber : Name : All |
4.2.5 Create Auto Attendant
First, we create a Resource accounts in Org-wide Settings/Resource accounts.
We must create this account with our original domain which is: vitxi.onmicrosoft.com. Press + Add and the following screen will appear:
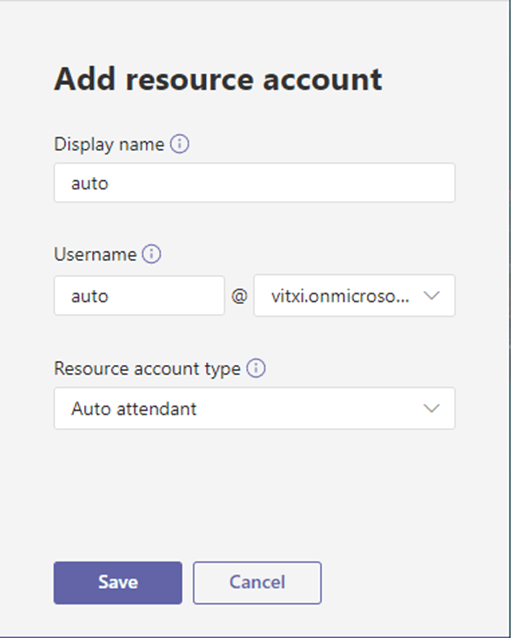
- Display name, a descriptive name of what the resource is going to do.
- Username, also add a user-friendly description of what the resource is going to do.
- Resource account type, we select “Auto attendant”.
Once the resource is created it will look like this:

Later we go to the Office 365 administration and assign a license that contains Voice, for this we go to User / Active users, select the user [email protected] and edit it to assign the Office 365 E5 license.
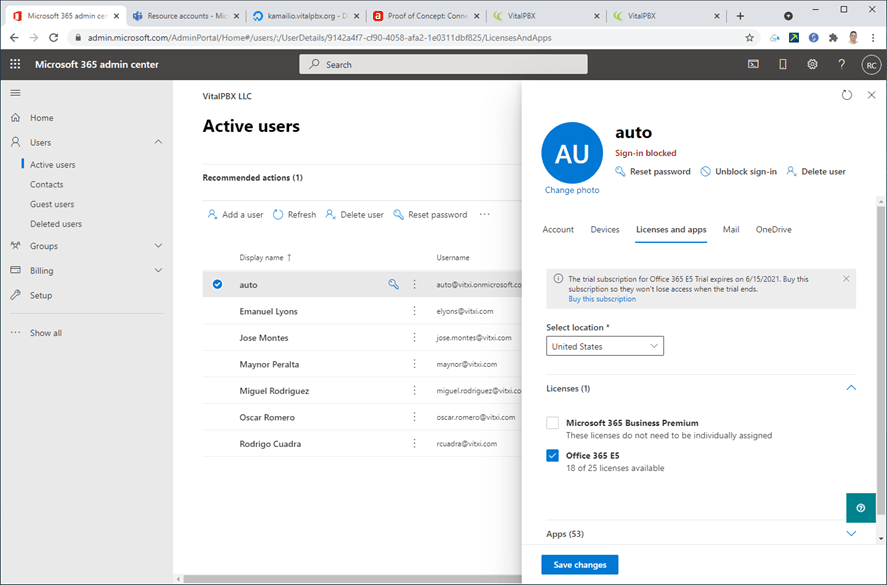
Since we have created the new resource and with the voice permissions we go to PowerShell and execute the following, where +3100 is the number that we are going to dial to access the Auto Attendant. Remember that there are times that it takes up to 30 minutes for the new resource to recognize the license, so if you get a license error, wait a while.
PS C:\Windows\system32> Set-CsOnlineApplicationInstance -Identity “[email protected]” -OnpremPhoneNumber +3100RunspaceId : 738753bc-e7e9-4948-9d56-6a29b633920e ObjectId : 9142a4f7-cf90-4058-afa2-1e0311dbf825 TenantId : 5c199f18-c629-4475-8f1a-a3ed1644ea92 UserPrincipalName : [email protected] ApplicationId : ce933385-9390-45d1-9512-c8d228074e07 DisplayName : auto PhoneNumber : |
Then go to MS Team Admin Voice/Auto Attendants and follow the instructions. Verify that the extension was configured by entering the resource, which should look like this:

Now we are going to create our Auto attendants, for which we go in MS Teams admin center Voice/Auto attendants.
In General info
- Operator, select nothing.
- Time zone, we select our time zone.
- Language, we select the language that we are going to use.
In Call Flow
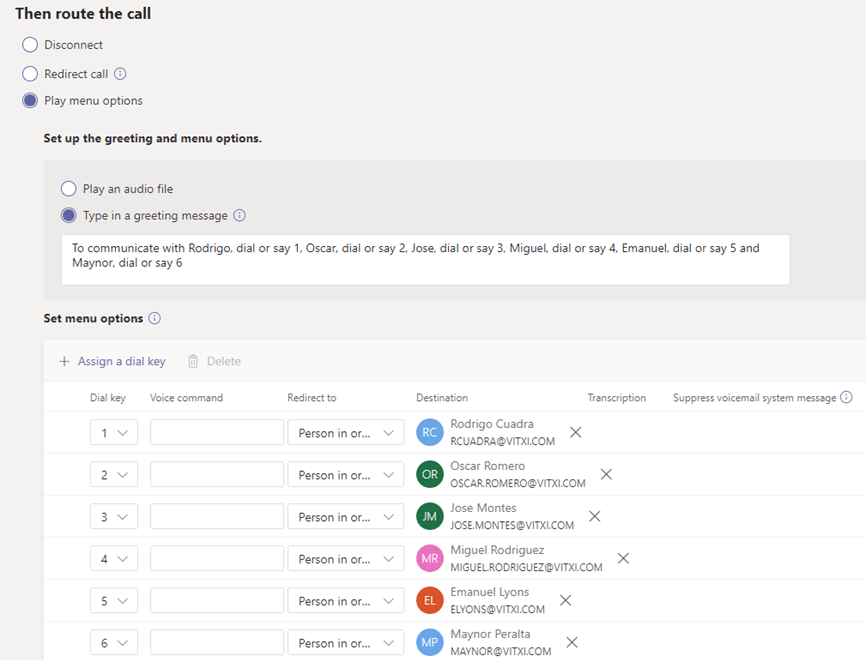
- Firt play a greeting message, if we do not have an audio recorded here, we can use the option of Type in a greeting message which works very well.

- The route the call, here we are going to configure the dialing instructions so that the caller reaches their desired destination.
Then we have options of schedules which we can leave as they are.
Finally, edit the Auto Attendant and go to Resource accounts and add the account, created for this purpose, which in this case is [email protected].

4.2.6 Verify configuration in Administrative Interface
To confirm the configuration, now we go to the MS Teams administrative interface by entering the following URL with our username and password.
Go to https://admin.teams.microsoft.com/
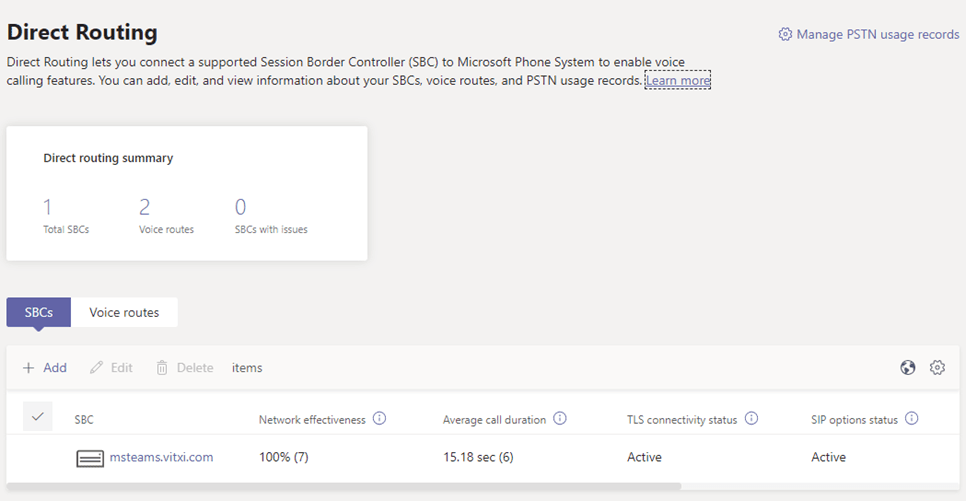
First, we go to Voice/Direct Routing and verify that the trunk against our VitalPBX is created. It will be with an error at the beginning since we have not created the part of VitalPBX, but after creating it in VitalPBX it should show us the following screen.
5.- VitalPBX Configuration
Next, we will show how to configure the trunk in VitalPBX.
5.1 Install MS Teams Module
First, remember that we must have a domain and a valid certificate associated with it, we can create this certificate in ADMIN/System Settings/Certificates select the Type “Let’s Encrypt”.
We install the MS Teams module, we go to ADMIN/Add-ons/Add-ons, we give Check Online, and we look for the Microsoft Teams module.
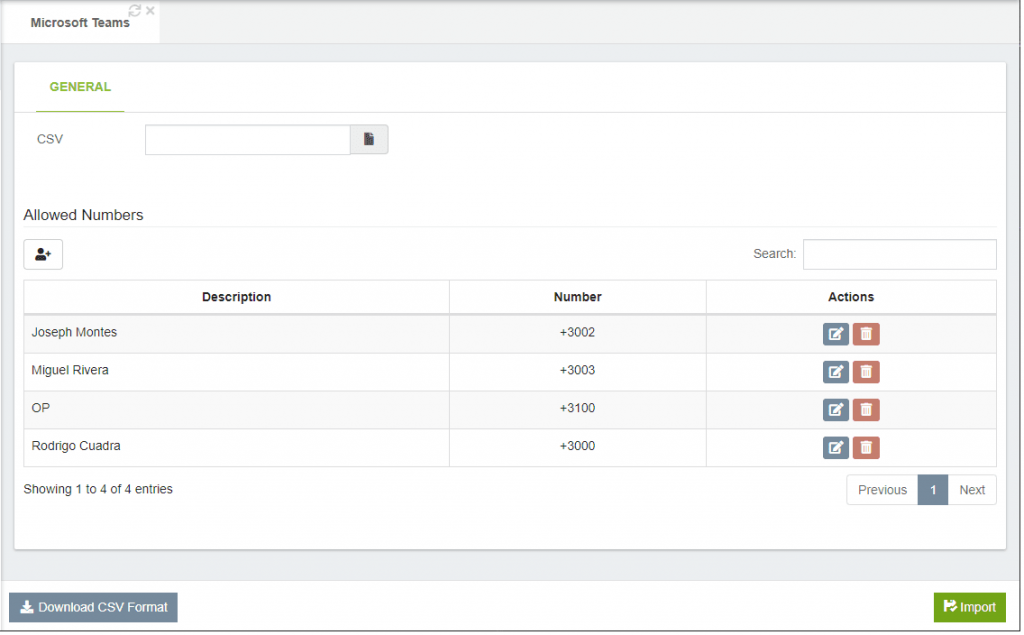
After installing the MS Teams Add-Ons go to SETTINGS/PBX Settings/ Microsoft Teams and add the extensions that will communicate with VitalPBX. Remember to add the “+” sign at the beginning of each extension.
5.2 Configure PJSip Settings
Then we will proceed to configure our global PJSip parameters in Settings/Technology Settings/PJSIP Settings.
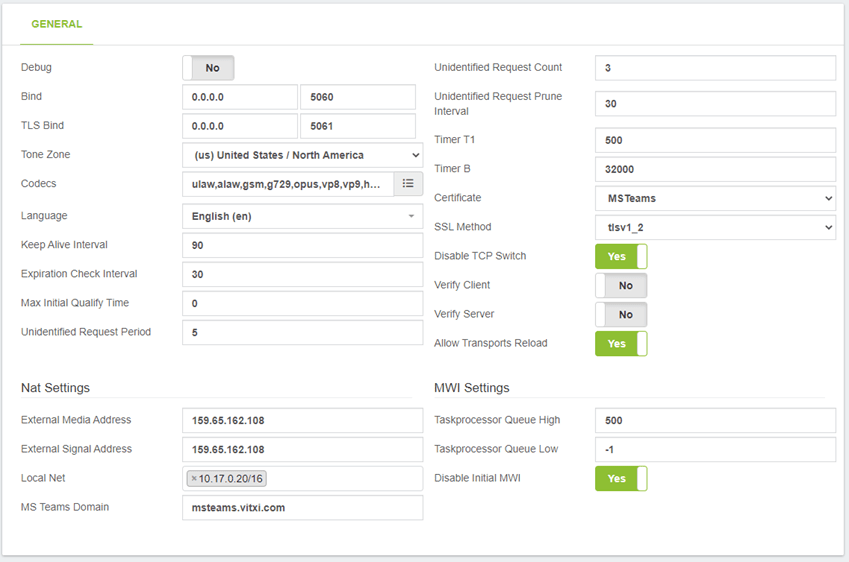
Here we must configure the following information.
- Certificate, we select the previously created certificate.
- SSL Method, we select “tlsv1_2”
- External Media Address, here we add our Public IP.
- External Signal Address, here we add our Public IP.
- Local Net, here we add our Local IP range.
- MS Teams Domain, add the domain that will recognize the trunk created in MS Teams.
5.3 Configure Device Profile type PJSip
Now we are going to create a new profile for which we are going to SETTINGS/Technology Settings/Device Profiles.
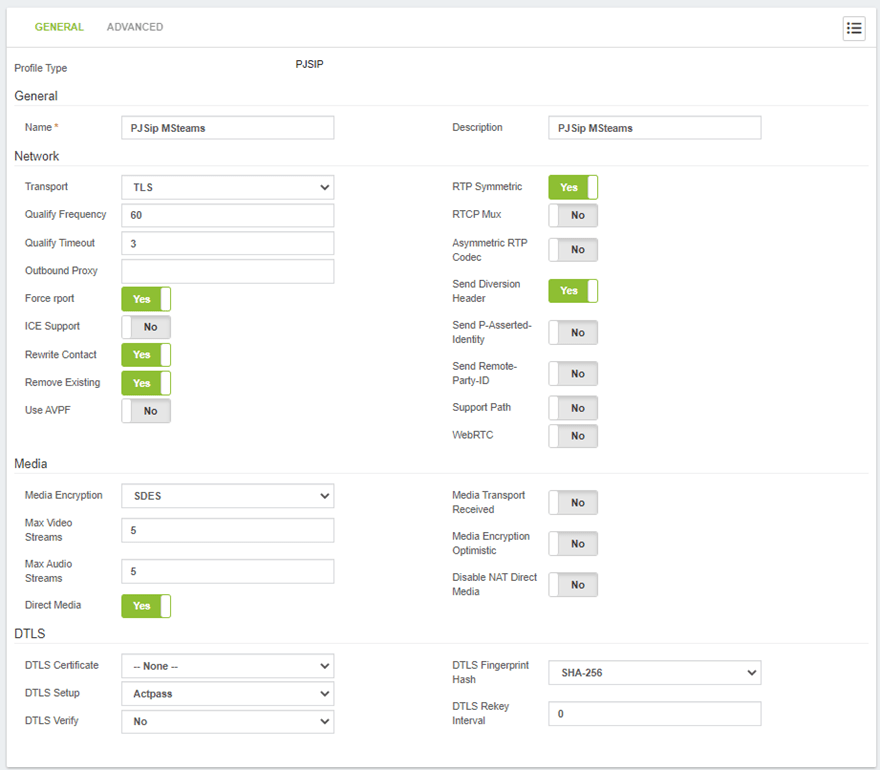
We create a new profile of type PJSip and with an easy to identify name since we are going to use it when we create the trunk.
The parameters to take into account are the following:
- Media Encryption, “SDES”
5.4 Configure Trunk
Now we will proceed to configure our trunk, for which we go to PBX/External/Trunks.
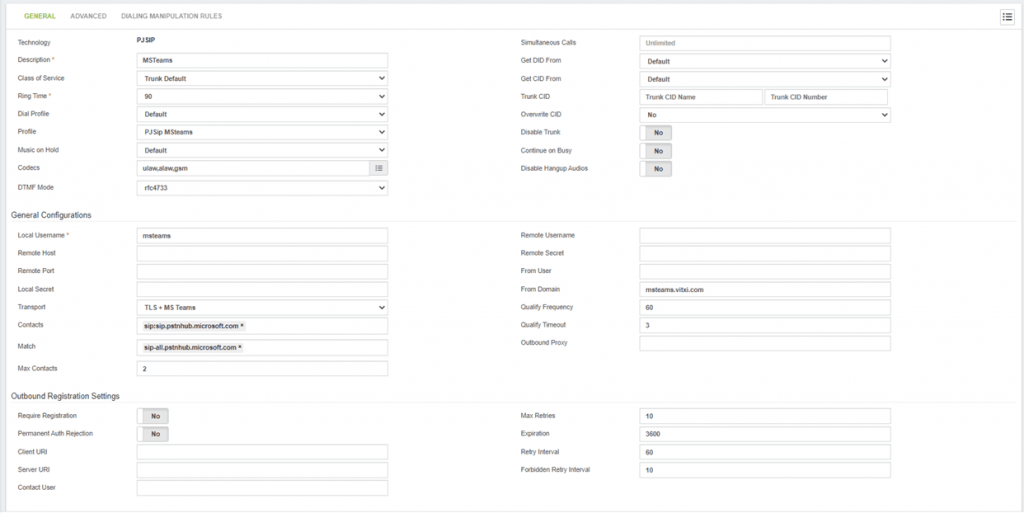
The parameters to take into account are:
- Codecs, select ulaw, alaw and gsm
- Transport, “TLS + MS Teams”
- Contacts, sip:sip.pstnhub.microsoft.com (this data is provided by Microsoft)
- Match, sip-all.pstnhub.microsoft.com (this data is provided by Microsoft)
- From Domain, here our valid domain is configured. In our case it is msteams.vitxi.com.
5.5 Configure Outbound Routes
Now we will proceed to configure our outgoing route, this will allow us to call MS Teams from VitalPBX.
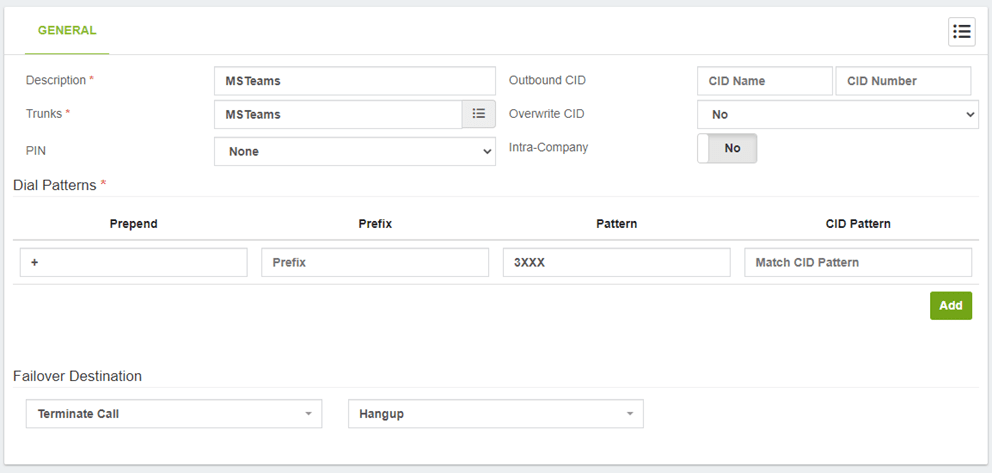
It is very important to take into account that MS Teams only sends and receives numbering with the E.164 standard, which means that it requires that in front of the number there must be a + symbol.
In our case in MS Teams our numbering plan is 3XXX, so when configuring our outgoing route what we do is add the + symbol at the beginning with the “Prepend” option.
5.6 Configure Inbound Routes
In order to receive calls from MS Teams it is necessary to define the incoming route for which we go to PBX/External/Inbound Routes
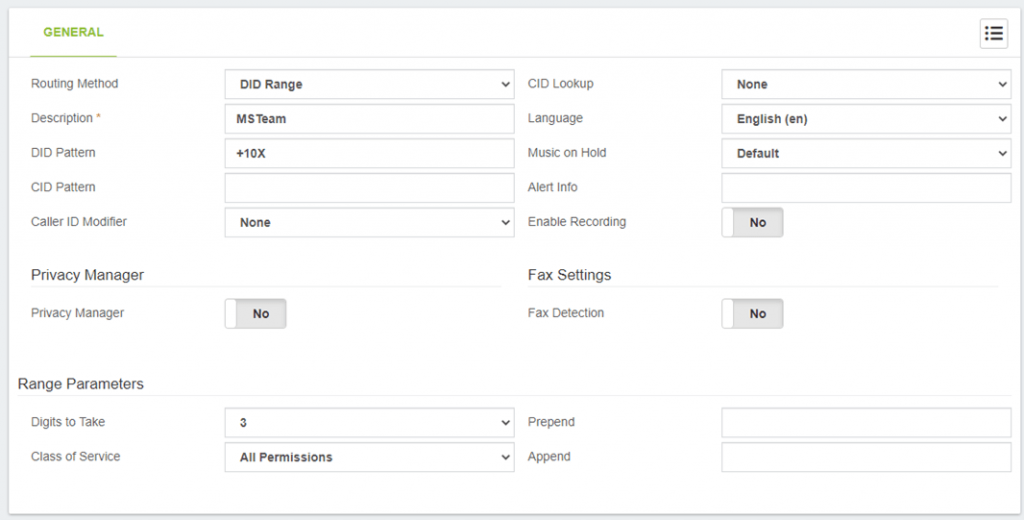
Here we configure the following options:
- Routing Methods, “DID Range”
- DID Pattern, as we mentioned previously, the number that we are going to receive is preceded by a + sign, so starting from the fact that we have a 10X local numbering plan in VitalPBX, here we configure + 10X.
- Class of Services, we select “All Permissions”, which allows the DID to access our local numbering plan.
5.7 Register Authorized Teams Users
Now we are going to add the list of Teams users who will be able to receive calls from Teams and make calls from VitalPBX to Teams. Go to SETTINGS/PBX Settings/ Microsoft Teams.
It is also necessary to add the extensions previously assigned in Teams with the E.164 format (ex: +3000).
