This guide provides step-by-step instructions to integrate VitalPBX with Conversational AI using Twilio’s Media Stream Gateway Service. With this integration, you’ll have a real-time, conversational AI assistant directly available in your VitalPBX system. Currently, this module integrates with Twilio’s conversational AI media streaming feature, with more providers planned in the future.
Requirements
Before beginning, make sure you have the following:
- OpenAI Account and OpenAI API
- Twilio Account
- Twilio Phone Number with Voice Capabilities
- AI Assistants Add-On Module
- Call Center, Carrier Plus, or VitalPBX One license
- FQDN or Public IP Address
Step 1 - Installing the AI Assistants Add-On Module
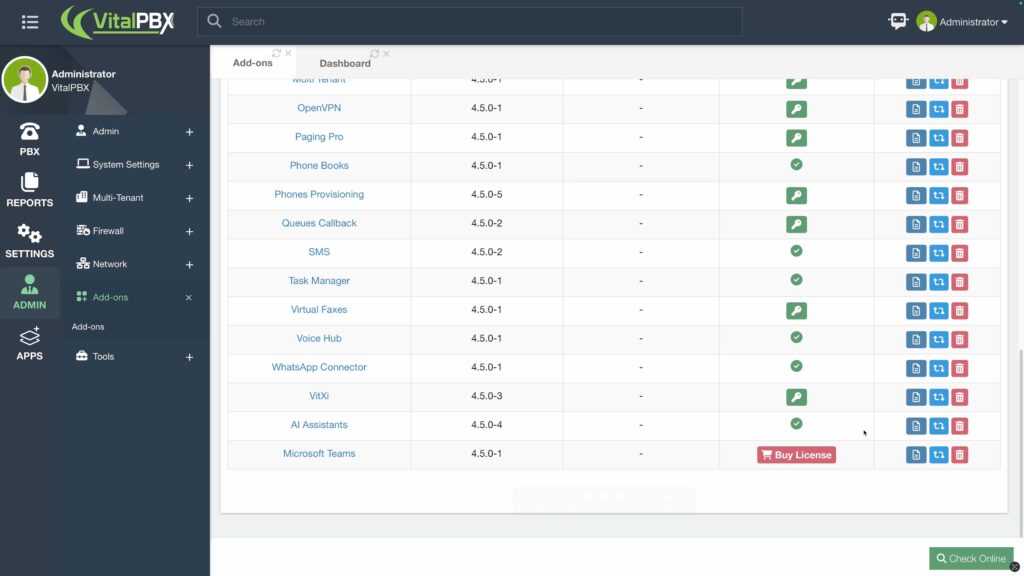
First, ensure the AI Assistants module is installed on your VitalPBX system. Go to Admin > Add-Ons > Add-Ons, locate the AI Assistants add-on module, and click on the install button if not already installed. After installation, refresh your browser.
Step 2 - Configuring the OpenAI Integration
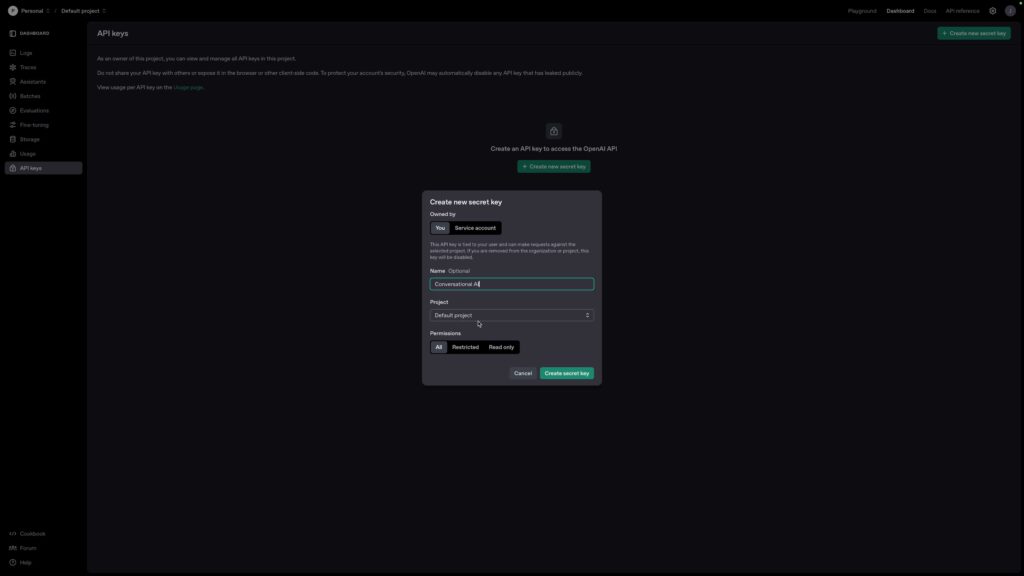
Once the add-on is installed, you need to enter your OpenAI API key. Visit https://platform.openai.com/api-keys. Log in with your OpenAI account or create a new one. Click on “Create new secret key”, provide a name, select a project, grant it “All Permissions”, and then click “Create secret key”. Securely copy this key.
For more detailed information, you can refer to the following guide: https://vitalpbx.com/blog/how-to-create-an-openai-api-key/.
Return to your VitalPBX system, navigate to Apps > AI Assistants > API Keys, enter a description for your key, and paste your OpenAI API Key.
Step 3 - Setting Up the Conversational AI
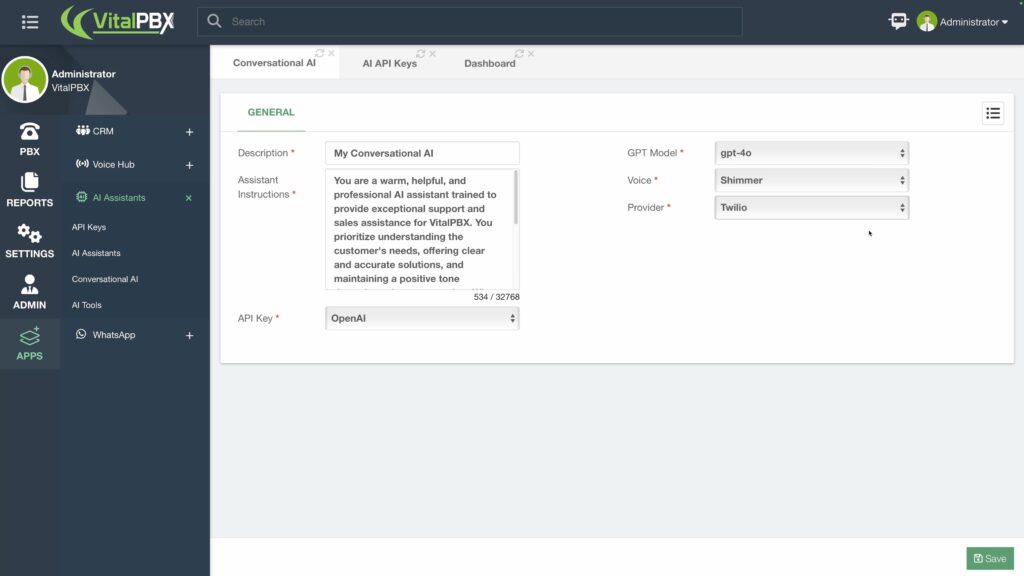
With OpenAI integrated, go to Apps > AI Assistants > Conversational AI within VitalPBX. Here you can configure the Conversational AI Assistant. Currently, only Twilio is supported as the media stream provider.
Enter a descriptive name for the assistant, select your preferred GPT model, choose the OpenAI voice that suits your needs best, and select the API key configured earlier.
The Assistant Instructions are crucial. They determine how your AI Assistant behaves and answers queries. Provide detailed and exact instructions, as Conversational AI assistants on VitalPBX do not support uploading documents. Include all necessary information and specific instructions.
Once completed, click “Save” at the bottom-right corner, then apply the changes. Retrieve your Webhook URL from the Conversational AI assistant page by selecting the hamburger menu icon and choosing the newly created assistant. Copy this URL for use in the next step. Note that your VitalPBX must have a publicly accessible IP address or FQDN.
Step 4 - Twilio Configuration
Go to the Twilio Console: https://console.twilio.com/. Log in or create a new account. Ensure you have sufficient credit to purchase or use an existing Twilio phone number.
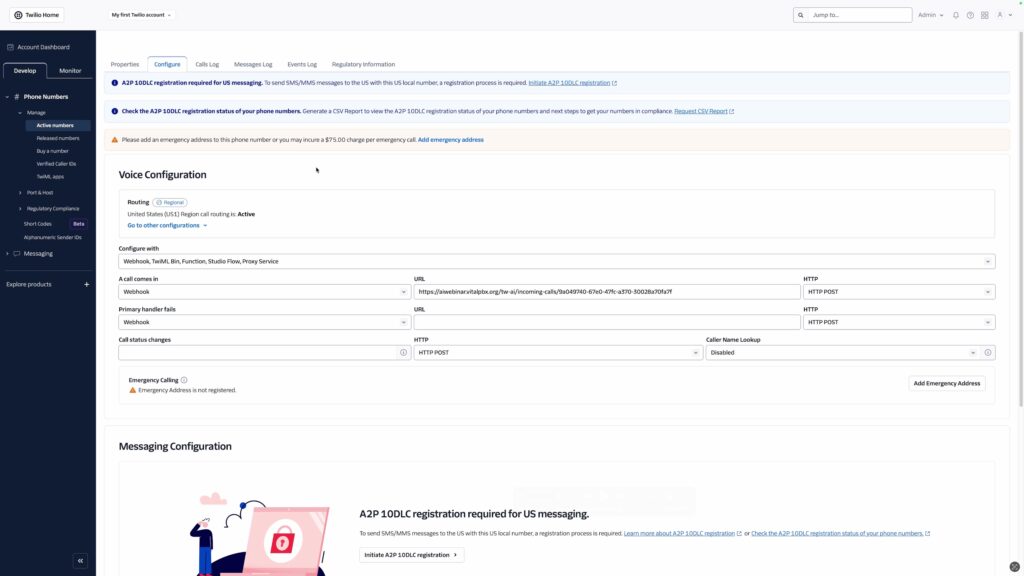
Navigate to Phone Numbers > Manage > Active Numbers, select the desired phone number, and go to the “Configure” tab. Under “Voice Configuration”, select “Webhook, TwiML, Bin, Function, Studio Flow, Proxy Service” from the “Configure With” options. In the “A call comes in” option, select Webhook and paste the Webhook URL obtained from your VitalPBX installation. Scroll down and click “Save configuration”.
Your Conversational AI assistant is now active. You can call the Twilio phone number and begin interacting in real-time.
Conclusion
Your VitalPBX Conversational AI Assistant is now configured. It provides fast, real-time conversational interactions but differs from regular AI Assistants in that it cannot route calls, review uploaded documents, or terminate calls. It relies fully on the instructions you provide. Further features and additional providers are expected as the technology evolves.
Currently, running Conversational AI internally on VitalPBX requires significant server resources. As such, external services like Twilio are recommended.
For more VitalPBX features and updates, stay tuned for additional guides and videos!