Important Update: End of Life (EOL) Announcement for VitalPBX Version 3
As part of our ongoing commitment to providing the best communication solutions, we continually evolve and update our systems to meet the dynamic needs of
VitalPBX One is the all-in-one solution designed to improve your business's collaboration and communication to new levels
Ideal for any size and type of business.
Get features that cover all your call center needs
Manage multiple PBX's on the same server
Experience a fully featured Switchboard, Recording Manager, Call Center Statistics, Call Account, and Call Center Dialer, system,
The add-ons module allows you to install new modules in order to expand the PBX capabilities and add new features.
Communicate anywhere with VitXi, our full WebRTC client exclusively for your VitalPBX installation.
With VitalPBX Connect, you can make and receive business calls on your smartphone.
An advanced windows softphone for call center which integrates presence, chat, video call, BLF, and much more.
We can help with everything from implementation assistance to upgrades and production down emergencies.

IXICA is Canada’s premier SIP trunking and hosted PBX provider, providing access to the most sip channels and network coverage.
If you’re looking for ways to connect your IXICA trunk to your VitalPBX, you’ve come to the right place. In this blog article, we’ll take you through the steps for setting up the connection. Ultimately, we’ll run tests to verify that the PBX configurations are flawless.
Before diving into the trunk configuration on VitalPBX, get a free trial account from IXICA’s website if you don’t have an account yet.
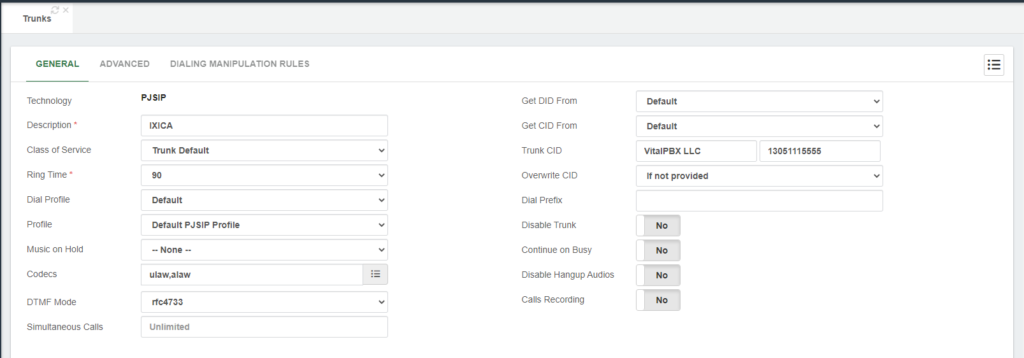
To start with our trunk setup, we will define the fields below in the top section.
It is essential for you to know that IXICA enables the “CLIP screening” feature by default. When this feature is enabled, the Caller ID is always set to your 911/emergency caller ID. So, if you need to send different Caller IDs per extension or per tenant, you must request them to disable this feature from your account.

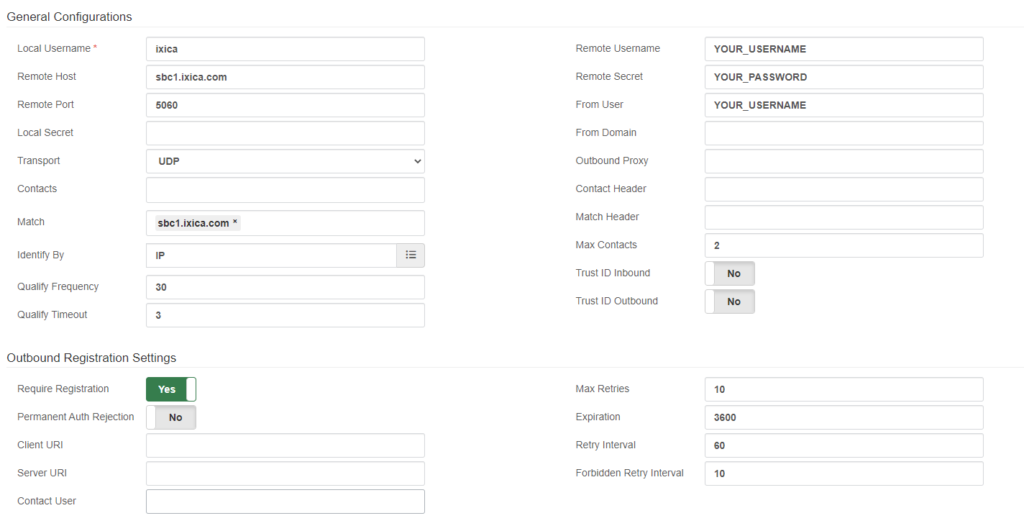
Next, in the sections “General Configurations and Outbound Registration Settings,” we must define the fields below.

After saving the trunk and applying changes, you can monitor the trunk status by navigating to “Reports / PBX Reports / PJSIP Endpoints.” Once there, you must select the “Trunks” tab.

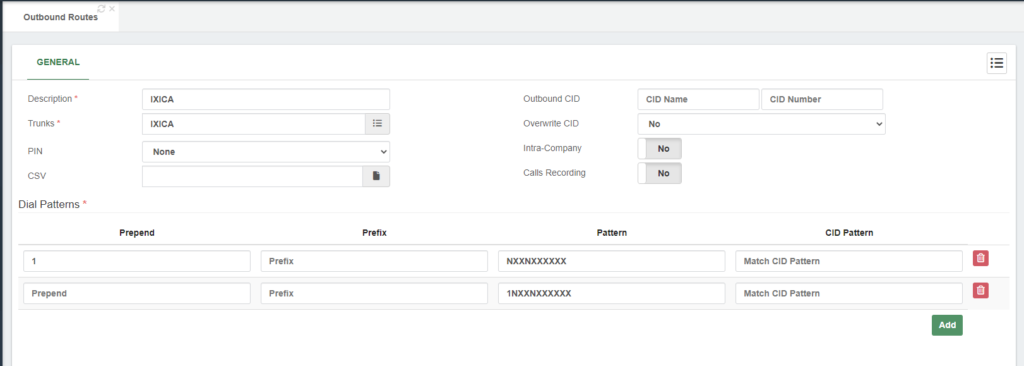
Now that we are assured that our trunk is up and running, we will create the outbound route to place calls using the IXICA trunking.

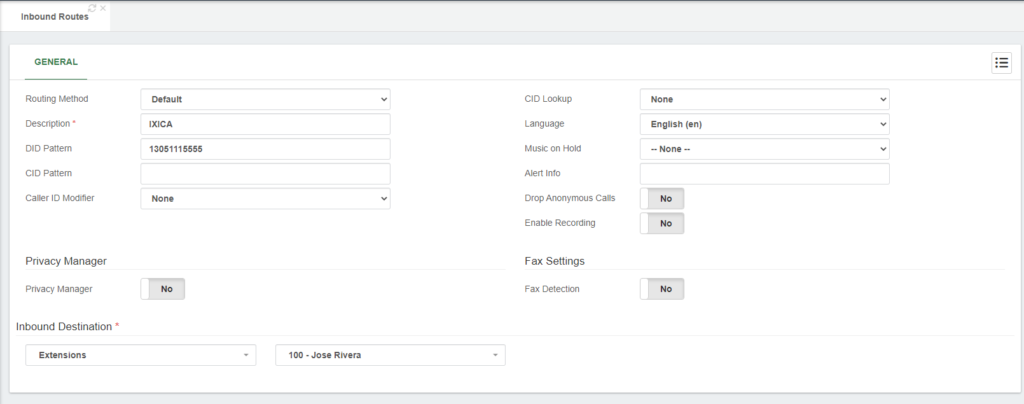
Finally, to receive calls in our VitalPBX server, we must create our inbound routes with our IXICA DIDs using the 11-digit format.

Now that the settings are complete, we can place test calls to confirm that our trunk is working.
For testing outbound calls, you can place a test call to a phone number outside of your network; it can be your mobile number, for instance.
For inbound call testing, you can call from your mobile to any of your IXICA’s DIDs.
Thus, if both tests went well, congrats! You have successfully set up an IXICA trunk in VitalPBX.
In conclusion, connecting an IXICA trunk with VitalPBX is a straightforward process that requires a few steps. By following this guide, you can have your trunk up and running in no time.

As part of our ongoing commitment to providing the best communication solutions, we continually evolve and update our systems to meet the dynamic needs of

We are thrilled to announce the release of VitalPBX V 4.1.0 R4, bringing with it a host of new features, improvements, and crucial fixes to

A better future of telephony where AI and seamless integration converge for your business, introducing VitalPBX release V 4.1.0 R3. This latest update contains fixes

VitalPBX provides a robust and scalable platform, which will allow you to manage your PBX in an easy and intuitive way.
Our newsletters are packed with all the latest updates, trends, and insights from VitalPBX.