
Releases
Exciting Product Updates to Enhance Your Communication Systems: 4.1.0 R2
We’re thrilled to share a series of updates and improvements we’ve rolled out to ensure that your experience with our communication solutions is not only


Asterisk PBX high availability is a characteristic of a system that aims to ensure an agreed level of operational performance, usually uptime, for a higher-than-normal period.
Make a high-availability cluster out of any pair of VitalPBX servers. VitalPBX can detect a range of failures on one VitalPBX server and automatically transfer control to the other server, resulting in a telephony environment with minimal downtime.
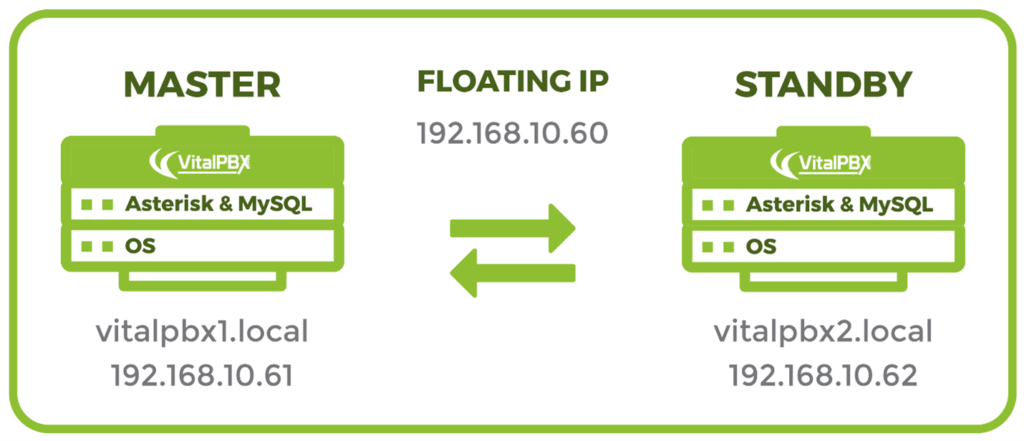
To install VitalPBX in high availability, you need the following:
| Name | Server 1 | Server 2 |
| Hostname | vitalpbx1.local | vitalpbx2.local |
| IP Address | 192.168.10.61 | 192.168.10.62 |
| Netmask | 255.255.255.0 | 255.255.255.0 |
| Gateway | 192.168.10.1 | 192.168.10.1 |
| Primary DNS | 8.8.8.8 | 8.8.8.8 |
| Secondary DNS | 8.8.4.4 | 8.8.4.4 |
Now we connect through ssh to each of the servers and we configure and configure the host name and the IP address.
Change Hostname
| root@vitalpbx1:~# hostname vitalpbx1.local |
Change Ip Address, edit the following file with nano, /etc/network/interfaces
| root@vitalpbx1:~# nano /etc/network/interfaces Change #The primary network interface allow-hotplug eth0 iface eth0 inet dchp With the following value #The primary network interface allow-hotplug eth0 iface eth0 inet static address 192.168.10.61 netmask 255.255.255.0 gateway 192.168.10.1 |
Change Hostname
| root@vitalpbx2:~# hostname vitalpbx2.local |
Change Ip Address, edit the following file with nano, /etc/network/interfaces
| root@vitalpbx2:~# nano /etc/network/interfaces Change #The primary network interface allow-hotplug eth0 iface eth0 inet dchp With the following value #The primary network interface allow-hotplug eth0 iface eth0 inet static address 192.168.10.62 netmask 255.255.255.0 gateway 192.168.10.1 |
Configure the hostname of each server in the /etc/hosts file, so that both servers see each other with the hostname.
| root@vitalpbx1-2:~# nano /etc/hosts 192.168.10.61 vitalpbx1.local master1 192.168.10.62 vitalpbx2.local master2 |
Adjust the firewall using the following commands:
| root@vitalpbx1-2:~# firewall-cmd –permanent –add-service=high-availability root@vitalpbx1-2:~# firewall-cmd –permanent –zone=public –add-port=3306/tcp root@vitalpbx1-2:~# firewall-cmd –permanent –zone=public –add-port=2224/tcp root@vitalpbx1-2:~# firewall-cmd –permanent –zone=public –add-port=3121/tcp root@vitalpbx1-2:~# firewall-cmd –permanent –zone=public –add-port=5403/tcp root@vitalpbx1-2:~# firewall-cmd –permanent –zone=public –add-port=5404-5405/udp root@vitalpbx1-2:~# firewall-cmd –permanent –zone=public –add-port=21064/tcp root@vitalpbx1-2:~# firewall-cmd –permanent –zone=public –add-port=9929/tcp root@vitalpbx1-2:~# firewall-cmd –permanent –zone=public –add-port=9929/udp root@vitalpbx1-2:~# firewall-cmd –reload |
Now create this Services and Rules in Server1. Admin/Firewall/Services
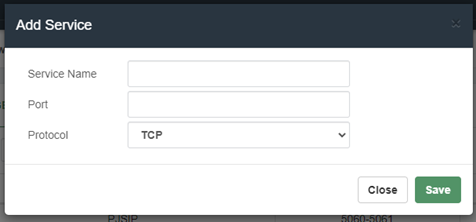
Service Name, A Descriptive name to easily recognize this service.
Port, Port or range of ports for this service. e.g.: 5060, 5060-5064, or 2030,3450.
Protocol, Type of connections for the ports listed on this service.
| Service Name | Port | Protocol |
| MariaDB Client | 3306 | TCP |
| HA2224 | 2224 | TCP |
| HA3121 | 3121 | TCP |
| HA5403 | 5403 | TCP |
| HA5404-5405 | 5404-5405 | UDP |
| HA21064 | 21064 | TCP |
| HA9929 | 9929 | Both |
Admin/Firewall/Rules
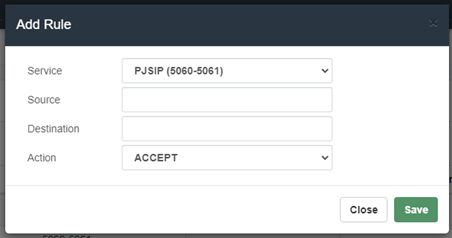
Service, Service to be accepted, rejected or dropped.
Source, Source IP or range of source IPs to which the service will be allowed or not. e.g.: 192.168.0.20 or 192.168.0.0/24.
Destination, Destination IP or range of destination IPs to which the service will be allowed or not. e.g.: 192.168.0.20 or 192.168.0.0/24.
Action, Action to be performed for the selected service.
| Service | Source | Destination | Action |
| MariaDB Client | ACCEPT | ||
| HA2224 | ACCEPT | ||
| HA3121 | ACCEPT | ||
| HA5403 | ACCEPT | ||
| HA5404-5405 | ACCEPT | ||
| HA21064 | ACCEPT | ||
| HA9929 | ACCEPT |
Now we will whitelist the IPs of Server1 and Server2
Admin/Firewall/Access Control
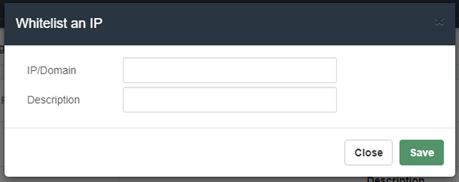
IP/Domain, IP or Domain to add to the whitelist. The IP can be in CIDR notation (e.g.: 192.168.0.1/24).
Description, Short description for this item.
| IP/Domain | Description |
| 192.168.10.61 | Server1 IP |
| 192.168.10.62 | Server2 IP |
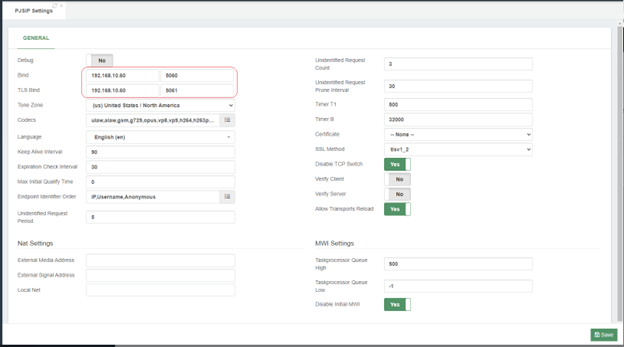
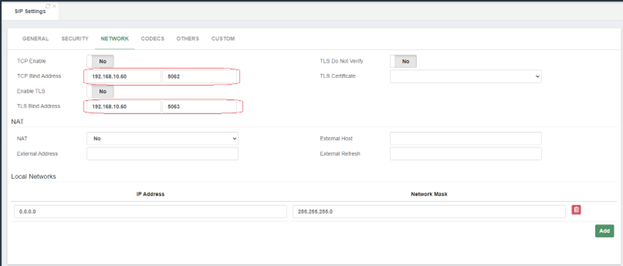
In the Server1 go to SETTINGS/PJSIP Settings and configure the Floating IP that we are going to use in “Bind” and “TLS Bind”. Also do it in SETTINGS/SIP Settings Tab NETWORK fields “TCP Bind Address” and “TLS Bind Address”.
Goto SETTINS/Technology Settings/PJSIP Settings
Goto SETTINS/Technology Settings/SIP Settings NETWORK Tab
Install the necessary dependencies on both servers
| root@vitalpbx1-2:~# apt -y install corosync pacemaker pcs rsync lsyncd chrony |
Create key in Server 1:
| root@vitalpbx1:~# ssh-keygen -f /root/.ssh/id_rsa -t rsa -N ” >/dev/null Created directory ‘/root/.ssh’. root@vitalpbx1:~# ssh-copy-id root@192.168.10.62 /usr/bin/ssh-copy-id: INFO: Source of key(s) to be installed: “/root/.ssh/id_rsa.pub” The authenticity of host ‘192.168.10.62 (192.168.10.62)’ can’t be established. ECDSA key fingerprint is SHA256:SMJmCQN0V7YUwUzzWS/VuUY6O18vXJEr2NjQbf3w1vU. Are you sure you want to continue connecting (yes/no/[fingerprint])? Yes /usr/bin/ssh-copy-id: INFO: attempting to log in with the new key(s), to filter out any that are already installed /usr/bin/ssh-copy-id: INFO: 1 key(s) remain to be installed — if you are prompted now it is to install the new keys root@192.168.10.62’s password: Number of key(s) added: 1 Now try logging into the machine, with: “ssh ‘root@192.168.10.62′” and check to make sure that only the key(s) you wanted were added. root@vitalpbx1:~# |
Create key in Server 2:
| root@vitalpbx2:~# ssh-keygen -f /root/.ssh/id_rsa -t rsa -N ” >/dev/null root@vitalpbx2:~# ssh-copy-id root@192.168.10.61 /usr/bin/ssh-copy-id: INFO: Source of key(s) to be installed: “/root/.ssh/id_rsa.pub” The authenticity of host ‘192.168.10.61 (192.168.10.61)’ can’t be established. ECDSA key fingerprint is SHA256:qSVd+t77O0TB4nluecwgh4fTEvTr+mC6ikQGKN+yWFc. Are you sure you want to continue connecting (yes/no/[fingerprint])? Yes /usr/bin/ssh-copy-id: INFO: attempting to log in with the new key(s), to filter out any that are already installed /usr/bin/ssh-copy-id: INFO: 1 key(s) remain to be installed — if you are prompted now it is to install the new keys root@192.168.10.61’s password: Number of key(s) added: 1 Now try logging into the machine, with: “ssh ‘root@192.168.10.61′” and check to make sure that only the key(s) you wanted were added. root@vitalpbx2:~# |
With lsync we are going to synchronize the content of the information on both servers. Below is the list of directories to sync.
| Directory | Description |
| /var/spool/asterisk/monitor | Recording storage |
| /var/lib/asterisk/ | Only the Asterisk database is included: astdb.sqlite3 |
| /usr/share/vitxi/backend/ | Directory of Vitxi |
| /usr/share/vitxi/backend/storage/ | Vitxi content storage |
| /var/lib/vitxi/ | Vitxi configuration, only file included: wizard.conf |
| /var/lib/asterisk/agi-bin/ | Asterisk AGI files |
| /var/lib/asterisk/priv-callerintros/ | |
| /var/lib/asterisk/sounds/ | Asterisk and VitalPBX audio files |
| /var/lib/vitalpbx/ | VitalPBX configuration files |
| /etc/asterisk/ | Asterisk and VitalPBX configuration files |
For lsync to work correctly it is necessary that the directories to be synchronized exist on both servers, so before starting to configure it is necessary to create some of them.
| root@vitalpbx1-2:~# mkdir /var/spool/asterisk/monitor root@vitalpbx1-2:~# chown asterisk:asterisk /var/spool/asterisk/monitor root@vitalpbx1-2:~# mkdir /usr/share/vitxi root@vitalpbx1-2:~# mkdir /usr/share/vitxi/backend root@vitalpbx1-2:~# mkdir /usr/share/vitxi/backend/storage root@vitalpbx1-2:~# chown -R www-data:www-data /usr/share/vitxi root@vitalpbx1-2:~# mkdir /var/lib/vitxi root@vitalpbx1-2:~# chown -R www-data:www-data /var/lib/vitxi root@vitalpbx1-2:~# mkdir /var/log/lsyncd root@vitalpbx1-2:~# touch /var/log/lsyncd/lsyncd.{log,status} |
Now we proceed to create and configure the lsyncd.conf file in Server 1 (/etc/lsyncd.conf). Remember to change the IP: 192.168.10.62, for the IP address of Server2
| root@vitalpbx1:~# mkdir /etc/lsyncd root@vitalpbx1:~# nano /etc/lsyncd/lsyncd.conf.lua —- — User configuration file for lsyncd. — — Simple example for default rsync. — settings { logfile = “/var/log/lsyncd/lsyncd.log”, statusFile = “/var/log/lsyncd/lsyncd.status”, statusInterval = 20, nodaemon = false, insist = true, } sync { default.rsyncssh, source = “/var/spool/asterisk/monitor/”, host = “192.168.10.62”, targetdir = “/var/spool/asterisk/monitor/”, rsync = { owner = true, group = true } } sync { default.rsyncssh, source = “/var/lib/asterisk/”, host = “192.168.10.62”, targetdir = “/var/lib/asterisk/”, rsync = { binary = “/usr/bin/rsync”, owner = true, group = true, archive = “true”, _extra = { “–include=astdb.sqlite3”, “–exclude=*” } } } sync { default.rsyncssh, source = “/usr/share/vitxi/backend/”, host = “192.168.10.62”, targetdir = “/usr/share/vitxi/backend/”, rsync = { binary = “/usr/bin/rsync”, owner = true, group = true, archive = “true”, _extra = { “–include=.env”, “–exclude=*” } } } sync { default.rsyncssh, source = “/usr/share/vitxi/backend/storage/”, host = “192.168.10.62”, targetdir = “/usr/share/vitxi/backend/storage/”, rsync = { owner = true, group = true } } sync { default.rsyncssh, source = “/var/lib/vitxi/”, host = “192.168.10.62”, targetdir = “/var/lib/vitxi/”, rsync = { binary = “/usr/bin/rsync”, owner = true, group = true, archive = “true”, _extra = { “–include=wizard.conf”, “–exclude=*” } } } sync { default.rsyncssh, source = “/var/lib/asterisk/agi-bin/”, host = “192.168.10.62”, targetdir = “/var/lib/asterisk/agi-bin/”, rsync = { owner = true, group = true } } sync { default.rsyncssh, source = “/var/lib/asterisk/priv-callerintros/”, host = “192.168.10.62”, targetdir = “/var/lib/asterisk/priv-callerintros/”, rsync = { owner = true, group = true } } sync { default.rsyncssh, source = “/var/lib/asterisk/sounds/”, host = “192.168.10.62”, targetdir = “/var/lib/asterisk/sounds/”, rsync = { owner = true, group = true } } sync { default.rsyncssh, source = “/var/lib/vitalpbx/”, host = “192.168.10.62”, targetdir = “/var/lib/vitalpbx/”, rsync = { binary = “/usr/bin/rsync”, owner = true, group = true, archive = “true”, _extra = { “–exclude=*.lic”, “–exclude=*.dat”, “–exclude=dbsetup-done”, “–exclude=cache” } } } sync { default.rsyncssh, source = “/etc/asterisk/”, host = “192.168.10.62”, targetdir = “/etc/asterisk/”, rsync = { owner = true, group = true } } |
This tutorial will go over how to set up MariaDB Master-Master Replication on Debian 11 Servers. Additionally, we will go over how to synchronize time using Chrony between MariaDB servers.
Time synchronization for the MariaDB Master-Master Replication deployment is crucial. And to synchronize time between servers, you will need to set up Chrony as the NTP client on each MariaDB server.
To install the Chrony package, run the following “apt install” command. Input Y to confirm the installation and press ENTER, and the installation will begin. Install on both servers
| root@vitalpbx1-2:~# apt install chrony root@vitalpbx1-2:~# systemctl start chrony root@vitalpbx1-2:~# systemctl enable chrony |
Now check and verify the Chrony service using the following command. And you should see the Chrony service is running. Also, you will see the Chrony service is “enabled”, which means it will automatically be running at system boot.
| root@vitalpbx1-2:~# systemctl status chronyd |
Next, run the “timedatectl” command below to adjust your system time with the specific timezone and enable it to use the NTP service Chrony.
| root@vitalpbx1-2:~# timedatectl set-timezone America/New_York –adjust-system-clock root@vitalpbx1-2:~# timedatectl set-ntp yes |
Lastly, run the “timedatectl” command below to check and verify the current settings of your system clock and time. Make sure the time is synchronized between all MariaDB servers.
| root@vitalpbx1-2:~# timedatectl |
To ensure that the information on Server1 is exactly the same as that on Server2, we will proceed to make an exact copy of the Server1 database.
In Server1
| root@vitalpbx1:~# mysqldump -u root –all-databases > all_databases.sql root@vitalpbx1:~# scp all_databases.sql root@192.168.10.62:/tmp/all_databases.sql |
In Server2
| root@vitalpbx2:~# mysql mysql -u root < /tmp/all_databases.sql |
VitalPBX already has MariaDB installed and configured. Now, let’s begin configuring MariaDB servers.
First, you will be setting up the MariaDB server on the “master1” server. Log in to the “master1” server shell.
Run the “systemctl” command below to stop the MariaDB service. This is needed before you set up the MariaDB server.
| root@vitalpbx1:~# systemctl stop mariadb |
Now edit the MariaDB server config file “/etc/mysql/mariadb.conf.d/50-server.cnf” using the following command.
| root@vitalpbx1:~# nano /etc/mysql/mariadb.conf.d/50-server.cnf |
Change the default “listen-address” to the internal IP address. In this example, the “master1” server has an IP address “192.168.10.61”. Next, enable the “binary_log” for the MariaDB server, this allows you to set up replication on the MariaDB server. Be sure to place the following configuration under the “[mysqld]” option. Comment the line bind-address = 127.0.0.1.
| [mysqld] bind-address = 192.168.10.61 server-id = 1 report_host = master1 log_bin = /var/log/mysql/mariadb-bin log_bin_index = /var/log/mysql/mariadb-bin.index relay_log = /var/log/mysql/relay-bin relay_log_index = /var/log/mysql/relay-bin.index |
Save and close the file when you are done.
Next, run the “systemctl” command below to start the MariaDB service and apply new changes. Then, check and verify which IP address the MariaDB is running. You should see the MariaDB service is now running on the internal IP address “192.168.10.61”.
| root@vitalpbx1:~# systemctl start mariadb root@vitalpbx1:~# ss -plnt |
Now you will need to create a new MariaDB user that will be used for replicating data between MariaDB servers. Log in to the MariaDB shell as “root” using the “mysql” command below.
| root@vitalpbx1:~# mysql -u root |
Run the following queries to create a new MariaDB user and password “replusr”. Then, grant the correct privileges to the user.
| CREATE USER ‘vitalpbx_replica’@’%’ IDENTIFIED BY ‘vitalpbx_replica’; GRANT REPLICATION SLAVE ON *.* TO ‘vitalpbx_replica’@’%’; FLUSH PRIVILEGES; |
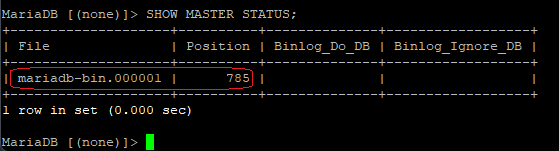
Next, run the following query to check the current binary log and its exact position of it. In this example, the binary log file for the MariaDB server is “mariadb-bin.000001” with the position “785”. These outputs will be used in the next stage for setting up the “master2” server.
| SHOW MASTER STATUS; |
Type “quit” to exit from the MariaDB shell.
Now move to the “master2” server and start configuring the MariaDB server. The configuration for the MariaDB Master-Master Replication is not particularly different for all MariaDB servers.
Run the following command to stop the MariaDB service.
| root@vitalpbx2:~# systemctl stop mariadb |
Edit the MariaDB config file “/etc/mysql/mariadb.conf.d/50-server.cnf” using the following command.
| root@vitalpbx1:~# nano /etc/mysql/mariadb.conf.d/50-server.cnf |
Change the “bind-address” to the local IP address of the “master2” server. Then, enable the binary log on the MariaDB server “master2” to enable the replication. Be sure to add place the following configuration under the “[mysqld]” option. Comment the line bind-address = 127.0.0.1.
| [mysqld] bind-address = 192.168.10.62 server-id = 2 report_host = master2 log_bin = /var/log/mysql/mariadb-bin log_bin_index = /var/log/mysql/mariadb-bin.index relay_log = /var/log/mysql/relay-bin relay_log_index = /var/log/mysql/relay-bin.index |
Save and close the file when you are done.
Next, start the MariaDB service to apply new changes. Then, check and verify the current IP address of which the MariaDB server is running. If your configuration is correct, you will see the MariaDB server is not running on the internal IP address of the “master2” server, which is “192.168.10.62”.
| root@vitalpbx2:~# systemctl start mariadb root@vitalpbx2:~# ss -plnt |
After the MariaDB service is running, run the following command to log in to the MariaDB shell as the “root” user..
| root@vitalpbx2:~# mysql -u root |
Run the following queries to create a new MariaDB user that will be used for replicating data between all MariaDB servers. This user must be matched with the user that you just created on the “master1” server.
| CREATE USER ‘vitalpbx_replica’@’%’ IDENTIFIED BY ‘vitalpbx_replica’; GRANT REPLICATION SLAVE ON *.* TO ‘vitalpbx_replica’@’%’; FLUSH PRIVILEGES; |
After that, you will need to make changes on the MariaDB “master2” server and define the “Master” node using the detailed configuration of the MariaDB “master1” server.
Run the following queries to stop the slave. Then, add detailed information about the MariaDB “master1” server. In this example, the MariaDB “master1” server uses the hostname “master1”, the user and password for data replication is “replusr”, and lastly the binlog file is “mariadb-bin.000001” with the position “785”.
| STOP SLAVE; CHANGE MASTER TO MASTER_HOST=’master1′, MASTER_USER=’vitalpbx_replica’, MASTER_PASSWORD=’vitalpbx_replica’, MASTER_LOG_FILE=’mariadb-bin.000001′, MASTER_LOG_POS=785; |
Now start the slave again using the following query. Then, check and verify the slave status on the “master2” server. If you get the output such as “Slave_IO_Running: Yes” and “Slave_SQL_Running: Yes”, it means the MariaDB replication is active and running. Also, you can see the binary log file on the “master2” server is “mariadb-bin.000001” with the position “785”. which is should be the same as on the “master1” server. Additionally, you can see the MariaDB “Master_Host” value is “master1”.
| START SLAVE; SHOW SLAVE STATUS\G |
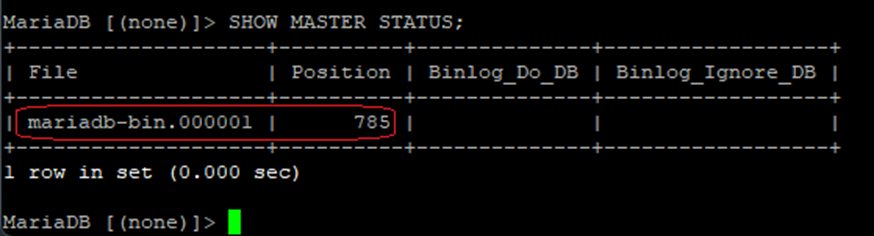
You can also verify the master binary log file and the position on the “master2” server using the following query. And you should get the same output as the binary log file “mariadb-bin.000001” with the position “785” as on the “master1” server.
| SHOW MASTER STATUS; |
Because this guide is to set up the MariaDB master-master Replication, then you also need to add and define the “master2” detailed configuration to the “master1” server.
Back to the “master1” server and log in to the MariaDB shell using the “mysql” command below.
| root@vitalpbx1:~# mysql -u root |
Stop the slave using the following command. Then, add detailed information about the “master2” server, which includes the “master2” server hostname, the MariaDB user and password for replication, and the binary log file and position.
| STOP SLAVE; CHANGE MASTER TO MASTER_HOST=’master2′, MASTER_USER=’vitalpbx_replica’, MASTER_PASSWORD=’vitalpbx_replica’, MASTER_LOG_FILE=’mariadb-bin.000001′, MASTER_LOG_POS=785; |
Now start again the slave using the below command. Then, check and verify the slave on the “master1” server. And you should see the output such as “Slave_IO_Running: Yes” and “Slave_SQL_Running: Yes”, which means the MariaDB replication is active and running on the “master1” MariaDB server. Also, you can see the “Master_Host” value is the “master2” server.
| START SLAVE; SHOW SLAVE STATUS\G |
Congratulation! You have now successfully deployed the MariaDB Master-Master Replication on Debian 11 servers. You have also configured time synchronization on MariaDB servers using the Chrony service. Additionally, you have also secured the MariaDB server deployment using the firewall. In the end, you have a MariaDB server with automatic replication between two MariaDB servers, you can write on all of those MariaDB servers, and all data will be automatically replicated.
Create hacluster password in Server1/2 (Change hapassword to your own password)
| root@vitalpbx1-2:~# echo hacluster:MyPassword | chpasswd |
Starting pcsd services in Server1/2
| root@vitalpbx1-2:~# systemctl start pcsd root@vitalpbx1-2:~# systemctl enable pcsd.service root@vitalpbx1-2:~# systemctl enable corosync.service root@vitalpbx1-2:~# systemctl enable pacemaker.service |
It appeared that some node was already running (probably just installing packages creates some default cluster), so we destroyed everything (pcs cluster destroy), started pcsd again.
| root@vitalpbx1:~# pcs cluster destroy |
Server Authenticate in Server 1 (Change hapassword to your own password)
| root@vitalpbx1:~# pcs host auth 192.168.10.61 192.168.10.62 -u hacluster -p hapassword |
Creating Cluster in Server1
| root@vitalpbx1:~# pcs cluster setup cluster_vitalpbx vitalpbx1.local vitalpbx2.local –force |
Starting Cluster in Server1
| root@vitalpbx1:~# pcs cluster start –all root@vitalpbx1:~# pcs cluster enable –all root@vitalpbx1:~# pcs property set stonith-enabled=false root@vitalpbx1:~# pcs property set no-quorum-policy=ignore |
Creating Floating IP in Server1
| root@vitalpbx1:~# pcs resource create virtual_ip ocf:heartbeat:IPaddr2 ip=192.168.10.60 cidr_netmask=24 op monitor interval=30s on-fail=restart root@vitalpbx1:~# pcs cluster cib drbd_cfg root@vitalpbx1:~# pcs cluster cib-push drbd_cfg |
Disable Services in Server 1/2
| root@vitalpbx1-2:~# systemctl disable asterisk root@vitalpbx1-2:~# systemctl stop asterisk root@vitalpbx1-2:~# systemctl disable lsyncd root@vitalpbx1-2:~# systemctl stop lsyncd |
Create asterisk Service in Server 1
| root@vitalpbx1:~# pcs resource create asterisk service:asterisk op monitor interval=30s root@vitalpbx1:~# pcs cluster cib fs_cfg root@vitalpbx1:~# pcs cluster cib-push fs_cfg –config root@vitalpbx1:~# pcs -f fs_cfg constraint colocation add asterisk with virtual_ip INFINITY root@vitalpbx1:~# pcs -f fs_cfg constraint order virtual_ip then asterisk root@vitalpbx1:~# pcs cluster cib-push fs_cfg –config root@vitalpbx1:~# pcs resource update asterisk op stop timeout=120s root@vitalpbx1:~# pcs resource update asterisk op start timeout=120s root@vitalpbx1:~# pcs resource update asterisk op restart timeout=120s |
Create lsyncd Service in Server 1
| root@vitalpbx1:~# pcs resource create lsyncd service:lsyncd.service op monitor interval=30s root@vitalpbx1:~# pcs cluster cib fs_cfg root@vitalpbx1:~# pcs cluster cib-push fs_cfg –config root@vitalpbx1:~# pcs -f fs_cfg constraint colocation add lsyncd with virtual_ip INFINITY root@vitalpbx1:~# pcs -f fs_cfg constraint order asterisk then lsyncd root@vitalpbx1:~# pcs cluster cib-push fs_cfg –config |
Creating VitalPBX Cluster role Command and copy in Server2
| root@vitalpbx1:~# nano /usr/local/bin/role #!/bin/bash # This code is the property of VitalPBX LLC Company # License: Proprietary # Date: 10-oct-2022 # Show the Role of Server. #Bash Colour Codes green=”\033[00;32m” txtrst=”\033[00;0m” linux_ver=`cat /etc/os-release | grep -e PRETTY_NAME | awk -F ‘=’ ‘{print $2}’ | xargs` vpbx_version=`aptitude versions vitalpbx | awk ‘{ print $2 }’` server_master=`pcs status resources | awk ‘NR==1 {print $5}’` host=`hostname` if [[ “${server_master}” = “${host}” ]]; then server_mode=”Master” else server_mode=”Standby” fi logo=’ _ _ _ _ ______ ______ _ _ | | | (_)_ | (_____ (____ \ \ / / | | | |_| |_ ____| |_____) )___) ) \/ / \ \/ /| | _)/ _ | | ____/ __ ( ) ( \ / | | |_( ( | | | | | |__) ) /\ \\ \/ |_|\___)_||_|_|_| |______/_/ \_\\ ‘ echo -e “ ${green} ${logo} ${txtrst} Role : $server_mode Version : ${vpbx_version//[[:space:]]} Asterisk : `asterisk -rx “core show version” 2>/dev/null| grep -ohe ‘Asterisk [0-9.]*’` Linux Version : ${linux_ver} Welcome to : `hostname` Uptime : `uptime | grep -ohe ‘up .*’ | sed ‘s/up //g’ | awk -F “,” ‘{print $1}’` Load : `uptime | grep -ohe ‘load average[s:][: ].*’ | awk ‘{ print “Last Minute: ” $3″ Last 5 Minutes: “$4” Last 15 Minutes “$5 }’` Users : `uptime | grep -ohe ‘[0-9.*] user[s,]’` IP Address : ${green}`ip addr | sed -En ‘s/127.0.0.1//;s/.*inet (addr:)?(([0-9]*\.){3}[0-9]*).*/\2/p’ | xargs `${txtrst} Clock :`timedatectl | sed -n ‘/Local time/ s/^[ \t]*Local time:\(.*$\)/\1/p’` NTP Sync. :`timedatectl |awk -F: ‘/NTP service/ {print $2}’` “ echo -e “” echo -e “************************************************************” echo -e “* Servers Status *” echo -e “************************************************************” echo -e “Master” pcs status resources echo -e “” echo -e “Servers Status” pcs cluster pcsd-status root@vitalpbx1:~# chmod +x /usr/local/bin/role scp /usr/local/bin/role root@192.168.10.62:/usr/local/bin/role ssh root@192.168.10.62 ‘chmod +x /usr/local/bin/role’ |
Creating VitalPBX Cluster bascul Command and copy in Server2
| root@vitalpbx1:~# nano /usr/local/bin/bascul #!/bin/bash # This code is the property of VitalPBX LLC Company # License: Proprietary # Date: 10-Oct-2022 # Change the status of the servers, the Master goes to Stanby and the Standby goes to Master. #funtion for draw a progress bar #You must pass as argument the amount of secconds that the progress bar will run #progress-bar 10 –> it will generate a progress bar that will run per 10 seconds set -e progress-bar() { local duration=${1} already_done() { for ((done=0; done<$elapsed; done++)); do printf “>”; done } remaining() { for ((remain=$elapsed; remain<$duration; remain++)); do printf ” “; done } percentage() { printf “| %s%%” $(( (($elapsed)*100)/($duration)*100/100 )); } clean_line() { printf “\r”; } for (( elapsed=1; elapsed<=$duration; elapsed++ )); do already_done; remaining; percentage sleep 1 clean_line done clean_line } server_a=`pcs status | awk ‘NR==11 {print $4}’` server_b=`pcs status | awk ‘NR==11 {print $5}’` server_master=`pcs status resources | awk ‘NR==1 {print $5}’` #Perform some validations if [ “${server_a}” = “” ] || [ “${server_b}” = “” ] then echo -e “\e[41m There are problems with high availability, please check with the command *pcs status* (we recommend applying the command *pcs cluster unstandby* in both servers) \e[0m” exit; fi if [[ “${server_master}” = “${server_a}” ]]; then host_master=$server_a host_standby=$server_b else host_master=$server_b host_standby=$server_a fi arg=$1 if [ “$arg” = ‘yes’ ] ;then perform_bascul=’yes’ fi # Print a warning message and ask to the user if he wants to continue echo -e “************************************************************” echo -e “* Change the roles of servers in high availability *” echo -e “*\e[41m WARNING-WARNING-WARNING-WARNING-WARNING-WARNING-WARNING \e[0m*” echo -e “*All calls in progress will be lost and the system will be *” echo -e “* be in an unavailable state for a few seconds. *” echo -e “************************************************************” #Perform a loop until the users confirm if wants to proceed or not while [[ $perform_bascul != yes && $perform_bascul != no ]]; do read -p “Are you sure to switch from $host_master to $host_standby? (yes,no) > ” perform_bascul done if [[ “${perform_bascul}” = “yes” ]]; then #Unstandby both nodes pcs node unstandby $host_master pcs node unstandby $host_standby #Do a loop per resource pcs status resources | awk ‘{print $2}’ | while read -r resource ; do #Skip moving the virutal_ip resource, it will be moved at the end if [[ “${resource}” != “virtual_ip” ]]; then echo “Moving ${resource} from ${host_master} to ${host_standby}” pcs resource move ${resource} ${host_standby} fi done sleep 5 && pcs node standby $host_master & #Standby current Master node after five seconds sleep 20 && pcs node unstandby $host_master & #Automatically Unstandby current Master node after$ #Move the Virtual IP resource to standby node echo “Moving virutal_ip from ${host_master} to ${host_standby}” pcs resource move virtual_ip ${host_standby} #End the script echo “Becoming ${host_standby} to Master” progress-bar 10 echo “Done” else echo “Nothing to do, bye, bye” fi sleep 15 role root@vitalpbx1:~# chmod +x /usr/local/bin/bascul root@vitalpbx1:~# scp /usr/local/bin/bascul root@192.168.10.62:/usr/local/bin/bascul root@vitalpbx1:~# ssh root@192.168.10.62 ‘chmod +x /usr/local/bin/bascul’ |
Change Welcome Message in Server 1/2
| root@vitalpbx1-2:~# cp -rf /usr/local/bin/role /etc/update-motd.d/20-vitalpbx root@vitalpbx1-2:~# chmod 755 /etc/update-motd.d/20-vitalpbx |
To execute the process of changing the role, we recommend using the following command:
| root@vitalpbx1:~# bascul ************************************************************ * Change the roles of servers in high availability * * WARNING-WARNING-WARNING-WARNING-WARNING-WARNING-WARNING * *All calls in progress will be lost and the system will be * * be in an unavailable state for a few seconds. * ************************************************************ Are you sure to switch from vitalpbx1.local to vitalpbx2.local? (yes,no) > |
This action makes Server1 (vitalpbx1.local) standby and Server2 (vitalpbx2.local) online. If you want to return to default do the same again.
If both servers are going to be turned off, it is recommended that the one we want to be online be turned on first.
To update VitalPBX to the latest version just follow the following steps:
1.- From your browser, go to ip 192.168.10.60 (Floating IP)
2.- Update VitalPBX from the interface
3.- Execute the following command in Server1 console
| root@vitalpbx1:~# bascul |
4.- From your browser, go to ip 192.168.10.60 (Floating IP) again and refresh.
5.- Update VitalPBX from the interface
6.- Execute the following command in Server1 console
| root@vitalpbx1:~# bascul |
CONGRATULATIONS, you have installed and tested the high availability in VitalPBX
We’re thrilled to share a series of updates and improvements we’ve rolled out to ensure that your experience with our communication solutions is not only

The VitalPBX team is thrilled to announce the rollout of VitalPBX 4.1 R1, a significant update that brings cutting-edge features and improvements to your communication

PBX System Recognized for Industry Innovation Miami, Florida, 02/27/24 — VitalPBX announced today that TMC, a global, integrated media company, has named VitalPBX Unified Communications