Exciting Product Updates to Enhance Your Communication Systems: 4.1.0 R2
We’re thrilled to share a series of updates and improvements we’ve rolled out to ensure that your experience with our communication solutions is not only
VitalPBX One is the all-in-one solution designed to improve your business's collaboration and communication to new levels
Ideal for any size and type of business.
Get features that cover all your call center needs
Manage multiple PBX's on the same server
Experience a fully featured Switchboard, Recording Manager, Call Center Statistics, Call Account, and Call Center Dialer, system,
The add-ons module allows you to install new modules in order to expand the PBX capabilities and add new features.
Communicate anywhere with VitXi, our full WebRTC client exclusively for your VitalPBX installation.
With VitalPBX Connect, you can make and receive business calls on your smartphone.
An advanced windows softphone for call center which integrates presence, chat, video call, BLF, and much more.
We can help with everything from implementation assistance to upgrades and production down emergencies.

Proxmox VE is a complete open-source server management platform for enterprise virtualization. It integrates the KVM hypervisor and Linux Containers (LXC), software-defined storage, and networking functionality into a single platform. In addition, the built-in web-based user interface allows you to easily manage virtual machines and containers, high cluster availability, or built-in disaster recovery tools.
For production servers, high-quality server equipment is needed. Proxmox VE supports clustering, meaning multiple installations of Proxmox VE can be centrally managed thanks to the built-in cluster functionality. In addition, Proxmox VE can use local storage such as (DAS), SAN, NAS, and shared and distributed storage (Ceph).
Proxmox needs a clean hard drive because it will remove all partitions and data from the hard drive during installation.
Step 1: Download the Proxmox VE ISO image from the following link:
https://proxmox.com/en/downloads/category/iso-images-pve
Step 2: If you install it on physical hardware, you must flash the ISO image on a USB stick of at least 8GB. For this, we recommend the baenaEtcher software (https://www.balena.io/etcher).
Step 3: Plug in the USB stick and start the server from that stick. Next, the following screen will appear, proceed to select “Install Proxmox VE

After a few seconds, “END USER LICENSE AGREEMENT (EULA)” will appear, press the “I agree” button.

Subsequently, the selection of the hard drive that we want to install will appear. Press “Next.”

Now it will ask us for the location, time zone, and language. Configure them and press ”Next.”

Now it will ask us for the password to enter with the root user both in the Proxmox web interface and in the server console via SSH. Again, because you are a susceptible user, we recommend a reasonably complex password.

The email you request can configure your email. And we press “Next.”
On the next screen, we will be asked to configure our Network.

Management Interface is the interface through which we will manage our Proxmox.
Hostname (FQDN), For it to work well, a valid FQDN (A valid domain) is recommended. However, we can use a local name such as proxmox.mydomain.local to enter through the IP address.
IP Address (CIDR) is the IP Address of our Proxmox, and the CIDR is the mask we use in our network.
Gateway, it is the gateway that allows us to navigate the internet.
DNS Server, is the IP to resolve names; we recommend using Google’s (8.8.8.8).
Once all the network options have been configured, press “Next.”
Next, it shows us a summary of all the configurations; verify and press “Install.”

The installation process takes about 10 minutes and depends on the hardware.
Once the installation is finished, we can enter the interface by typing the IP address plus 8006 in our favorite browser (Example: IP:8006).
It will show us the following screen

User name: root
Password: the one that we configure in the installation.
Every time we enter our Proxmox it shows us a message that we do not have a valid subscription. There are two ways to remove that message:
1.- The recommended option. Buy a valid subscription, for which we must go to the following link:
https://www.proxmox.com/en/proxmox-ve/pricing
2.- Modify a file so that it stops appearing. Next, we show the procedure.
To remove the “You do not have a valid subscription for this server” pop-up message on login, run the following command. You must SSH to your Proxmox server or use the node console through the PVE web interface.
When you update your Proxmox server, and the update includes the proxmox-widget-toolkit package, you will need to complete this modification again.
This mod works with version 5.1 and later, tested up to the version shown in the title.
Run the following one-line command, and then clear your browser’s cache (depending on your browser, you may need to open a new tab or restart your browser):
| sed -Ezi.bak “s/(Ext.Msg.show\(\{\s+title: gettext\(‘No valid sub)/void\(\{ \/\/\1/g” /usr/share/javascript/proxmox-widget-toolkit/proxmoxlib.js && systemctl restart pveproxy.service |
3.- Manual Configuration
Here are alternative step-by-step instructions so you can understand what the above command is doing:
3.a.- Change to working directory
| cd /usr/share/javascript/proxmox-widget-toolkit |
3.b.- Create a backup
| cp proxmoxlib.js proxmoxlib.js.bak |
3.c.- Edit the promoxlib.js file
| nano proxmoxlib.js |
3.d.- Locate the text “No valid subscription” (Use ctrl+w)
| Ext.Msg.show({ title: gettext(‘No valid subscription’), |
3.e.- Replace “Ext.Msg.show with voip
| void({ //Ext.Msg.show({ title: gettext(‘No valid subscription’), |
3.f.- Restart the Proxmox web service (also make sure to clear your browser cache, depending on the browser, you may need to open a new tab or restart the browser).
| systemctl restart pveproxy.service |
Proxmox is quite flexible in its possible configurations. In this first stage, we will not focus on using local storage and creating Virtual Machines (VM) and Containers (LXC).
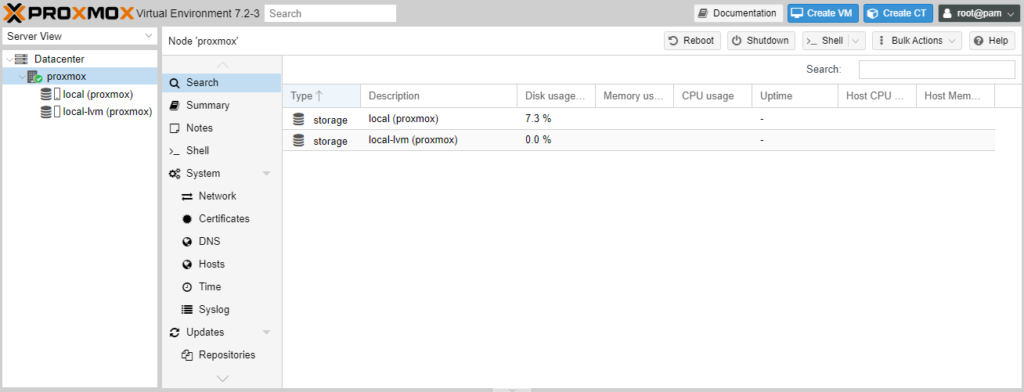
The first time we enter the Proxmox configuration, we should see the following:

If we want to create a VM from the VitalPBX ISO, we must load it first, for which we must follow these steps:
1.- Go to Datacenter/proxmox/local (proxmox) /ISO Images
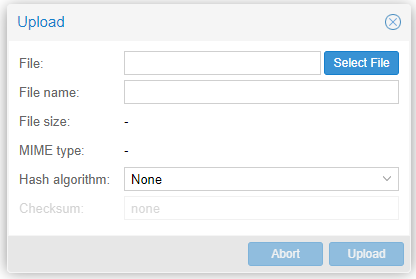
2.- Press the Upload button shown on the top left.

3.- Select the file and upload it.
Once the ISO is uploaded, we can create our first instance of VitalPBX, for which we follow these steps:
1.- Press the button on the top right that says “Create VM”

Name, Any friendly name for this VM.
Start at boot, and select it so that every time the server is restarted, the VM starts.
2.- We press “Next.”

ISO image, we select the ISO that we previously uploaded.
3.- We press “Next.”

We leave everything as shown
4.- We press “Next.”

Disk size, we select the size of the disk to assign to this VM.
5.- We press “Next.”

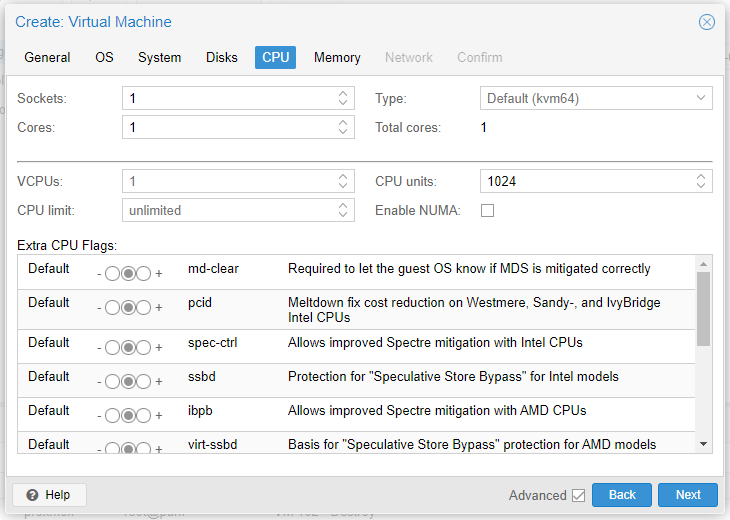
Sockets, If our server has more than one processor, it is possible to assign me more than one Sockets.
Cores, here we assign how many Core the VM will have at its disposal.
6.- We press “Next.”

Memory (MiB) is the memory to allocate to our VM. VitalPBX works with 1GB, but it is always recommended to assign at least 2GB.
7.- We press “Next.”

At this stage, we can leave it as is, considering that the IP address will be taken from the local DHCP server.
8.- We press “Next.”

We confirm the information and proceed to create our first VM.
9.- After about 30 seconds, it will appear created with the ID that we selected in step 1

Press the right button on it and Start it (Star), once started press the right button again and go to Console.
The VitalPBX installation interface will appear. We proceed to Install it.
Once the installation is finished, we recommend converting to a Template so that the creation of the following VMs is much faster and easier, for which we must follow the next steps:
1.- We press the right button on our VM and give Stop.
2.- Now we press the right button again and select “Convert to template”
3.- Now, every time we want to create a new instance of VitalPBX we just press the right button and select “Clone”

And almost immediately, we can start (Start), and we already have our new VM with VitalPBX installed.
If we want to create a Container from a CT Template, we must follow the following steps:
1.- Go to Datacenter/proxmox/local (proxmox)/CT Templates
2.- Press the Templates button, choose debian-11-standard, and press Download.

Wait a few minutes, and our new Template will appear in the list.
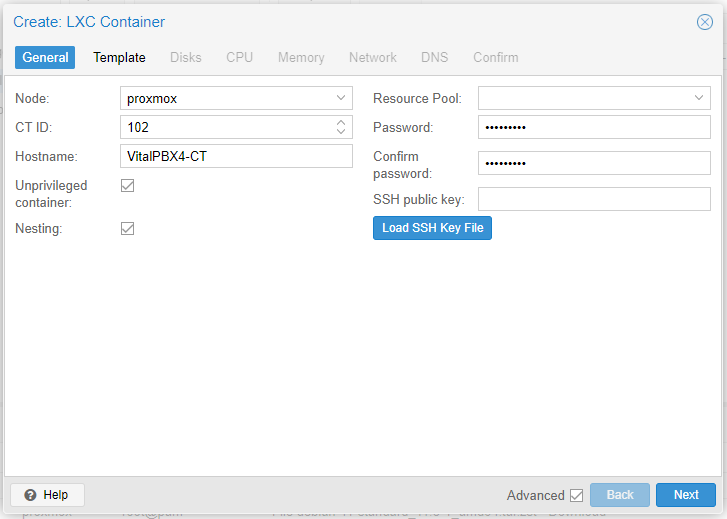
3.- We press the “Create CT” button in the upper right.

Hostname, we select any name to identify our container.
Password, the password of the root user of the console of our Debian.
4.- We press “Next.”

Template, we select the template that we downloaded previously.
5.- We press “Next.”

Disk size (GIB), we select an amount in GB of the hard disk that we want to reserve for our container.
6.- We press “Next.”

Cores, we select the number of cores that we want to assign to the container.
7.- We press “Next.”

Memory (MiB), memory to allocate to the container.
Swap (MiB), disk memory to allocate to the container.
8.- We press “Next.”

Data is network information.
9.- We press “Next.”

DNS to use
10.- We press “Next.”

We confirm that everything is correct, and we give “Finish.”
Now we wait a minute, and our Container will be created.
Now we install VitalPBX 4 from the Script following the next steps
1.- We enter the console of our Debian 11 as root and update our Container
| apt update apt upgrade |
2.- We download the Script, we give it execution right, and we execute it
| wget https://repo.vitalpbx.com/vitalpbx/v4/apt/debian_vpbx_installer.sh chmod +x debian_vpbx_installer.sh ./debian_vpbx_installer.sh |
Once the installation is finished, we recommend converting to a Template so that the creation of the following Containers is much faster and easier, for which we must follow the next steps:
1.- We press the right button on our Container and give Stop.
2.- Now we press the right button again and select “Convert to template”
3.- Now, every time we want to create a new CT instance of VitalPBX we just press the right button and select “Clone.”
4.- From this Template, it is possible to create a Container image by making a GZIP-type Backup, for which we go to our Container and press Backup.

Press Backup now

Compression, select GZIP (good)
Now we go to the /var/lib/vz/dunp folder and download our backup
And finally, we can add it as a CT Template following the next steps:
1.- Go to Datacenter/proxmox/local (proxmox)/CT Templates
2.- Press Upload and select our file that we downloaded from the server.
Ready? Now we have our Template to create our VitalPBX Container quickly and efficiently.
In this blog, we teach how to install Proxmox, create VM and Container, and install VitalPBX 4 in both solutions.
In the next Blog, we will go one step further and show how to create our High Availability environment through Proxmox.

We’re thrilled to share a series of updates and improvements we’ve rolled out to ensure that your experience with our communication solutions is not only

The VitalPBX team is thrilled to announce the rollout of VitalPBX 4.1 R1, a significant update that brings cutting-edge features and improvements to your communication

PBX System Recognized for Industry Innovation Miami, Florida, 02/27/24 — VitalPBX announced today that TMC, a global, integrated media company, has named VitalPBX Unified Communications

VitalPBX provides a robust and scalable platform, which will allow you to manage your PBX in an easy and intuitive way.